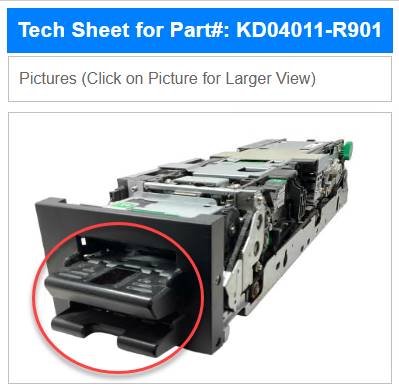
WI# 1420 GSR50 TOP MOD
CLIENTE/CUSTOMER: REVOLUTION RETAIL SYSTEMS
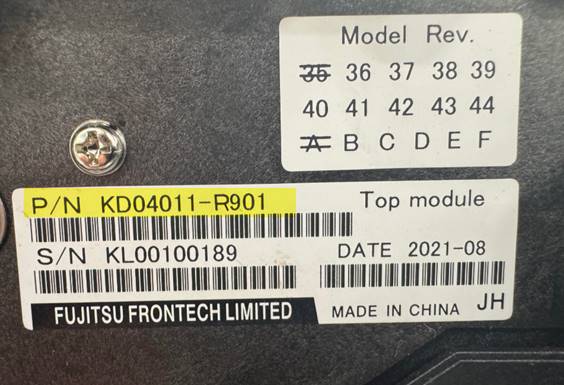
PN: KD04011 R901 / CPN:424-0009-702S
|
|
|
PN: KD04011-C301 / CPN: 424-0009-711S
|
|
|

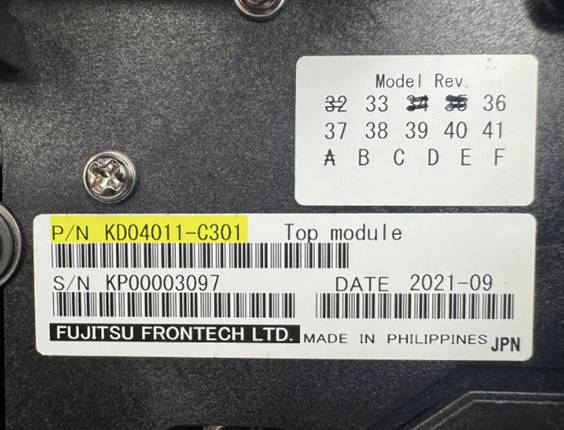
NOTA: Una manera de identificar físicamente el número de parte, es el tipo de Bezel que tiene cada uno de ellos, (ver imágenes anteriores), por tal motivo no son intercambiables.
NOTE: One way to physically identify the part number is by the type of bezel each one has (see previous images), which is why they are not interchangeable.
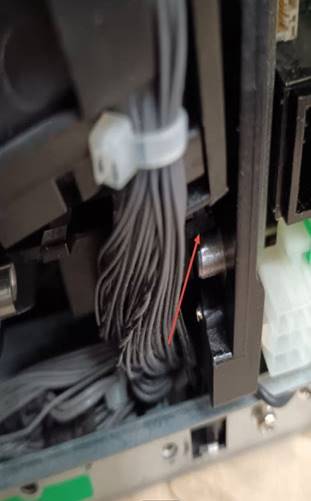
Antes de empezar el proceso de la unidad necesitaremos revisar que no venga quebrado o cables expuestos
Nota: En caso de llegar quebrado el top module se hace scrap
Before starting the unit process we will need to check that the top module has no physical damage.
Note: if the top module scrap is broken
Estas son algunas imagines de daños del Top Module son algunas de las más frecuentes
These are some images of damage to the Top Module, they are some of the most frequent
|
|
|
|
|
|
|
|

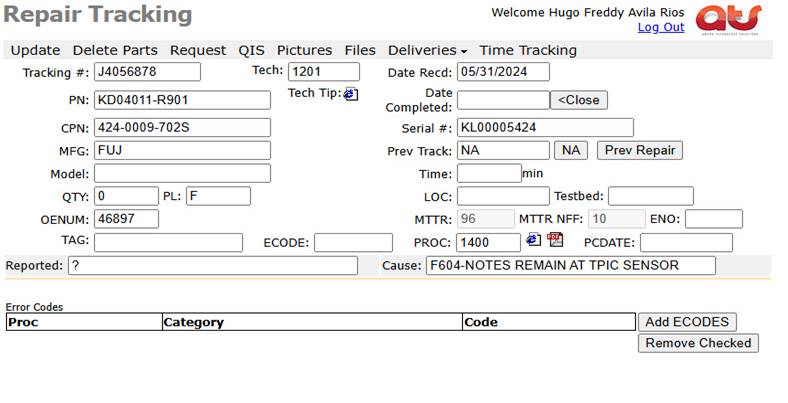
El primer paso que realizaremos es introducir el número de rastreo (Tracking #) en la página de ATS.
The first step we will take is to enter the tracking number (Tracking #) on the ATS page
|
|
Procedimiento de limpieza del top module GSR 50 GLORY
Hacerle una pre prueba antes de iniciar con la limpieza requerida.
Cleaning procedure for the GSR 50 GLORY top module
Do a pre-test before starting the required cleaning.
INSTALACION Y CONFIGURACIÓN / INSTALLATION AND SETUP
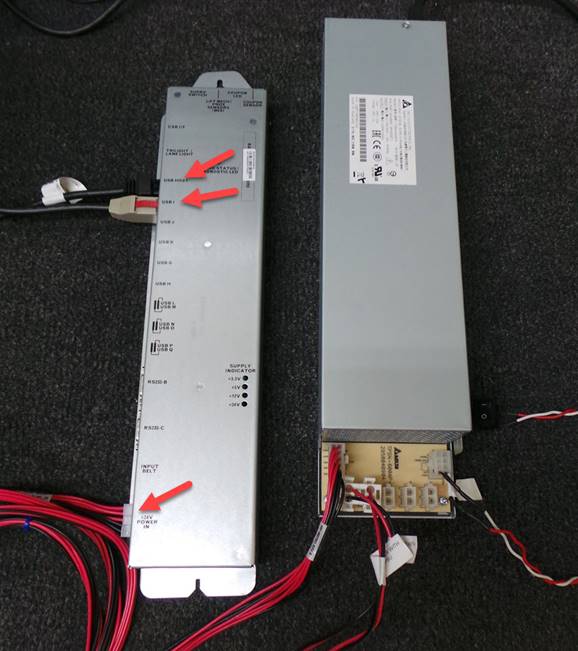
Conecte los cables de la interfaz USB HOST, USB 1 y el de +24V POWER IN
Connect the USB HOST, USB 1 and +24V POWER IN interface cables.
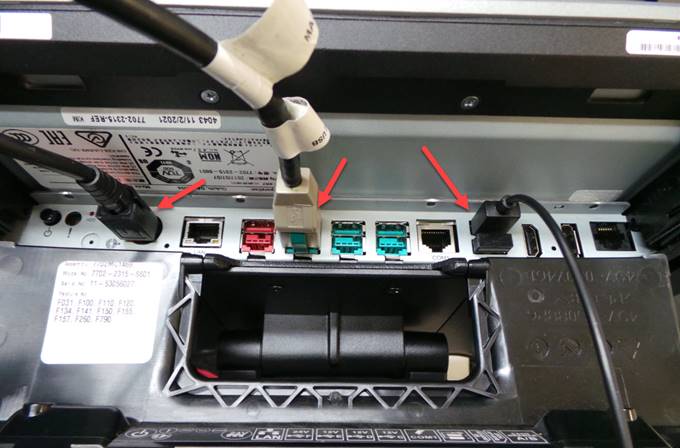
Conecte la fuente de alimentación, el cable de 12V, teclado y ratón a la computadora de prueba 7702
Connect the power supply, 12V cable, keyboard and mouse to the 7702 test computer.
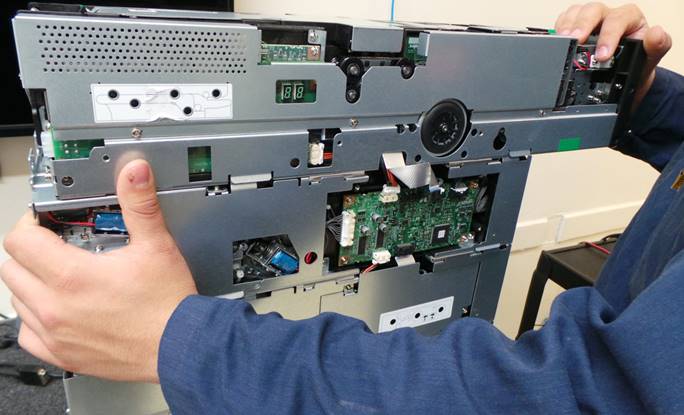
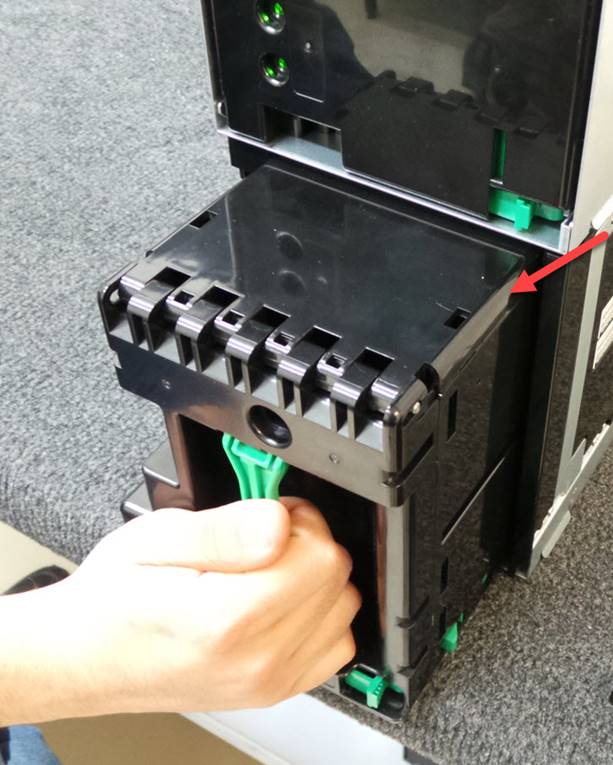
Coloque el modulo validador de billetes superior en la estación de prueba con cuidado de no dañar los cables intermodulos
Place the upper bill validator module in the test station taking care not to damage the intermodule cables.
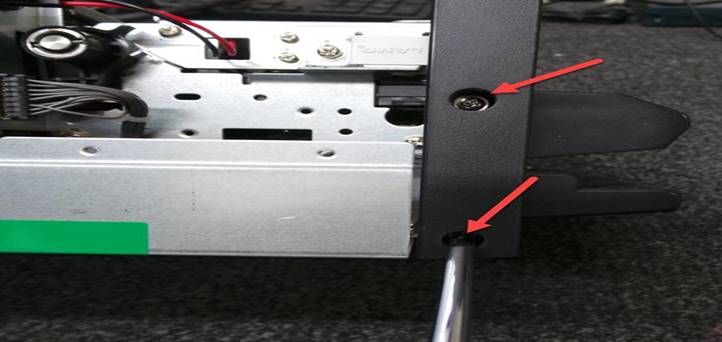
Deslice ligeramente hacia atrás el módulo validador superior
Slide back the upper validator module slightly
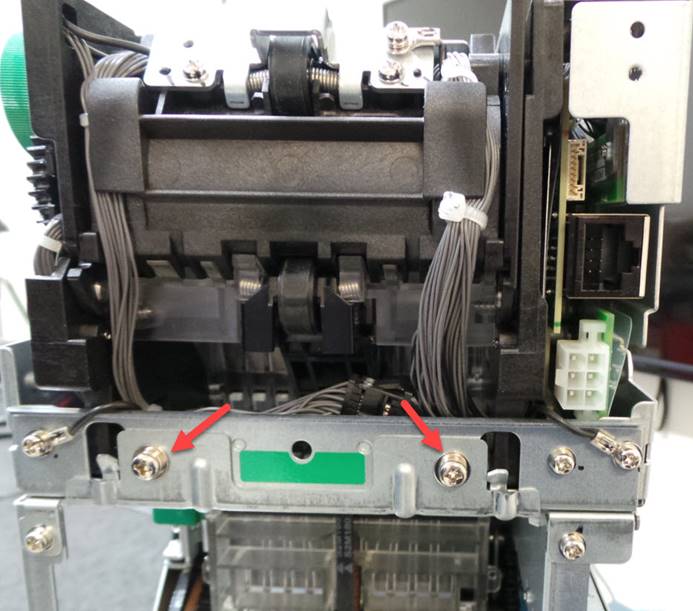
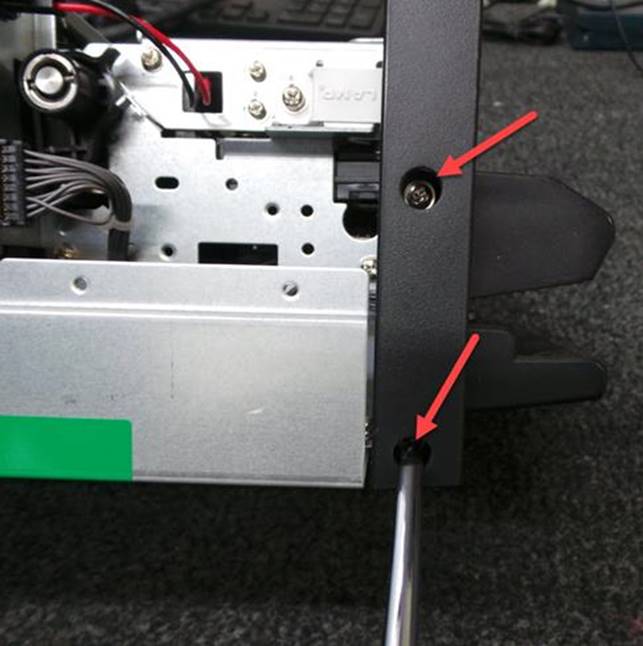
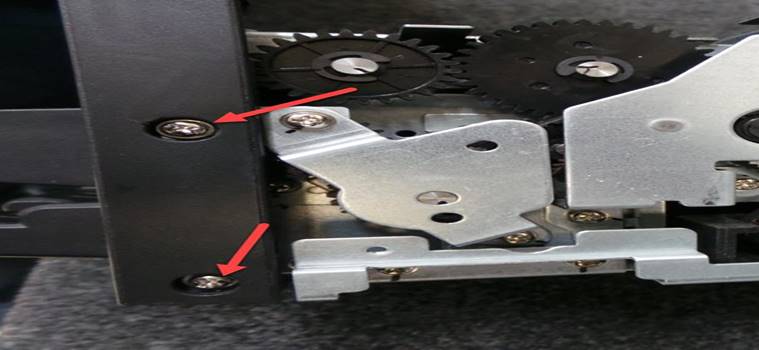
Coloque los 2 tornillos para asegurar el módulo superior
Insert the 2 screws to secure the upper module.
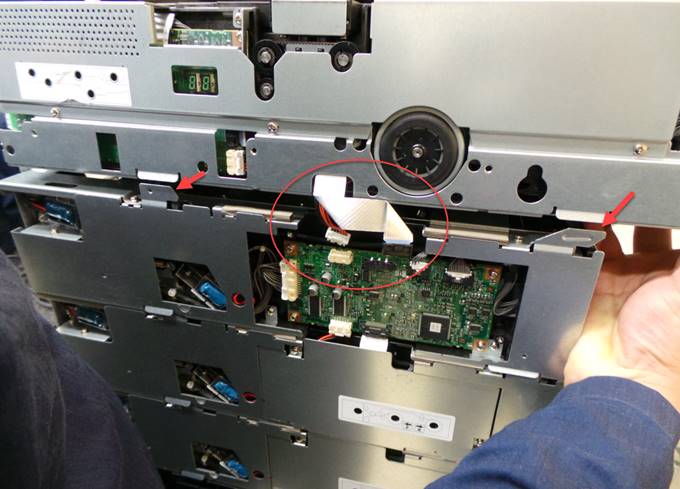
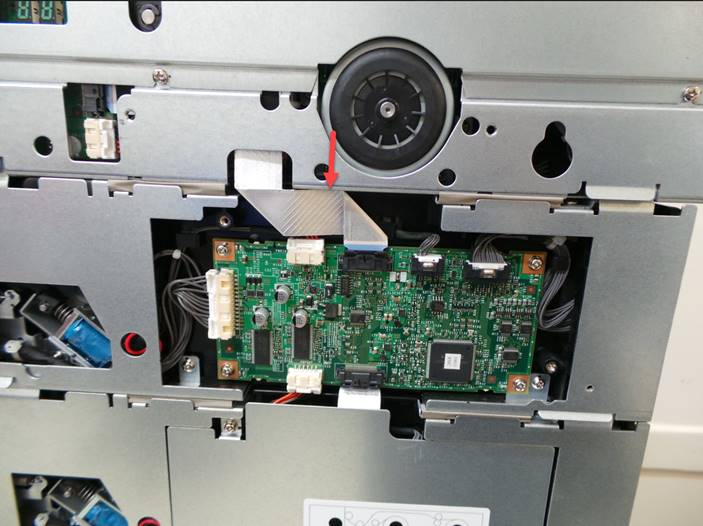
Conecte los 2 cables intermodulos
Connect the 2 intermodule cables
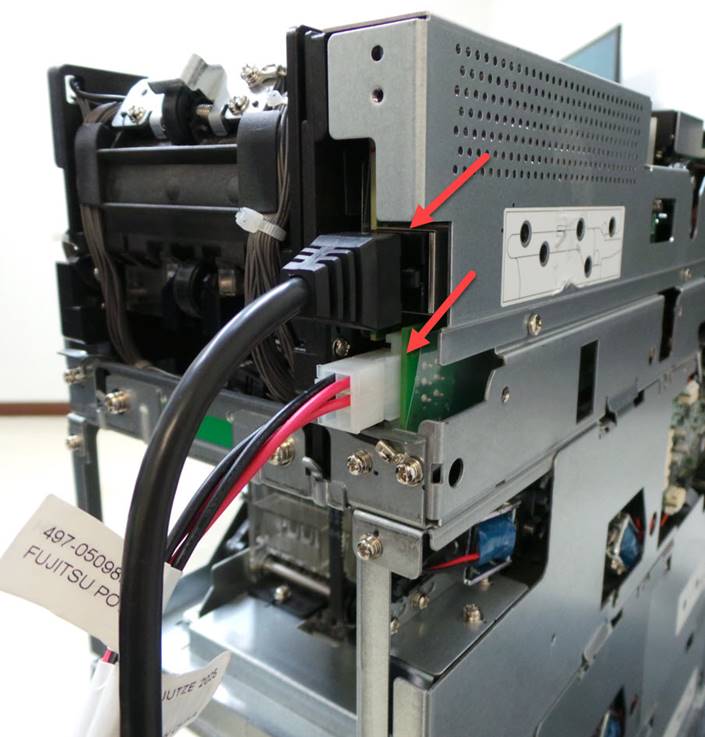
Conecte el cable de comunicación y el cable de alimentación de corriente
Connect the communication cable and the power supply cable.
Encienda la computadora
Turn on the computer
Nota: El personal de reparación y el inspector de calidad deben realizar una inspección visual, asegurándose de que todos los tornillos y cubiertas estén bien colocados, que no tenga cables expuestos, piezas rotas o faltantes, además de sonaja ni piezas sueltas dentro de la unidad, sin pasar por alto la limpieza (vidrio, rodillos, correas, según corresponda).
Note: Repair personnel and the quality inspector should perform a visual inspection, ensuring that all screws and covers are secure, that there are no exposed wires, broken or missing parts, and no rattles or loose parts inside the unit, including cleaning (glass, rollers, belts, as applicable).
PRUEBA / TEST
La prueba debe consistir en ingresar un total de 50 billetes
Se debe dispensar 30 billetes
Se deben purgar con 20 billetes
Se debe revisar que rechace 10 cupones
The test must consist of entering a total of 50 banknotes.
30 bills must be dispensed
20 bills must be purged
It must be checked to reject 10 vauchers
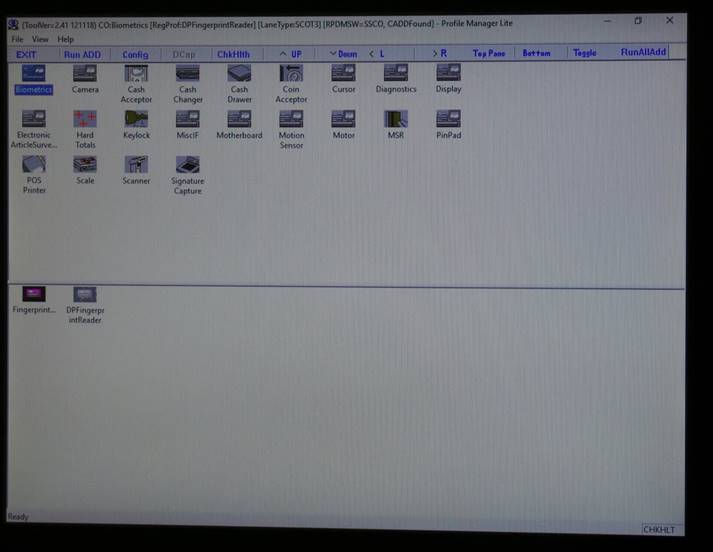
Siga las siguientes instrucciones para realizar la prueba
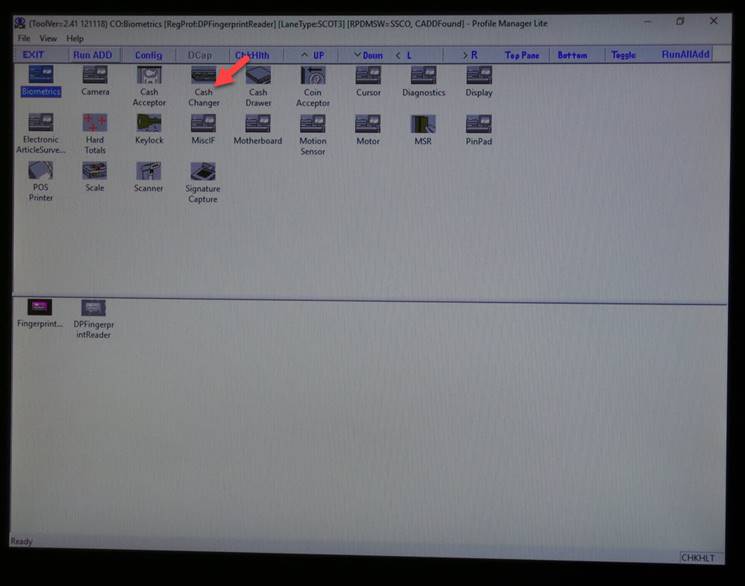
Seleccione Cash Changer
Follow the instructions below to perform the test
Select Cash Changer
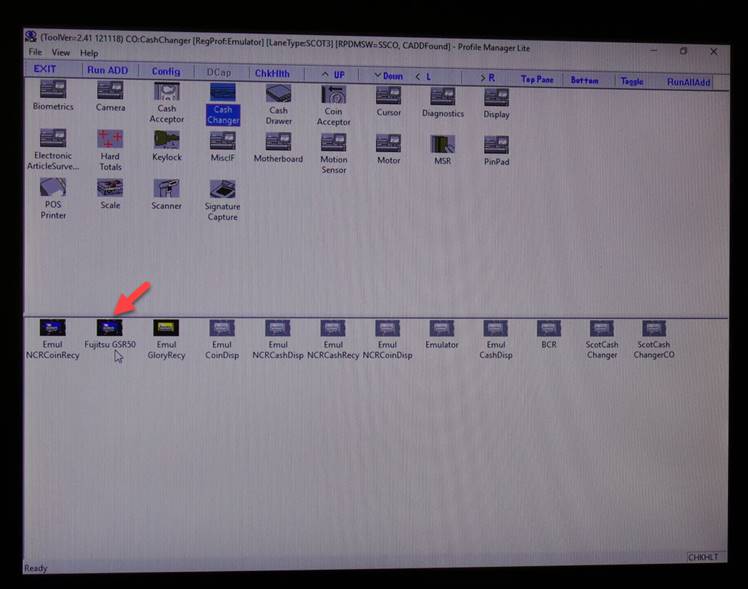
Seleccione Fujitsu GSR50
Select Fujitsu GSR50
Espere a que se ejecute el programa
Wait for the program to run
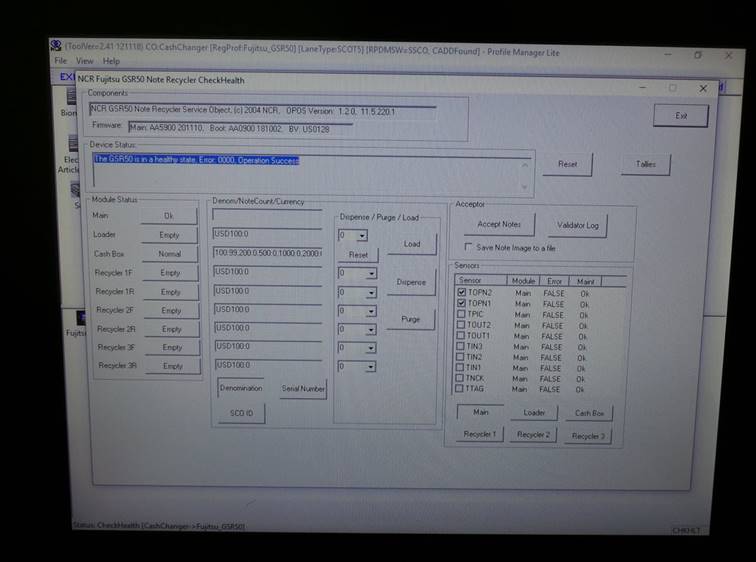
Seleccione Reset
Select Reset
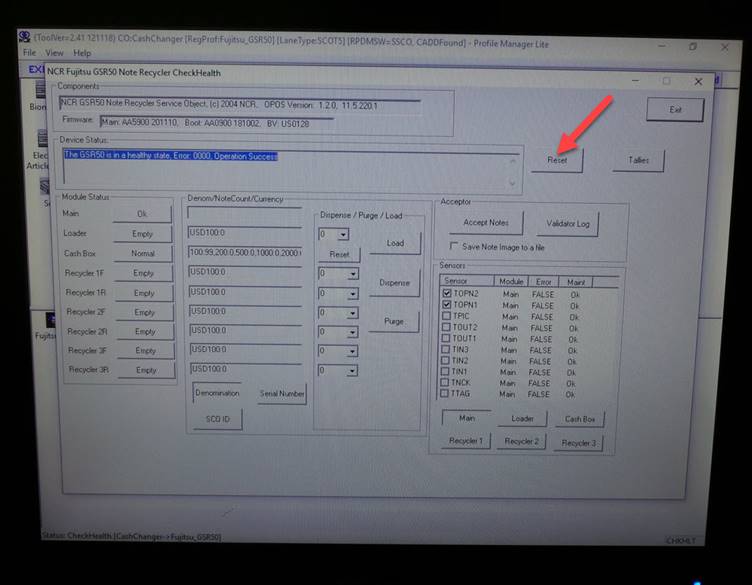
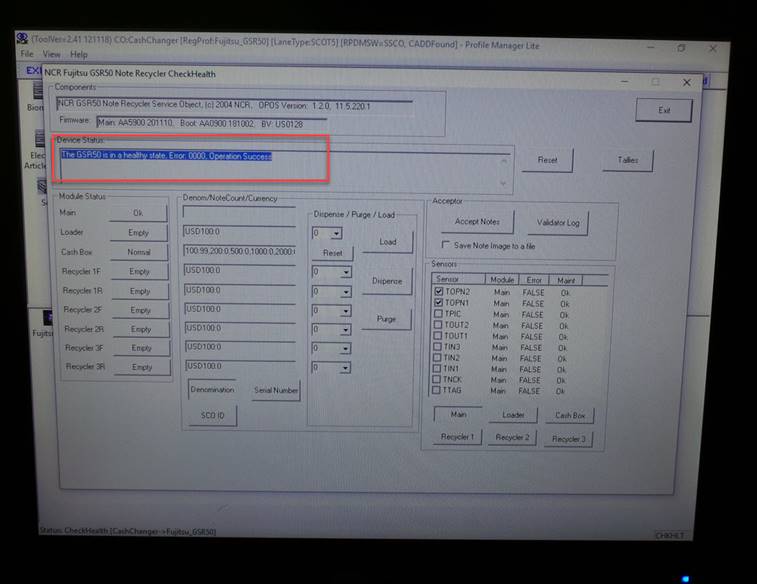
La unidad va a realizar el auto diagnóstico y debe ser sin errores
The unit will perform self-diagnostics and must be error-free.
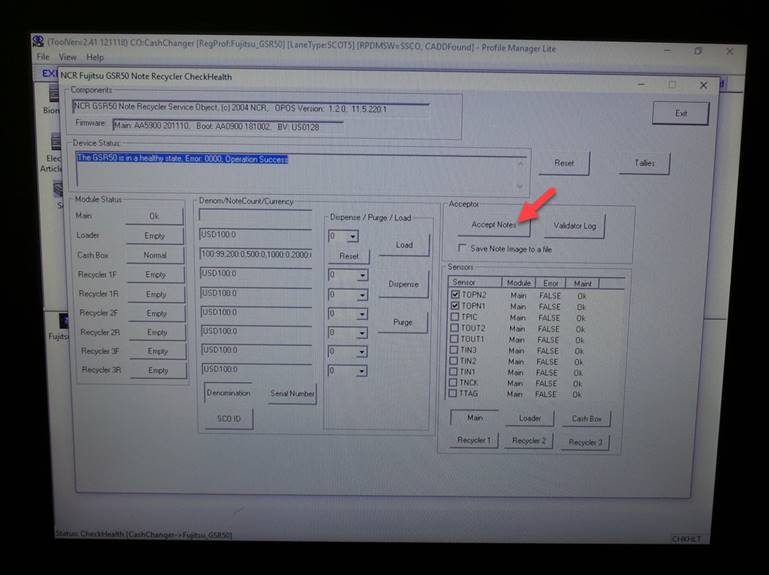
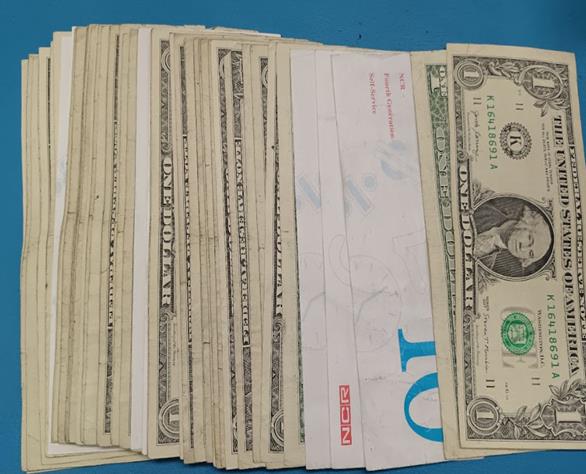
Ingrese 50 billetes e incluya además 10 cupones.
Ingrese los billetes en cantidades de 20
Primero seleccione Accept Notes
Enter 50 bills and also include 10 vaucher.
Enter bills in quantities of 20
First select Accept Notes
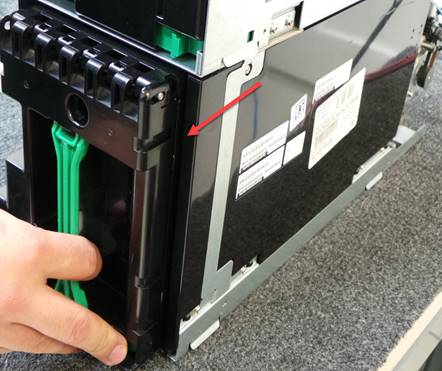
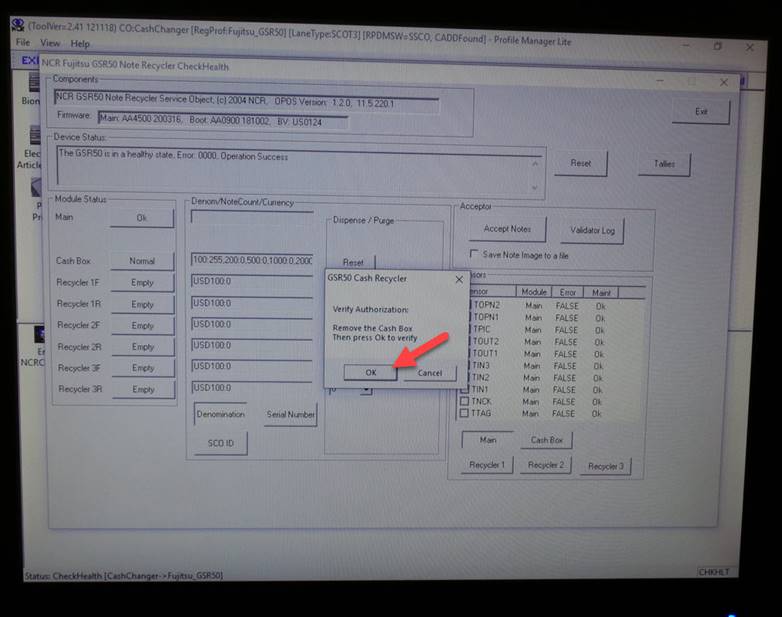
Remueva la caja
Remove the box
|
|
|
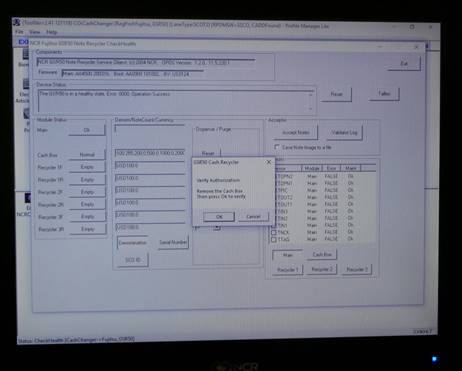
Seleccione OK
Select OK
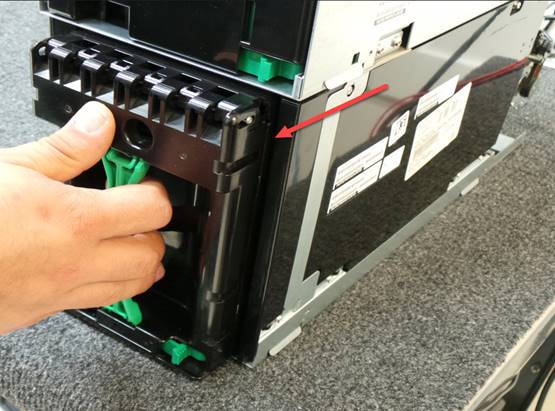
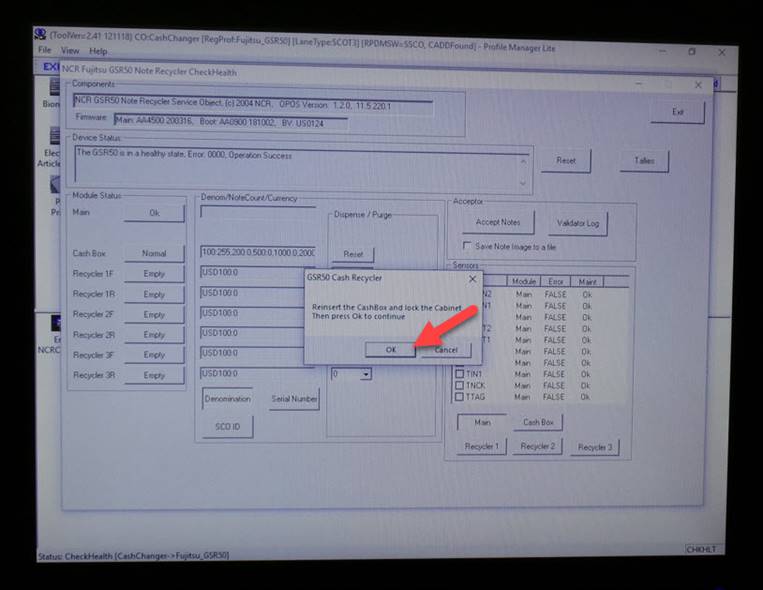
Instale la caja
Install the box
|
|
|

Seleccione OK
Select OK
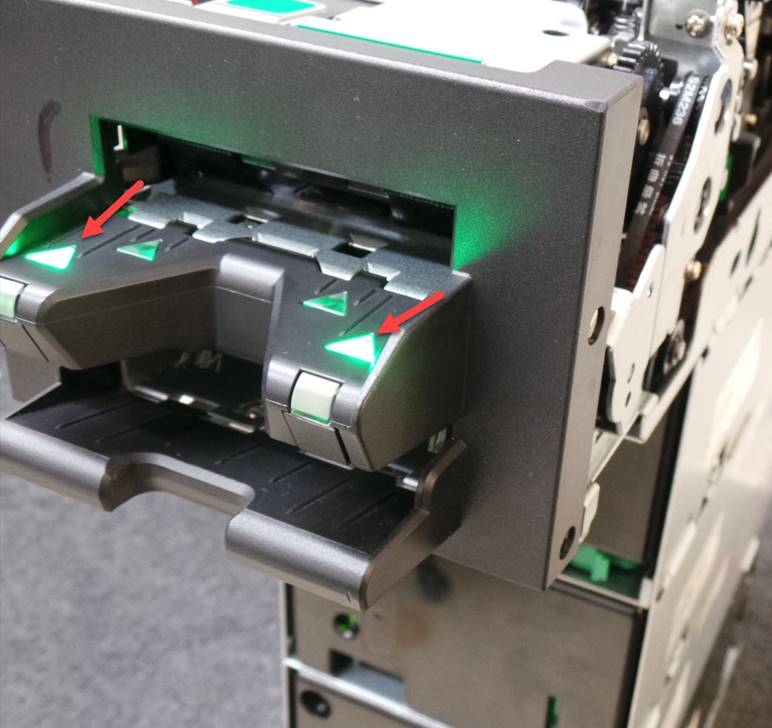
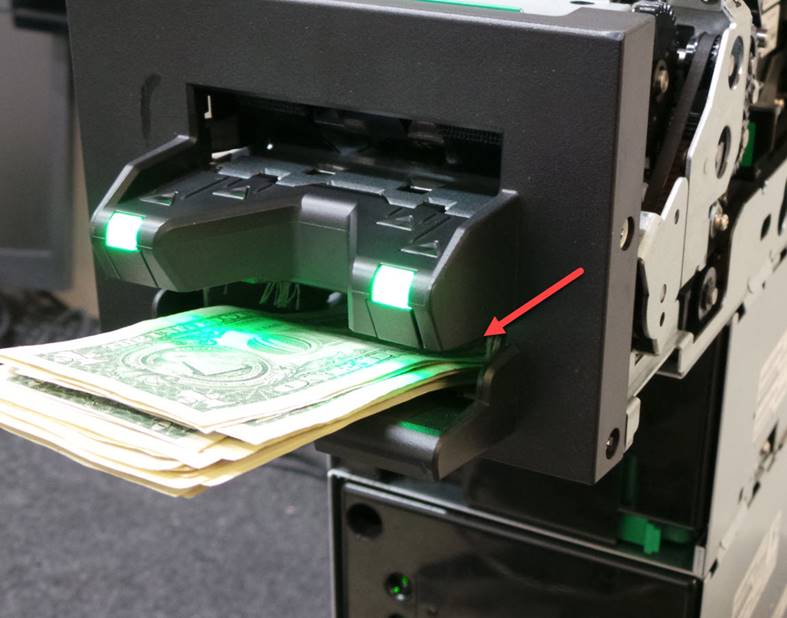
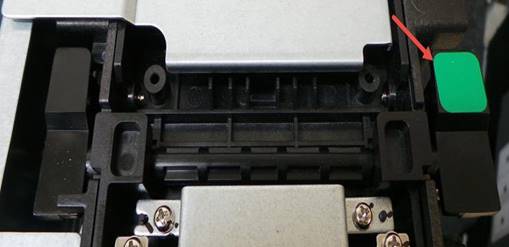
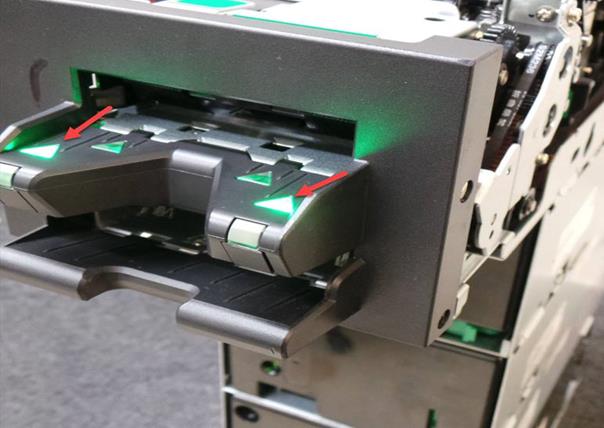
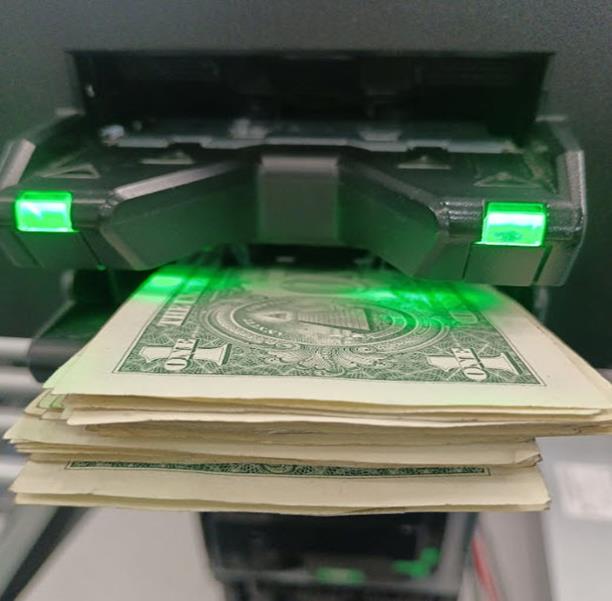
El bezel encenderá en color verde indicando que la unidad esta lista para aceptar los billetes
The bezel will light green indicating that the unit is ready to accept banknotes.
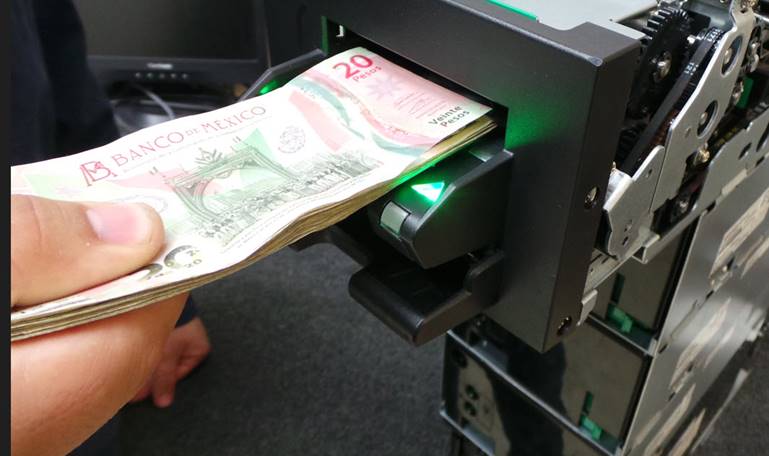
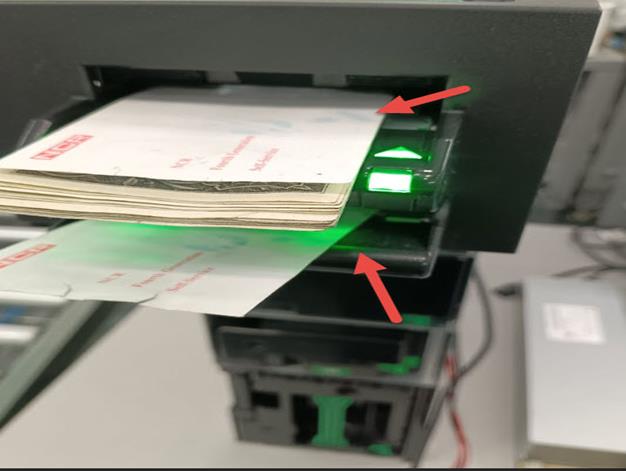
Coloque los billetes en cantidades de 20 incluyendo billetes de divisa diferente a dólares
Place bills in quantities of 20 including bills of currencies other than dollars
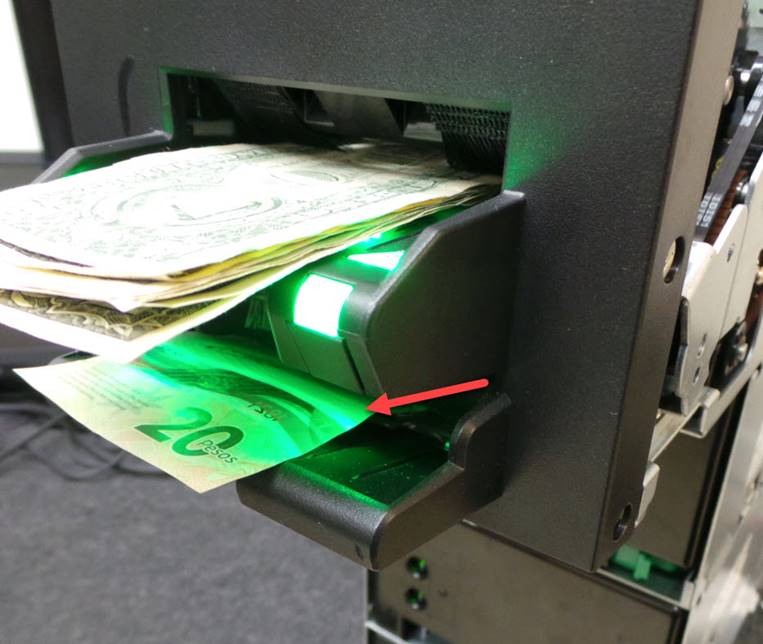
Los billetes de divisa diferente a dólar serán rechazados hacia la parte de abajo del bezel
Non-dollar bills will be rejected towards the bottom of the bezel.
Una vez que haya ingresado los 50 billetes seleccione Disable Acceptor para detener la inserción de billetes
Once you have entered 50 bills select Disable Acceptor to stop inserting bills.
NOTA: Después de ver ingresado los 50 billetes de 1 dollar, debera ingresa al menos 2 billetes de cada una de las otras denominaciones ( 5, 10, 20, 50 y 100 dlls) Estas denominaciones deberán ser aceptadas y por automático se irán a la caja de efectivo
NOTE: After you have entered the 50 1 dollar bills, you must enter at least 2 bills of each of the other denominations (5, 10, 20, 50 and 100 dollars). These denominations must be accepted and will automatically go to the cash box.

Los leds del bezel se van a apagar indicando que ha terminado la inserción de billetes
The bezel LEDs will turn off indicating that the insertion of banknotes has been completed.

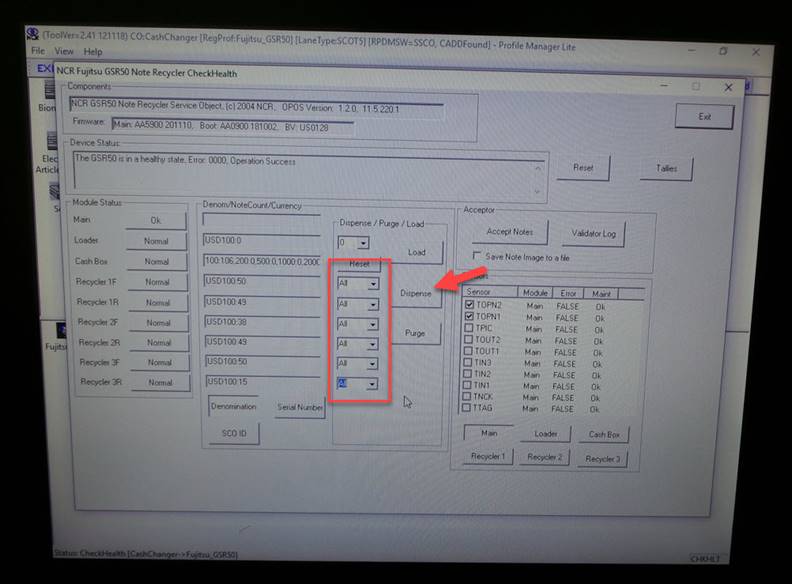
Realice la configuración para dispensar 30 billetes, seleccionando All en todos los recicladores y luego seleccione Dispense
Configure to dispense 30 bills by selecting All on all recyclers and then select Dispense.
La unidad va a empezar a dispensar los billetes en cantidades de 20 en 20 y hay que removerlos del bezel para que continúe dispensando
The unit will begin to dispense bills in quantities of 20 at a time and must be removed from the bezel to continue dispensing
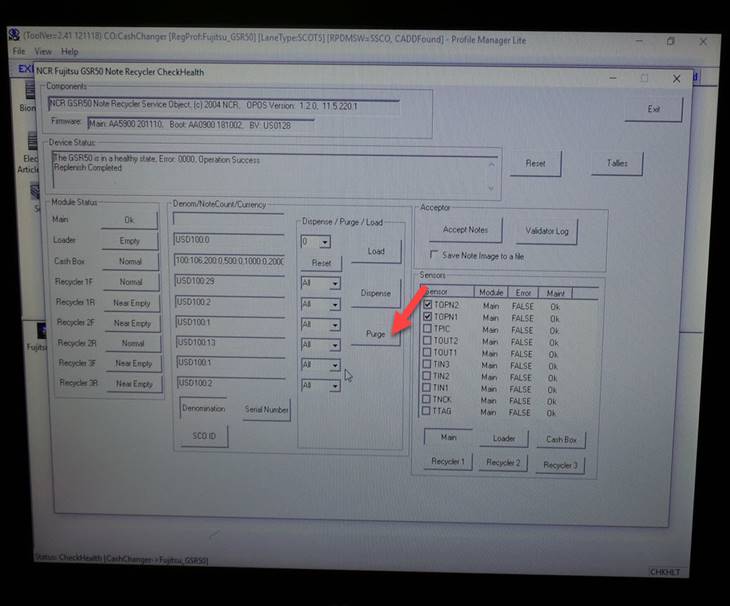
Una vez que los billetes hayan sido enviados a los recicladores seleccione All en todos los recicladores y luego seleccione Purge para purgar todos billetes.
Los billetes serán enviados a la caja de efectivo
Once the bills have been sent to the recyclers select All on all recyclers and then select Purge to purge all bills.
The bills will be sent to the cash box
Remueva la caja de efectivo
Remove the cash box
Retire los billetes de la caja de efectivo
Remove the bills from the cash box
Vuelva a instalar la caja de efectivo
Reinstall the cash box
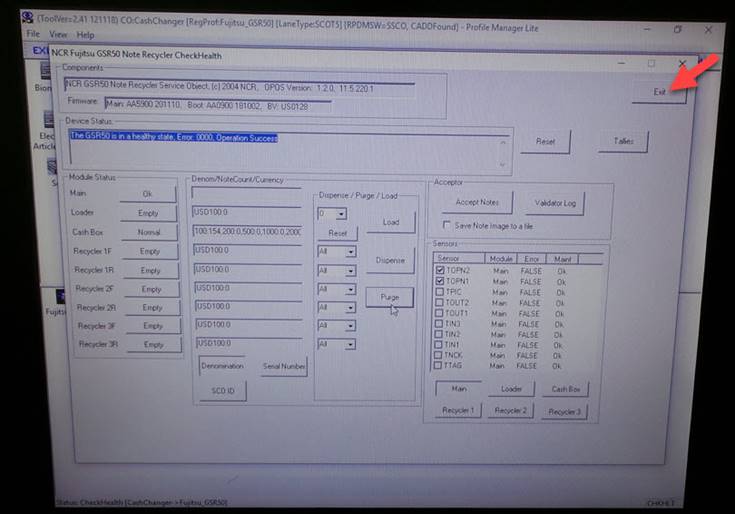
Seleccione Exit para cerrar el programa
Select Exit to close the program
Apague la estación de prueba
Turn off the test station
Desconecte los cables de comunicación y alimentación de corriente
Disconnect the communication and power supply cables.
Ya terminada la prueba selecciona log out para desconectar el top module y empezar el mantenimiento
Once the test is finished, select Log Out to disconnect to Top Module and begin maintenance.
LIMPIEZA / CLEAN-UP
Realice la limpieza completa de la unidad y reemplace las partes que encuentre dañadas como por ejemplo el pick up roller
Perform a complete cleaning of the unit and replace any damaged parts such as the pick up roller.
**NOTA**
NO UTILIZAR ALCOHOL PARA LIMPIAR PLASTICOS O CRISTALES DE LOS SENSORES
**NOTE **
DO NOT USE ALCOHOL TO CLEAN PLASTIC OR GLASS OF THE SENSORS.
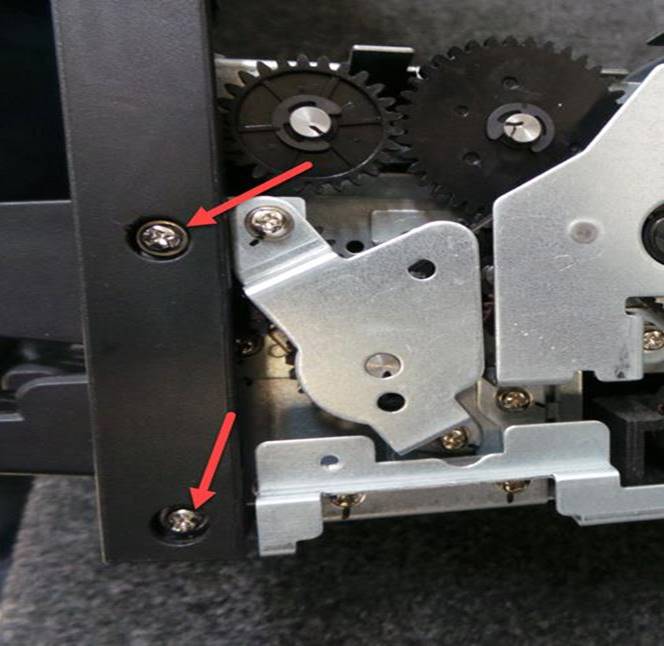
Primero retire los 4 tornillos del bezel son 2 por cada lado
First remove the 4 bezel screws, 2 on each side.
|
|
|
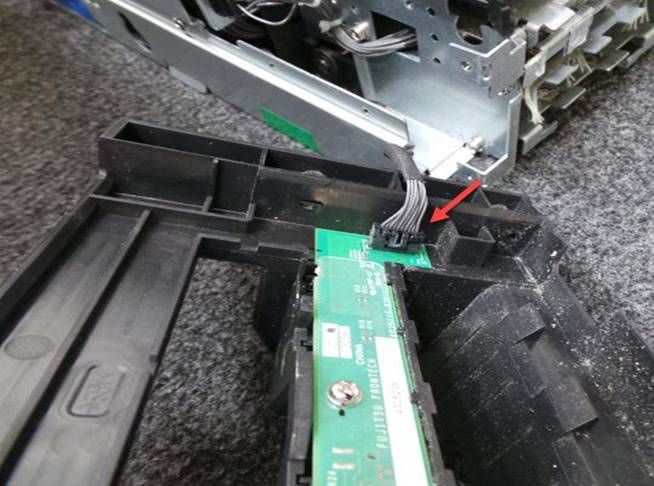
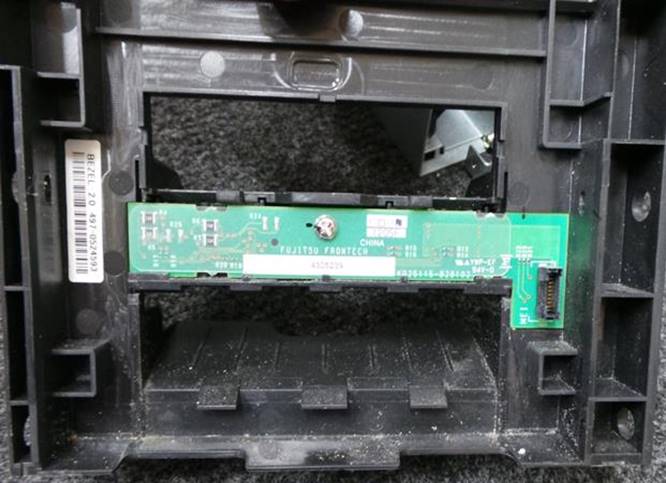
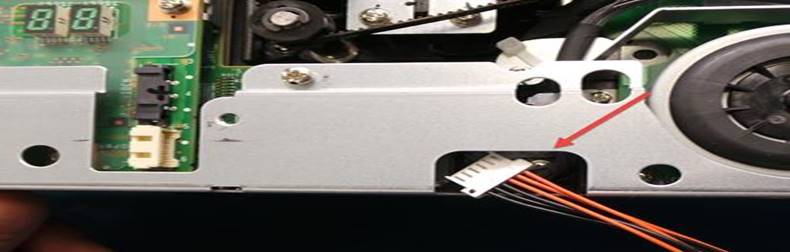
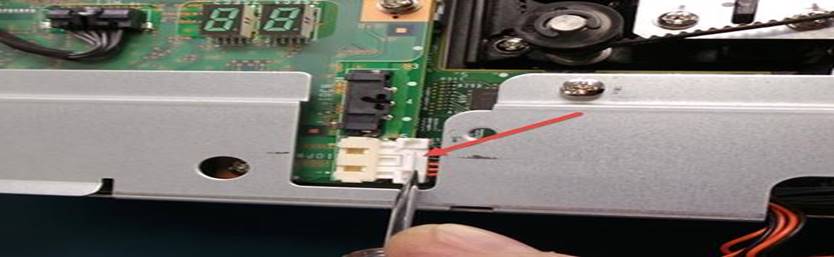
Desconecte el cable Remueva todo el polvo del Bezel
Disconnect the cable Remove all dust from the Bezel
|
|
|
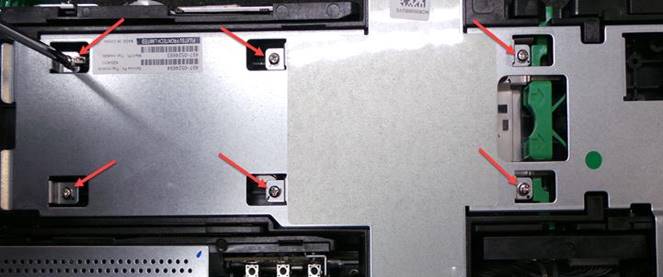
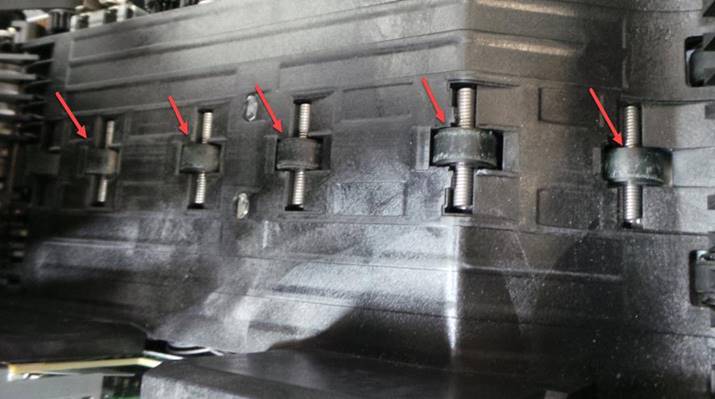
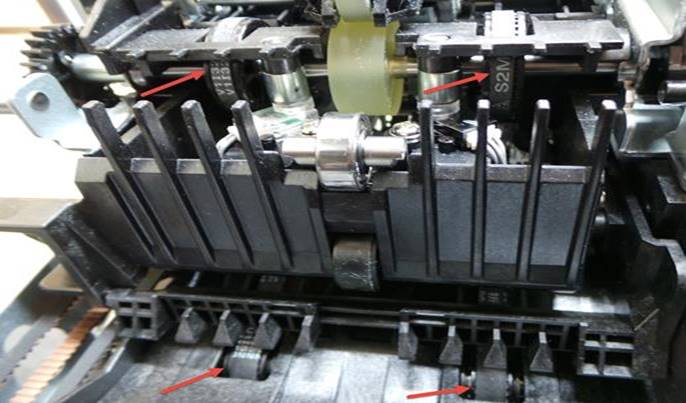
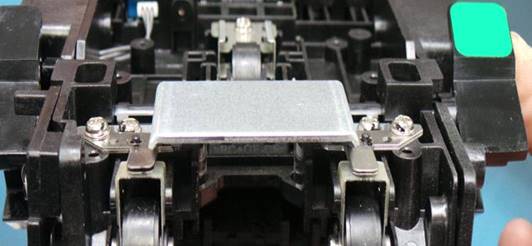
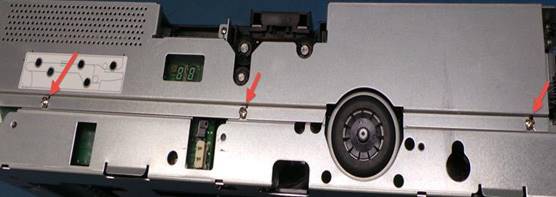
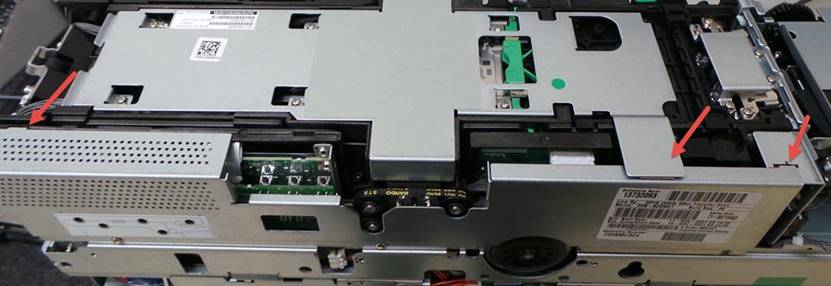
Remueva los 6 tornillos de la placa superior de la unidad Localice los rodillos
Remove the 6 screws from the top plate of the unit. Locate the rollers
|
|
|
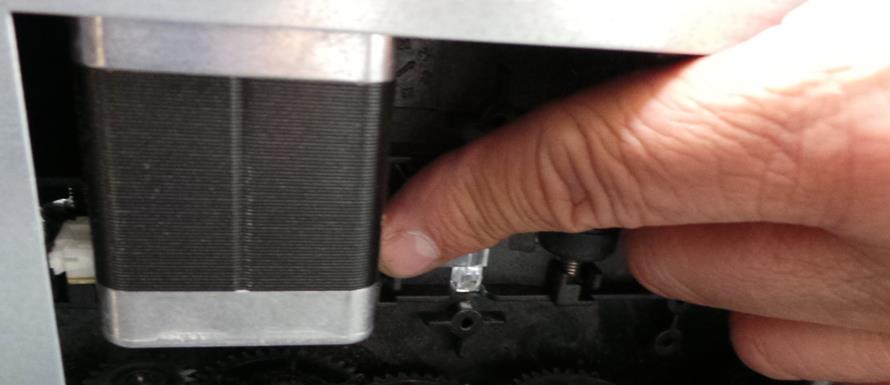
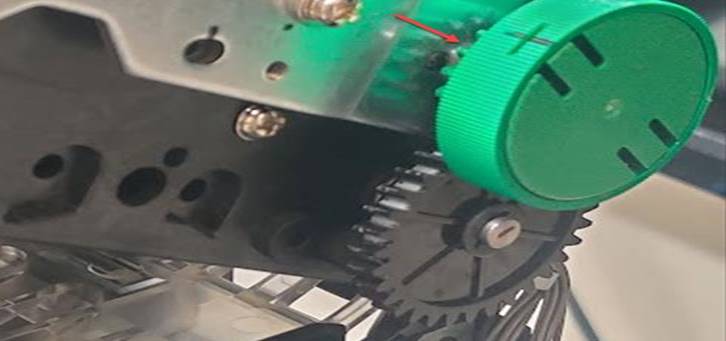
Gire la perilla y limpie cada uno de los rodillos utilizando una franela que no
deje
residuos Vuelva a
instalar la placa superior Levante la cubierta superior
Turn the knob and clean each of the rollers using a non-residual cleaning cloth. Reinstall the top plate Lift the top cover
|
|
|
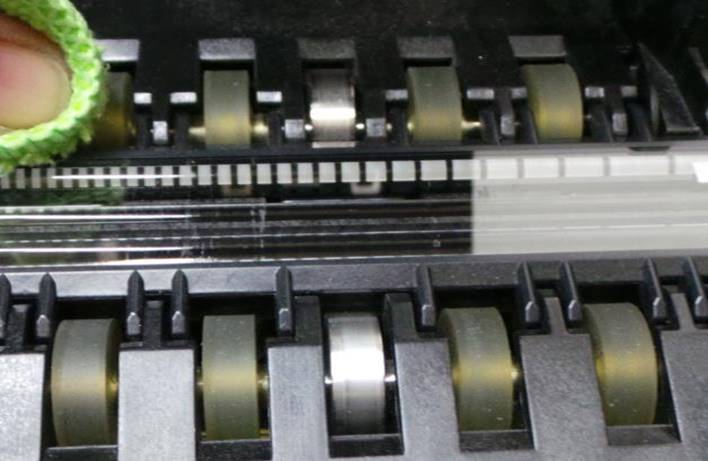
Localice y limpie los rodillos. TENGA PRECAUCION CON LA CAMARA
Locate and clean the rollers. USE CAUTION WITH THE CAMERA
|
|
|
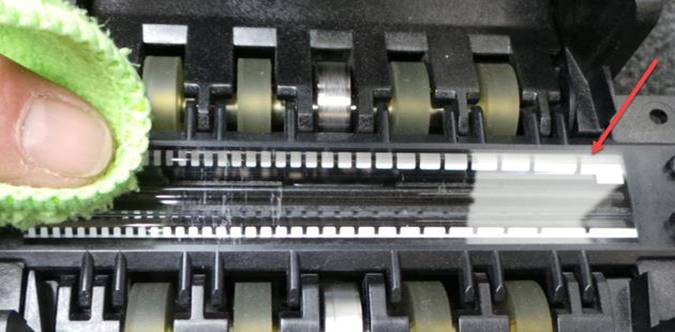
Con una franela seca que no deje residuos y sin usar ningún químico limpie y remueva toda suciedad de la cámara superior e inferior. TENGA MUCHA PRECAUCION DE NO RAYAR LA CAMARA
With a dry cloth that does not leave any residue and without using any chemicals, clean and remove all dirt from the upper and lower chamber. BE VERY CAREFUL NOT TO SCRATCH THE CAMERA.
|
|
|
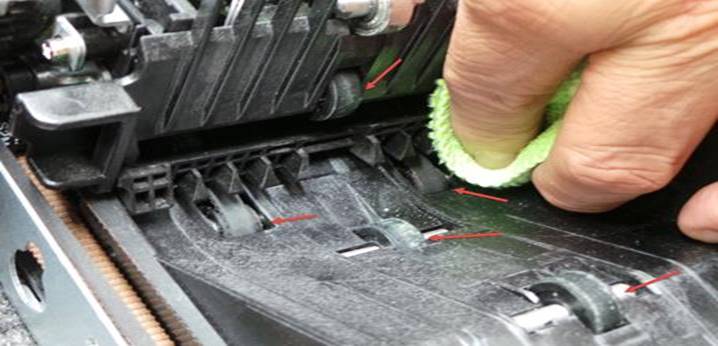
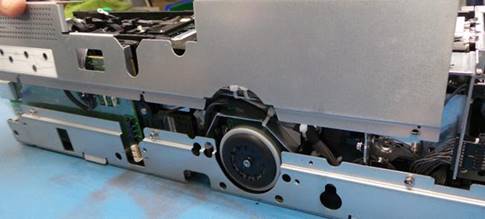
Vuelva a cerrar la cubierta superior. Localice y limpie los rodillos
Levante la zona intermedia de la unidad Locate and clean the rollers
Close the top cover again.
Lift the middle area of the unit
|
|
|
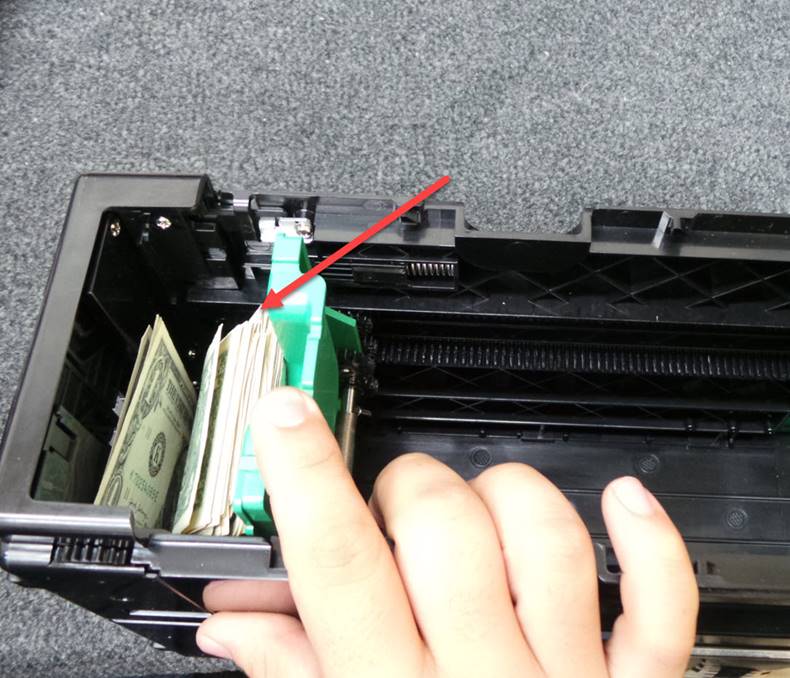
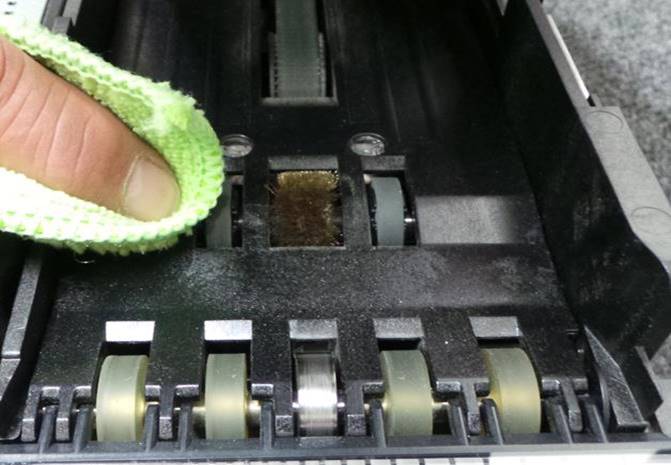
Puede sujetar los rodillos de la parte inferior de la unidad para facilitar su limpieza
Can hold the rollers at the bottom of the unit for easy cleaning
|
|
Limpie los rodillos
Clean the rollers
|
|
|
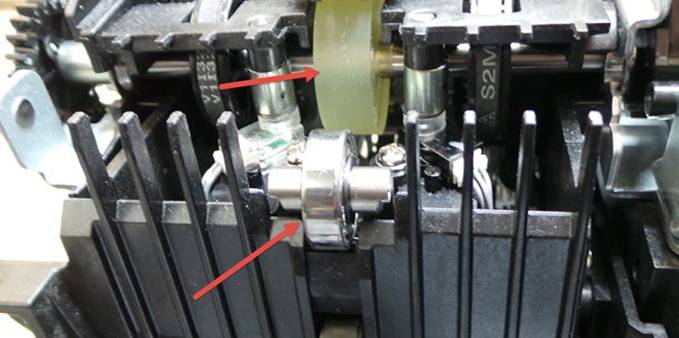
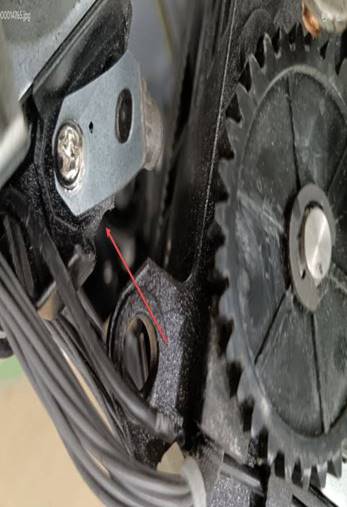
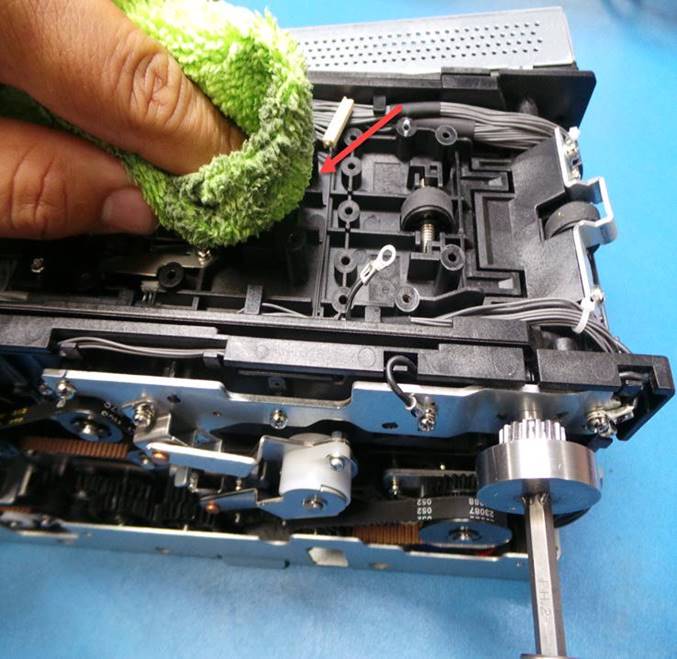
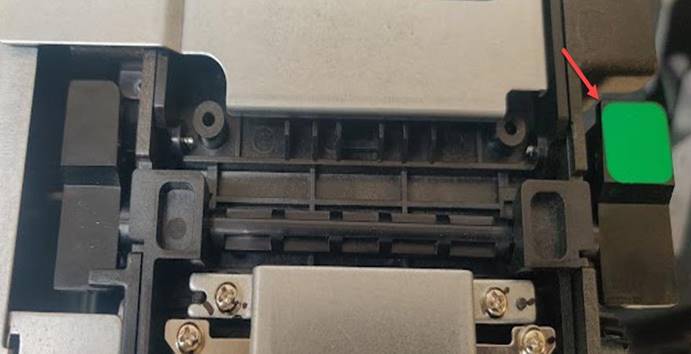
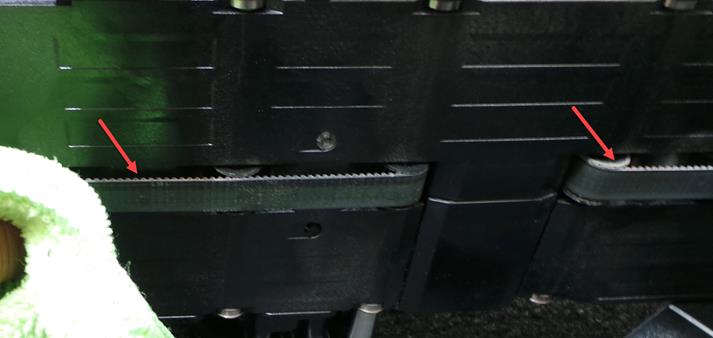
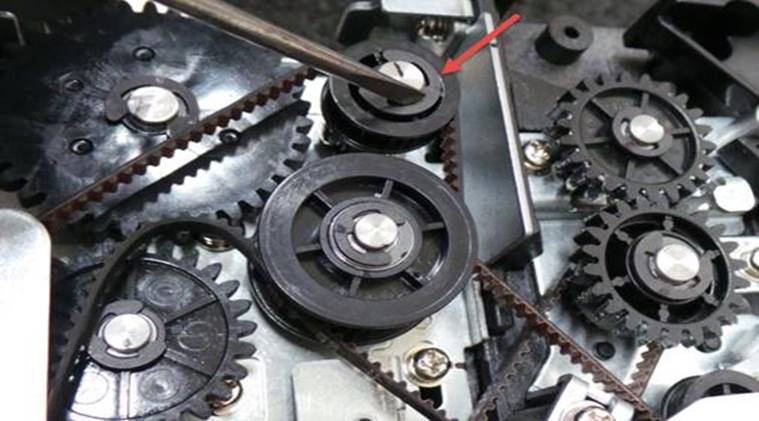
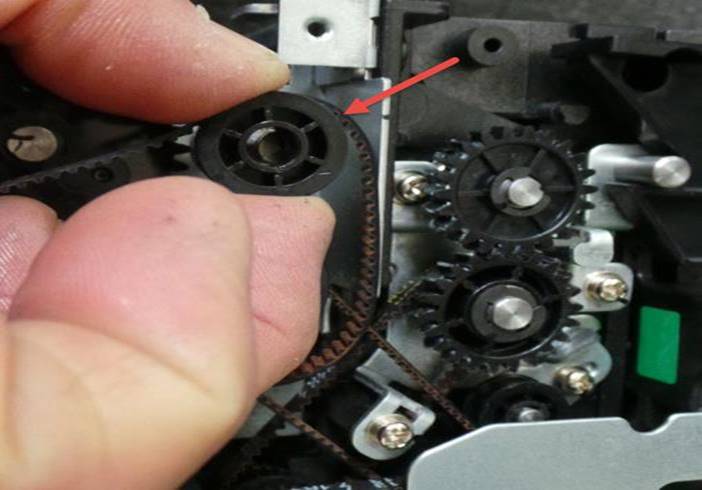
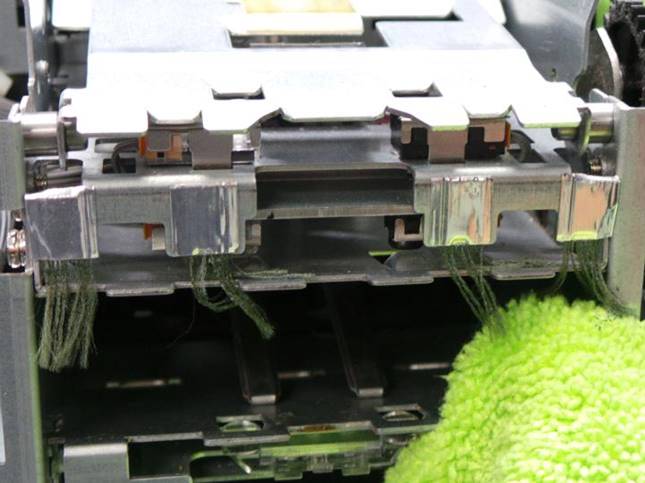
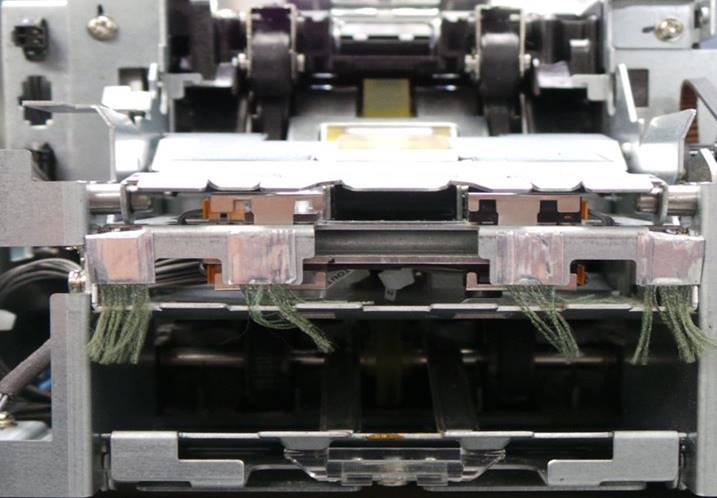
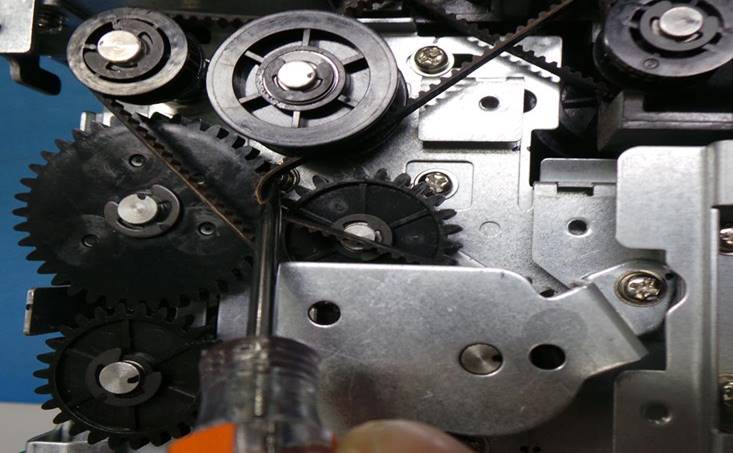
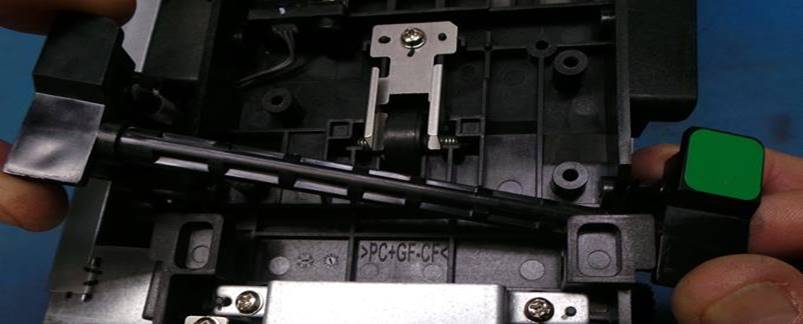
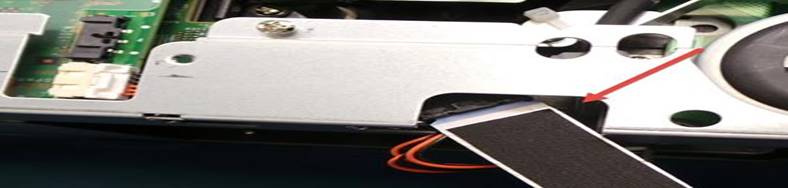
Gire el engrane señalado y limpie las bandas
Rotate the marked gear and clean the belts
|
|
|
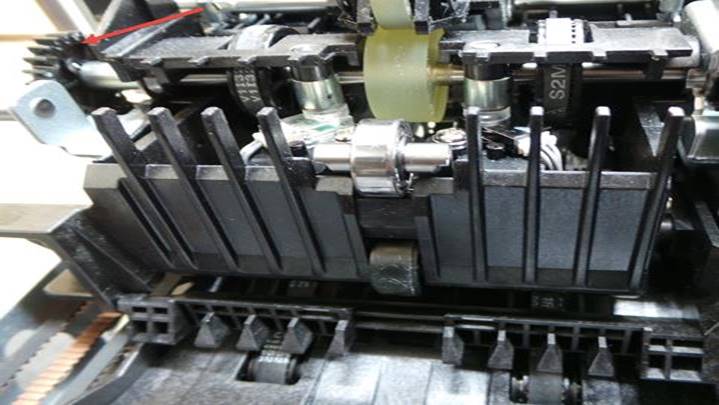
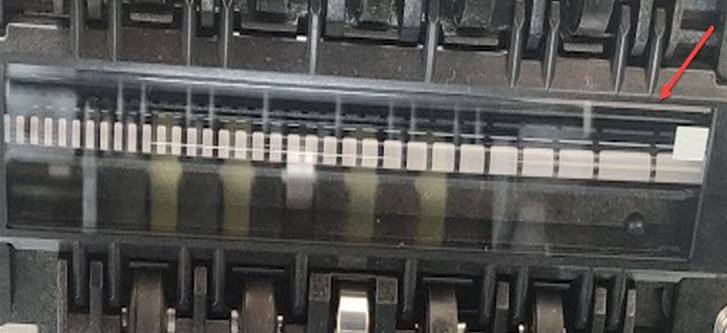
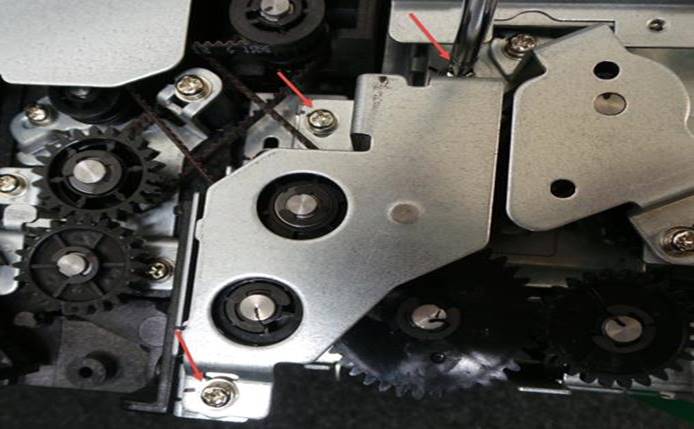
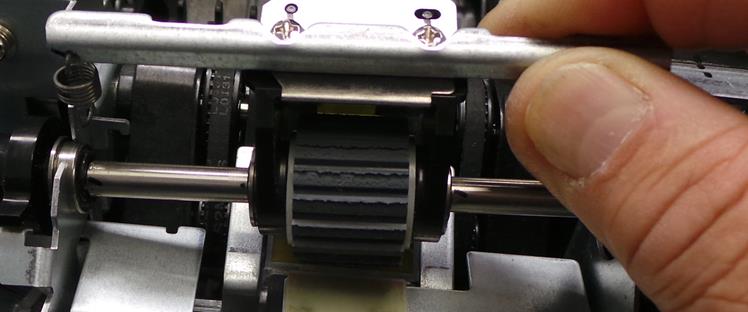
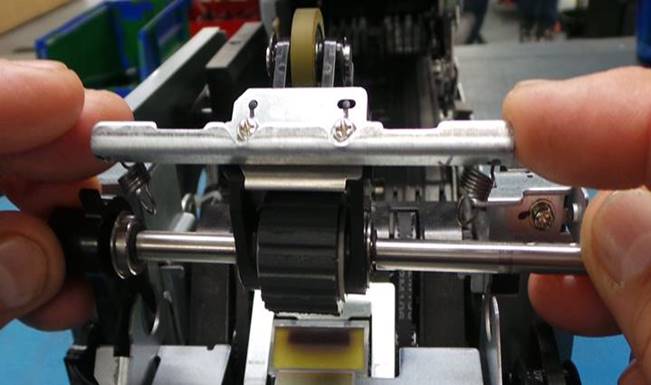
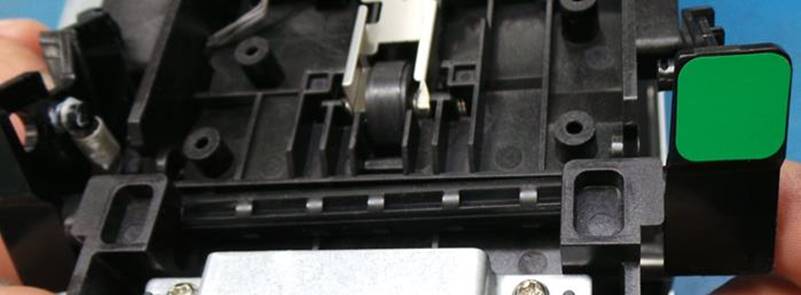
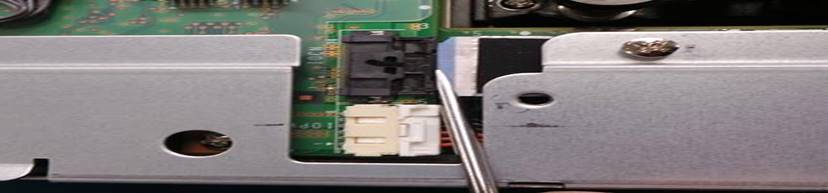
En la parte superior localice y limpie las bandas girando la perilla manual
At the top, locate and clean the belts by turning the manual knob.
|
|
|
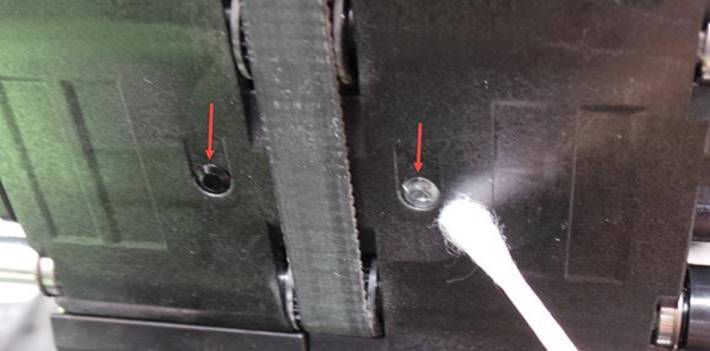
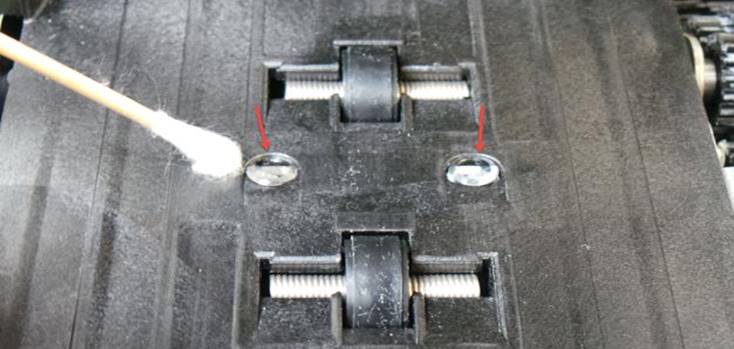
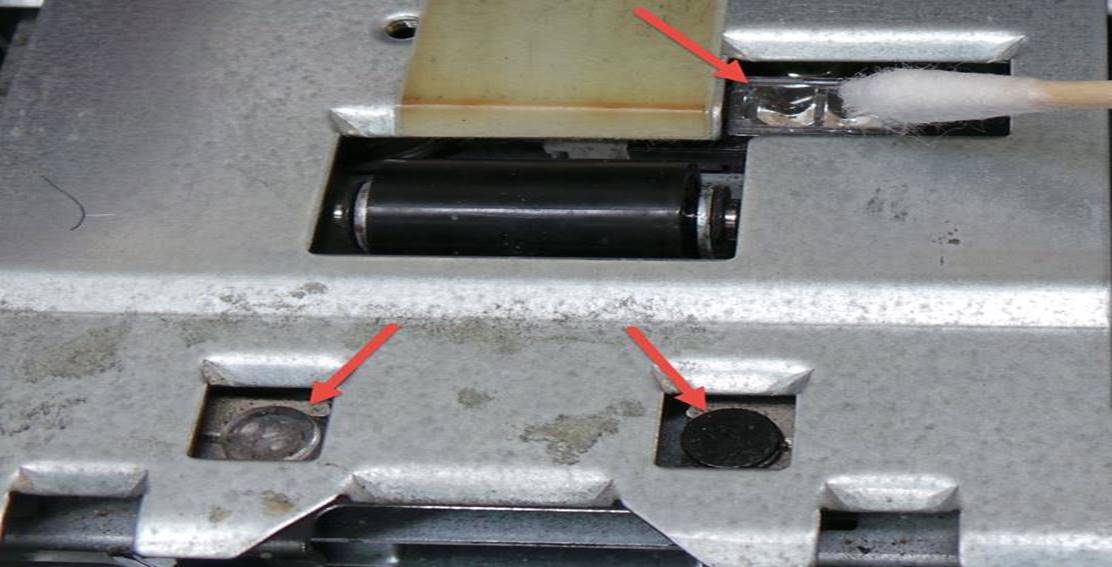
Con un cotonete limpie los cristales y retire toda suciedad.
Use a cotton swab to clean the lenses and remove any dirt.
|
|
|
REEMPLAZO DEL PICKUP ROLLER / PICKUP ROLLER REPLACEMENT
UNICAMENTE SE DEBEN REEMPLAZAR LOS RODILLOS CON DESGASTE NIVEL C O D
SI EL DESGASTE ESTA EN NIVEL A O B NO DEBE SE REEMPLAZADO
ONLY ROLLS WITH WORN LEVEL C OR D SHOULD BE REPLACED
IF THE WEAR IS AT LEVEL A OR B IT SHOULD NOT BE REPLACED
|
|

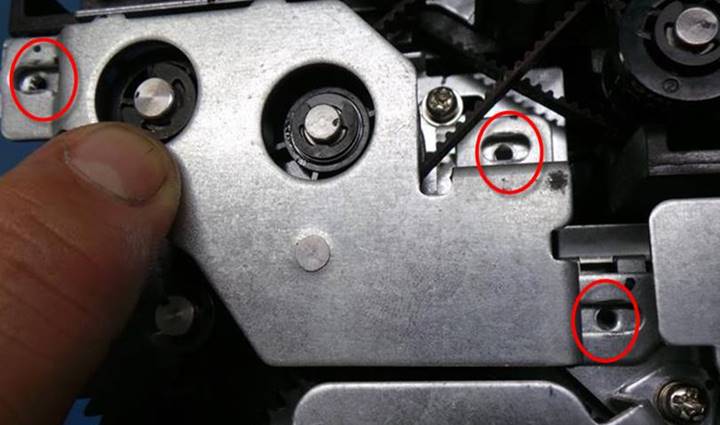
Retire la placa lateral removiendo los 3 tornillos Retire el Eclip del engrane
Remove the side plate by removing the 3 screws Remove the Eclip from the gear
|
|
|
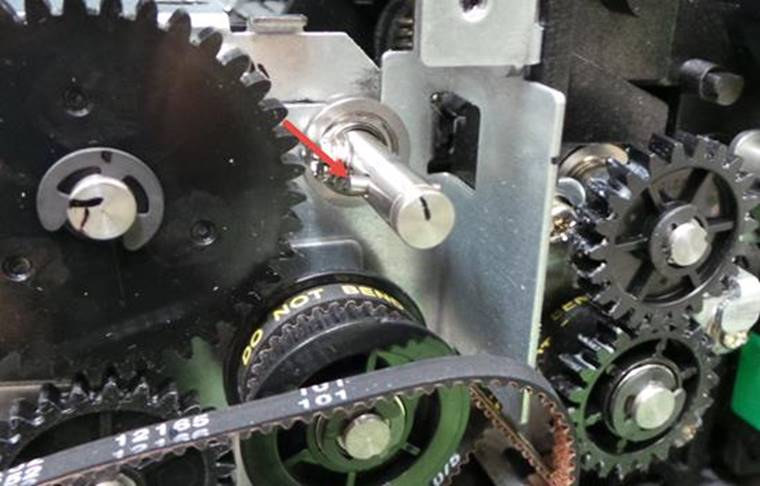
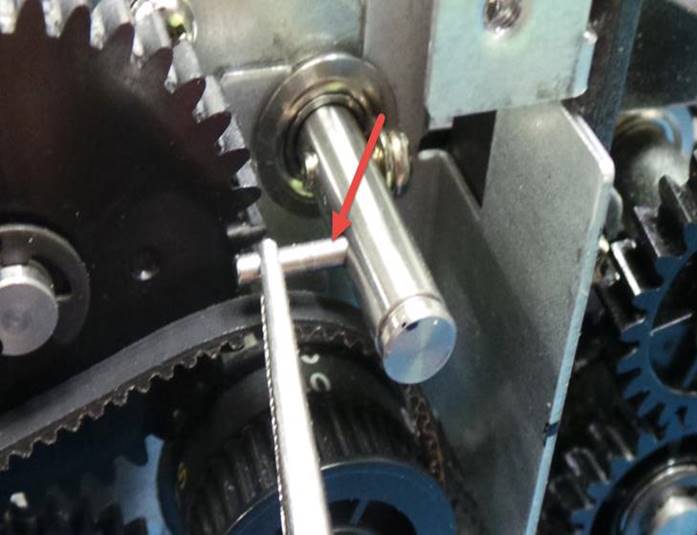
Retire el engrane Retire el perno del eje
Remove the gear Remove shaft bolt
|
|
|
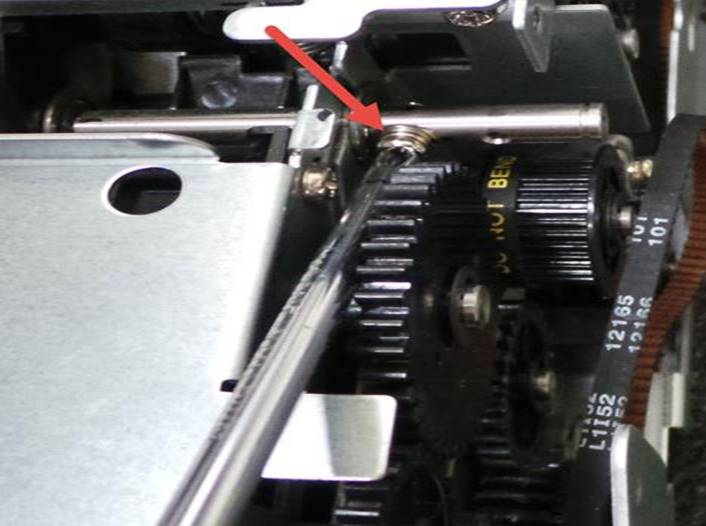
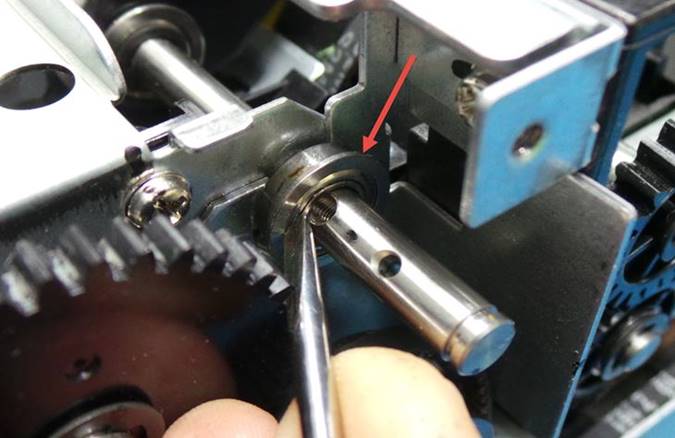
Retire el tornillo del eje Libere el balero de la placa
Remove shaft screw Release the bearing from the plate
|
|
|
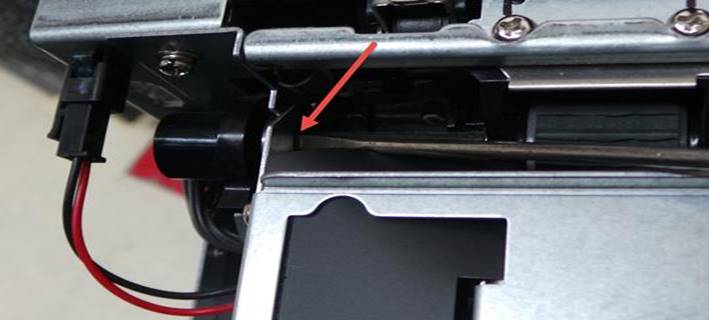
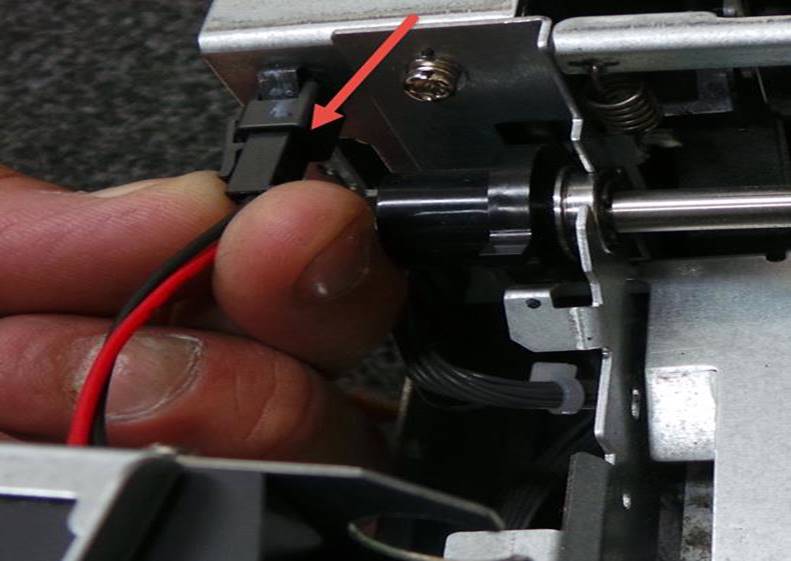
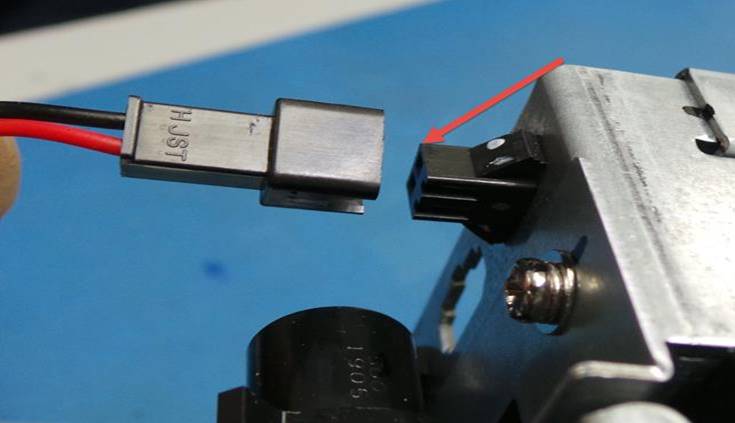
Empuje el balero hacia el lado izquierdo y libere el mecanismo Desconecte el cable
Push the ball bearing to the left side and release the mechanism. Disconnect the cable
|
|
|
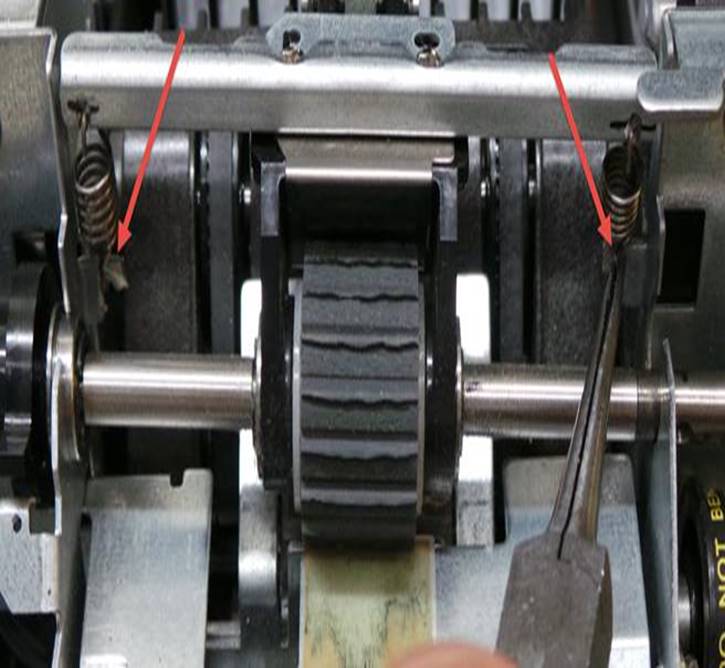
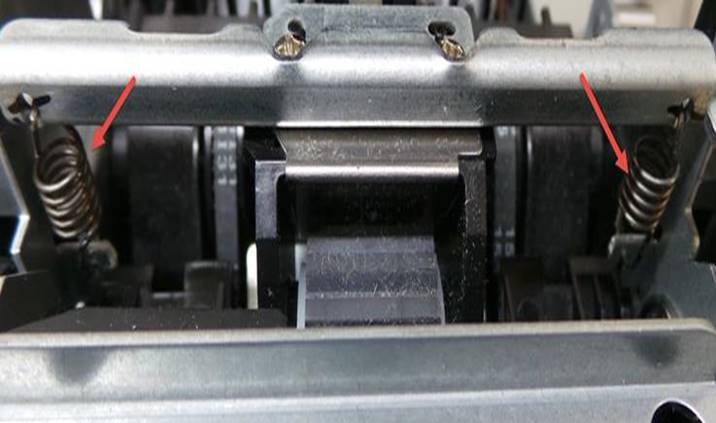
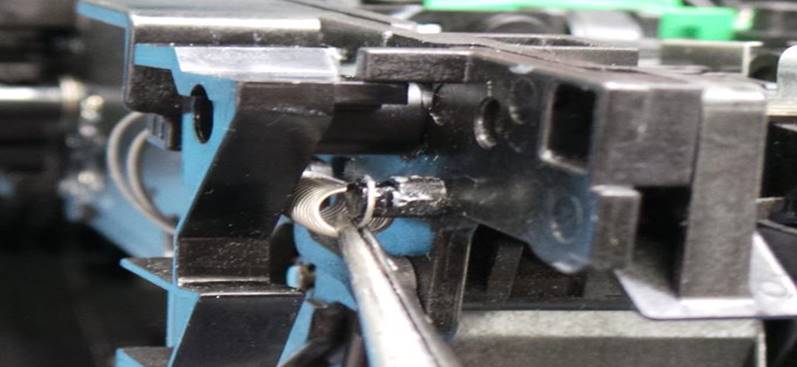
Con ayuda de unas pinzas de punta retire los 2 resortes del pickup roller Retire el pickup roller
With the help of needle-nose pliers remove the 2 springs from the pickup roller Remove the pickup roller
|
|
|
Con ayuda de una franela apenas humedecida con alcohol limpie el área perfectamente
With the help of a flannel slightly dampened with alcohol, clean the area thoroughly.
|
|

Con ayuda de un cotonete seco limpie los cristales y remueva toda suciedad de ellos sin dejar residuos
With the help of a dry cotton swab, clean the glass panes and remove all dirt without leaving any residue.
|
|
Limpie toda la zona frontal liberándola de toda suciedad
Clean the entire frontal area freeing it from dirt and debris
|
|
|
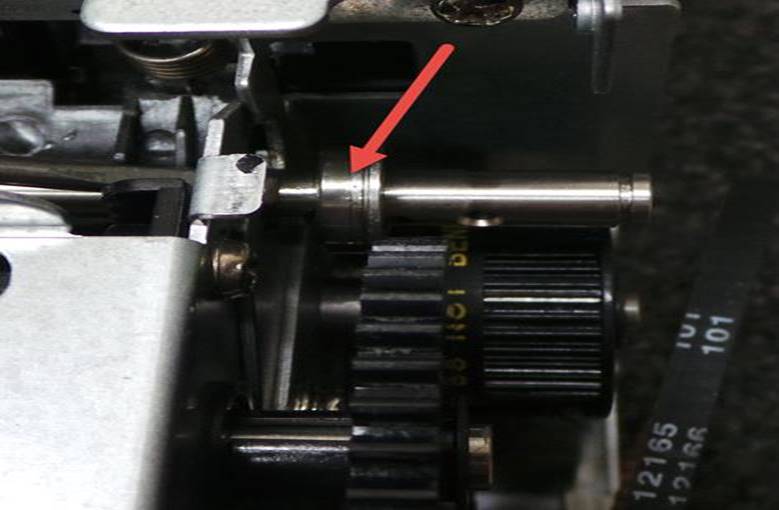
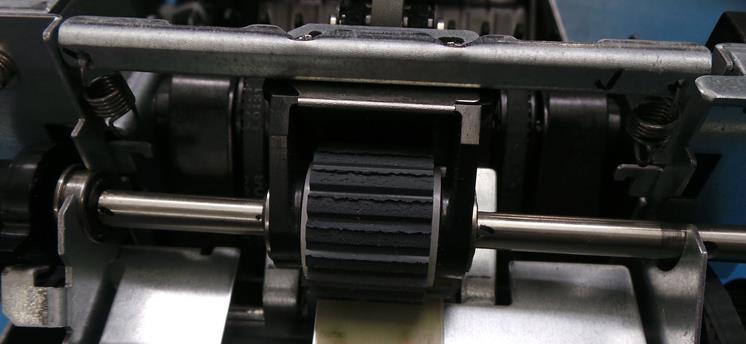
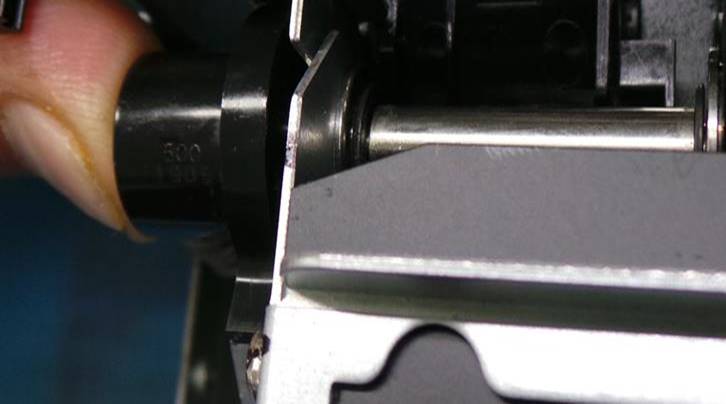
Coloque un pickup roller nuevo. Ajuste el eje en la siguiente posición
Install a new pickup roller. Adjust the shaft to the following position
|
|
|
Coloque el mecanismo Deslice el eje
levemente hacia la derecha
Position the
mechanism Slide shaft slightly to the
right
|
|
|

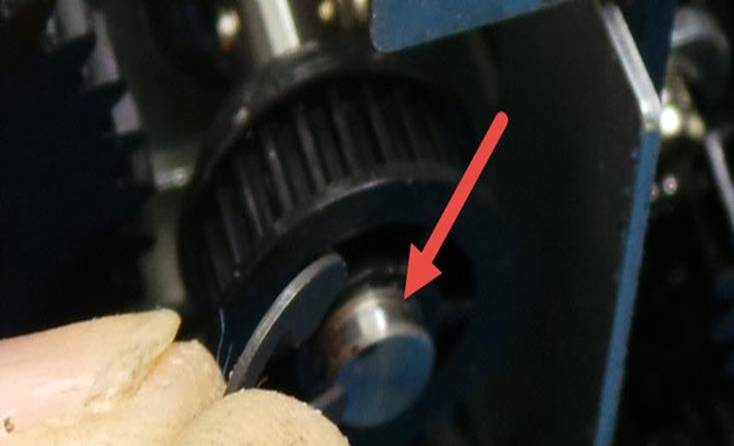
Coloque el balero en el eje e insértelo en la placa Coloque el tornillo en el eje
Place the bearing on the shaft and insert it into the plate Place the screw on the shaft
|
|
|

Inserte el perno en el eje Tome el engrane e insértelo en el eje de forma que el perno entre en el
Insert bolt into shaft Take the gear and insert it on the shaft so that the bolt enters the
|
|
|
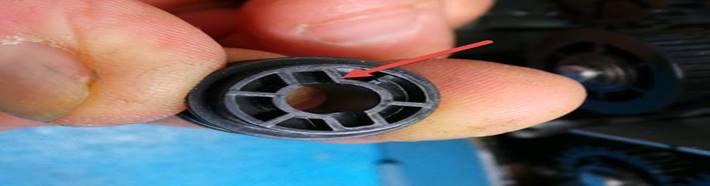

Coloque el Eclip Coloque la banda en su lugar
Place the Eclip Put the band in place
|
|
|
Coloque la placa y ubíquela en su lugar, no olvide poner los 3 tornillos Conecte el cable
Position the plate and set it in place, don't forget to put the 3 screws Connect the cable
|
|
|
Coloque los resortes del pickup roller a la unidad tome el bezel y remueva toda suciedad de él. Remplácelo por uno nuevo en caso de ser necesario.
Attach the pickup roller springs to the unit. Take the bezel and remove any dirt from it Replace it with a new one if necessary.
|
|
|
Coloque los 4 tornillos que sujetan el bezel, son 2 por lado
Place the 4 screws that hold the bezel, 2 on each side.
|
|
|
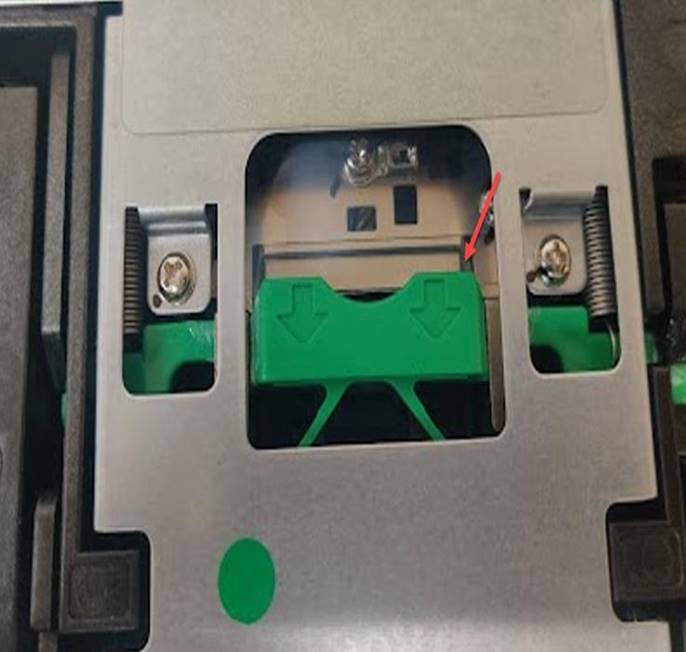
Asegúrese de que el bezel quede bien sujeto y centrado en su lugar.
Make sure the bezel is securely fastened and centered in place.
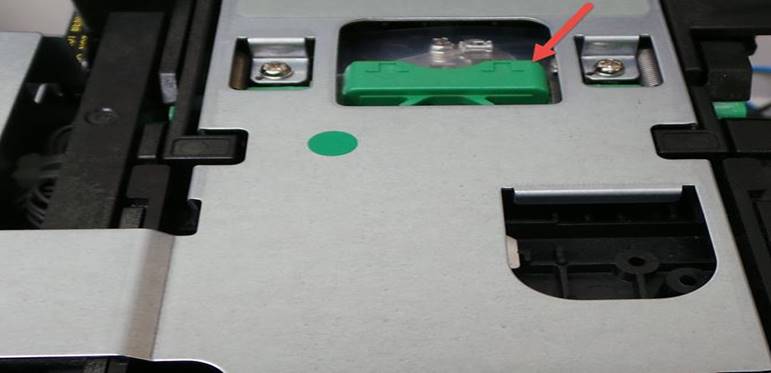
REEMPLAZO DEL LATCH / LATCH REPLACEMENT
Nota: En caso de ser necesario por algún daño, siga las siguientes instrucciones para reemplazarlo
Note: If necessary due to damage, follow the following instructions to replace it
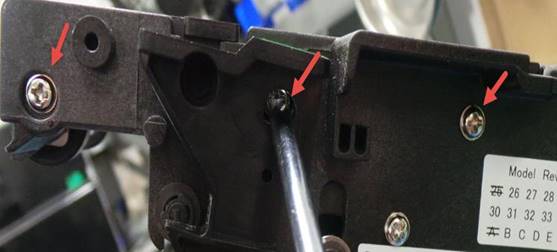
Abra la zona intermedia de la unidad En la cubierta superior retire los 6 tornillos que sujetan el latch, son 3 por cada lado
Open the intermediate zone of the unit On the top cover, remove the 6 screws that hold the latch, 3 on each side.
|
|
|
|


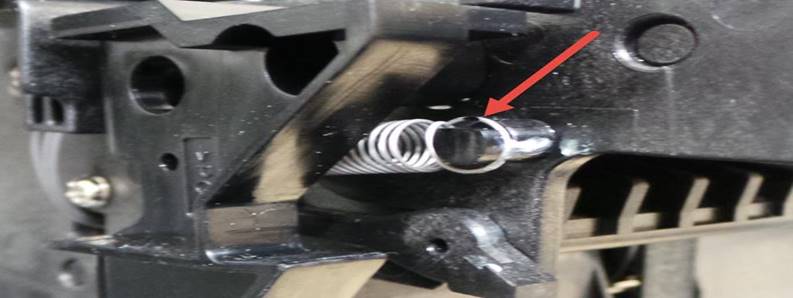
Levante cubierta superior de la unidad Retire el resorte
Lift top cover of the unit Remove the spring
|
|
|
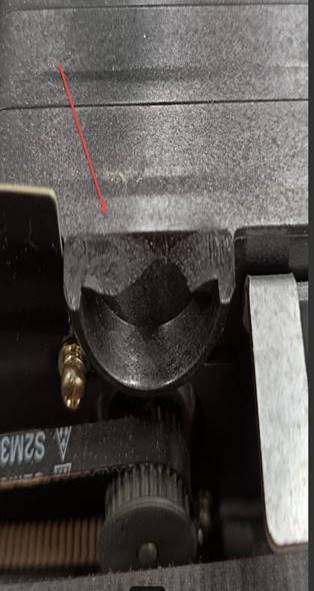
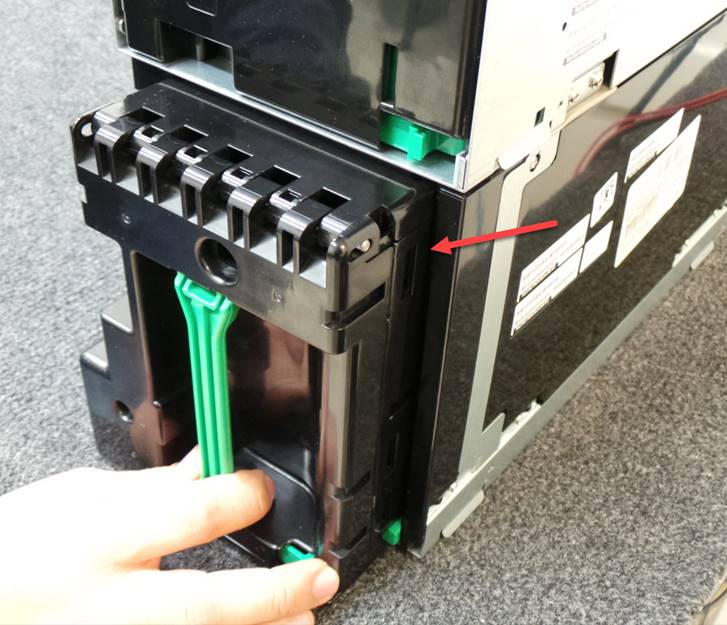
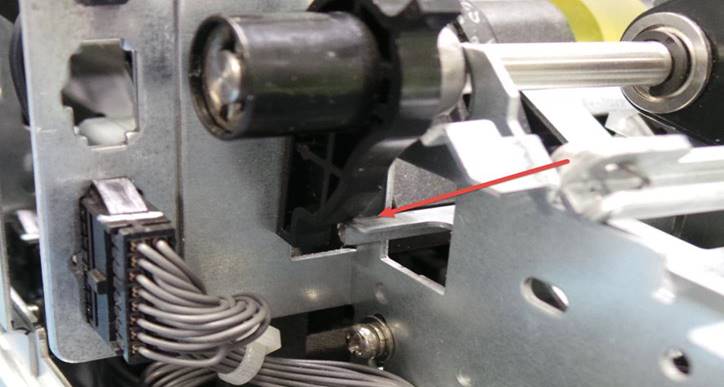
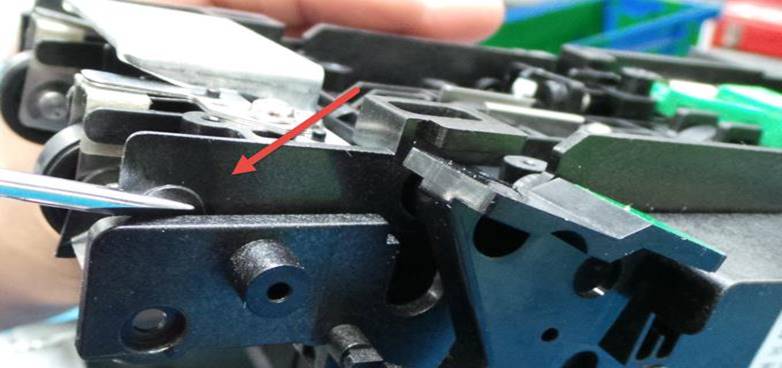
Con ayuda de un desarmador plano retire la base del latch Retire el latch
Use a flat screwdriver to remove the latch base. Remove the latch
|
|
|
Coloque el nuevo latch Coloque el resorte del latch
Place the new latch Attach the latch spring
|
|
|
Coloque la base del latch y presione un poco para asegurarlo en su lugar Coloque los 6 tornillos que sujetan la base a la unidad
Place the base of the latch and press down slightly to secure it in place. Attach the 6 screws that hold the base to the unit.
|
|
|
|
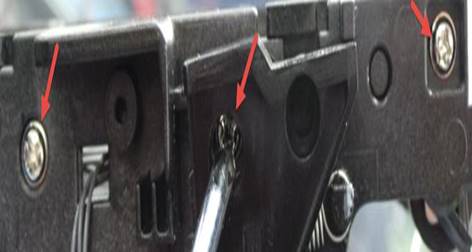
Hay 3 tornillos por lado
There are 3 screws per side
REEMPLAZO DE CABLES INTERMODULOS / INTERMODULE CABLE REPLACEMENT
Retire los 3 tornillos de la placa metálica lateral izquierda Levante la cubierta Retire la placa metálica
Remove the 3 screws from the left side metal plate Lift the cover Remove the metal plate
|
|
|
|

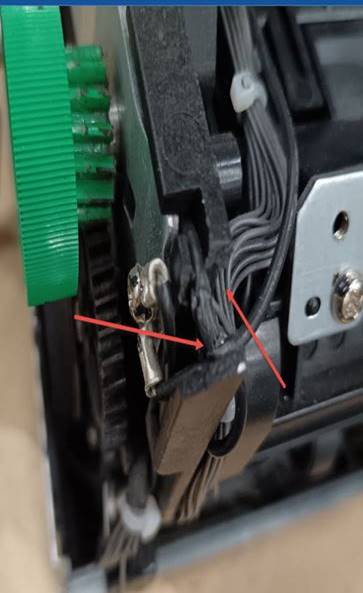
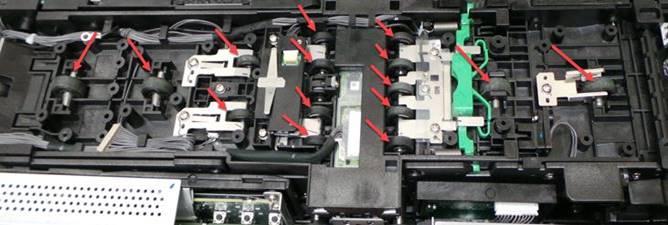
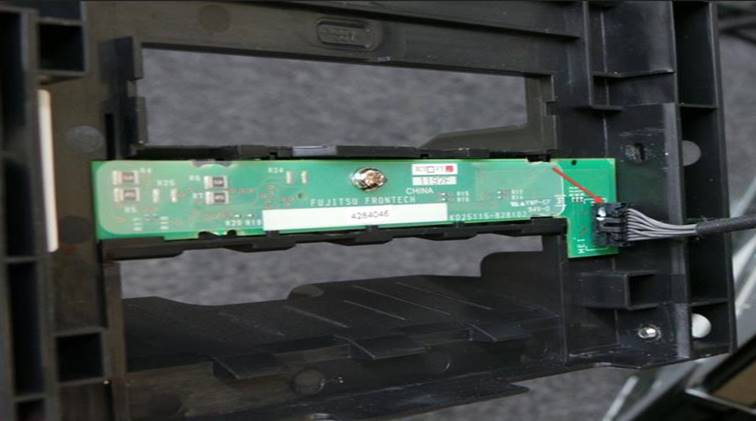
Inserte los cables como se muestra a continuación y asegúrelos en su lugar
Insert the cables as shown below and secure them in place.
|
|
|
|
|
|
Vuelva a colocar la placa metálica asegurándose que la placa quede asegurada en las ranuras y la cubierta superior arriba de ella
Replace the metal plate making sure that the plate is secured in the slots and the top cover on top of it.
|
|
Terminando de realizar el mantenimiento procedemos a probar la unidad
After finishing the maintenance we proceed to test the unit.
Siga las siguientes instrucciones para realizar la prueba
Seleccione Cash Changer
Follow the instructions below to perform the test
Select Cash Changer
Seleccione Fujitsu GSR50
Select Fujitsu GSR50
Espere a que se ejecute el programa
Wait for the program to run
Seleccione Reset
Select Reset
La unidad va a realizar el auto diagnóstico y debe ser sin errores
The unit will perform self-diagnostics and must be error-free.
Ingrese 50 billetes e incluya además 10 cupones.
Ingrese los billetes en cantidades de 20
Primero seleccione Accept Notes
Enter 50 bills and also include 10 vaucher.
Enter bills in quantities of 20
First select Accept Notes
Remueva la caja
Remove the box
|
|
|
Seleccione OK
Select OK
Instale la caja
Install the box
|
|
|
Seleccione OK
Select OK
El bezel encenderá en color verde indicando que la unidad esta lista para aceptar los billetes
The bezel will light green indicating that the unit is ready to accept banknotes.
Coloque los billetes en cantidades de 20 incluyendo billetes de divisa diferente a dólares
Place bills in quantities of 20 including bills of currencies other than dollars
Los billetes de divisa diferente a dólar serán rechazados hacia la parte de abajo del bezel
Non-dollar bills will be rejected towards the bottom of the bezel.
Una vez que haya ingresado los 50 billetes seleccione Disable Acceptor para detener la inserción de billetes
Once you have entered 50 bills select Disable Acceptor to stop inserting bills.
Los leds del bezel se van a apagar indicando que ha terminado la inserción de billetes
The bezel LEDs will turn off indicating that the insertion of banknotes has been completed.
Realice la configuración para dispensar 30 billetes, seleccionando All en todos los recicladores y luego seleccione Dispense
Configure to dispense 30 bills by selecting All on all recyclers and then select Dispense.
La unidad va a empezar a dispensar los billetes en cantidades de 20 en 20 y hay que removerlos del bezel para que continúe dispensando
The unit will begin to dispense bills in quantities of 20 at a time and must be removed from the bezel to continue dispensing
Una vez que los billetes hayan sido enviados a los recicladores seleccione All en todos los recicladores y luego seleccione Purge para purgar todos billetes.
Los billetes serán enviados a la caja de efectivo
Once the bills have been sent to the recyclers select All on all recyclers and then select Purge to purge all bills.
The bills will be sent to the cash box
Remueva la caja de efectivo
Remove the cash box
Retire los billetes de la caja de efectivo
Remove the bills from the cash box
Vuelva a instalar la caja de efectivo
Reinstall the cash box
Seleccione Exit para cerrar el programa
Select Exit to close the program
. NOTA Ya terminada la pruebas con billetes hay que dale un Reset y luego configuración y Runalladd
Para que pueda aceptar el programa de GLORY en el área de calidad
NOTE: Once you've finished testing with banknotes, you'll need to perform a Reset, then Configuration, and Runalladd.
So that the GLORY program can be accepted in the quality area.
Espere a que inicie automáticamente Diagnostic tool
Wait for the Diagnostic tool to start automatically.
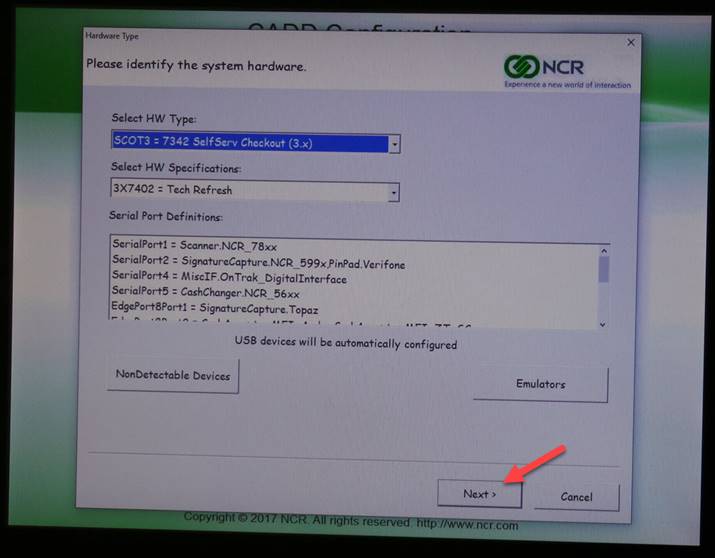
Seleccione Run AllADD
Select Run AllADD

Seleccione Next
Select Next
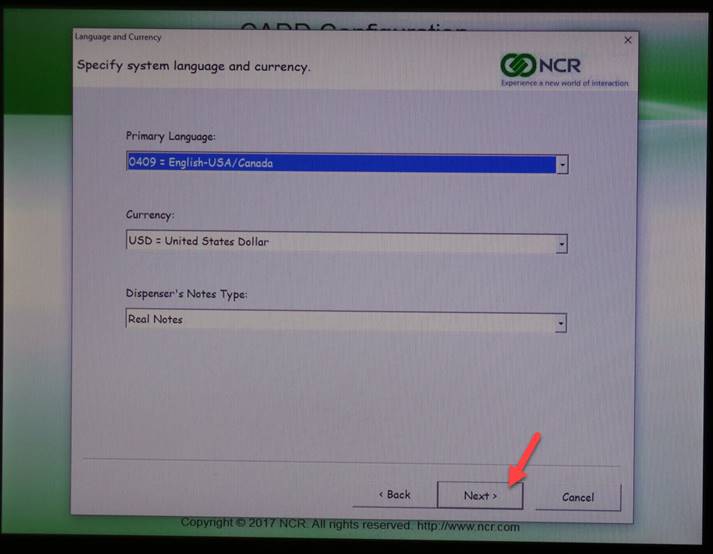
Seleccione Next
Select Next
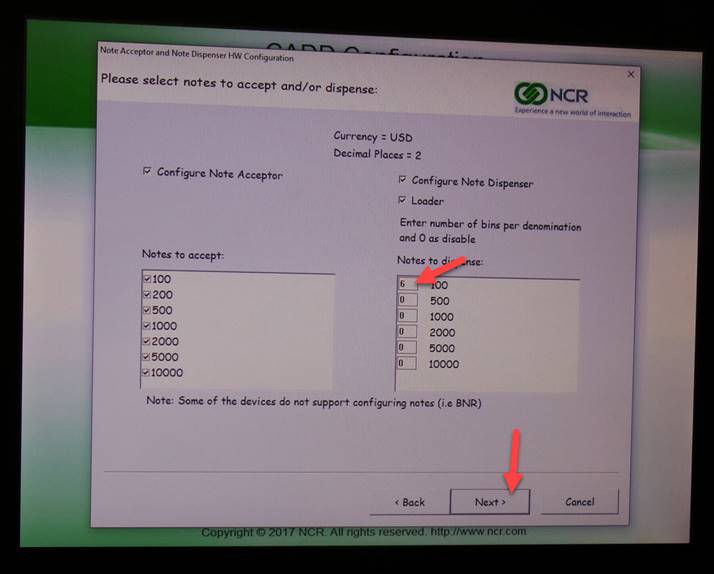
Seleccione 6 y luego Next
Select 6 then Next
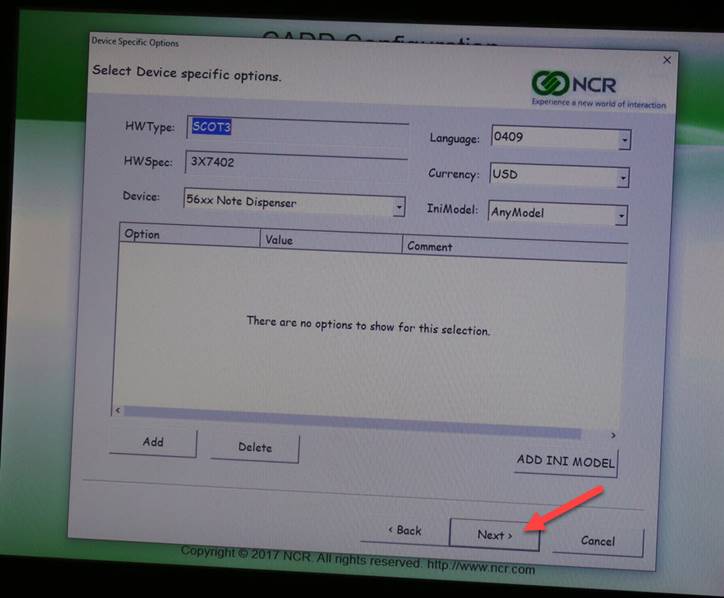
Seleccione Next
Select Next
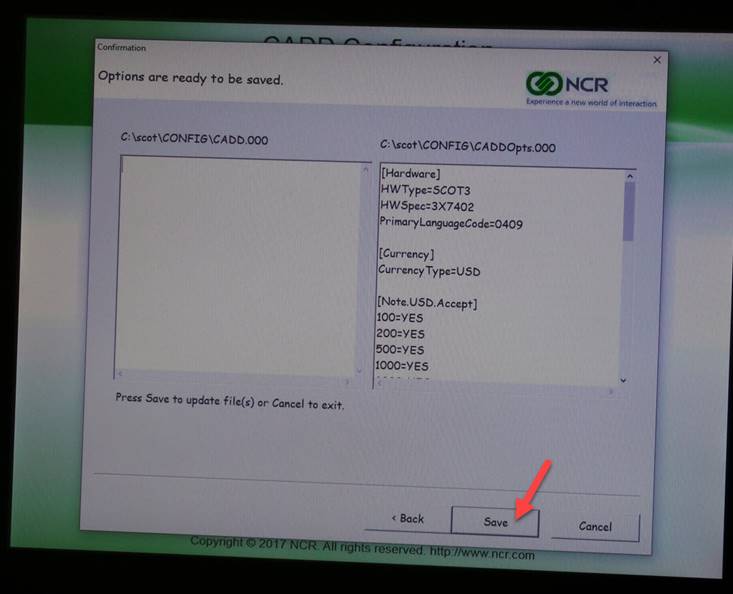
Seleccione Save
Select Save
Espere a que termine la configuración
Wait for the configuration to finish
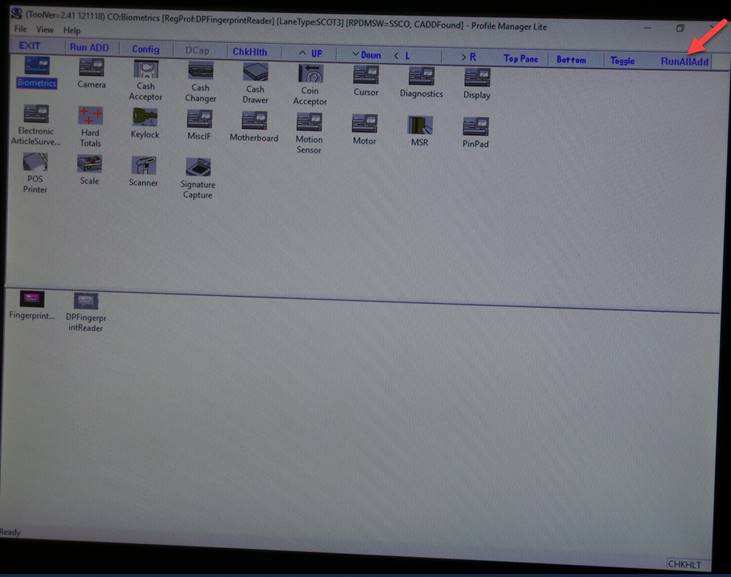
Seleccione Run AllADD
Select Run AllADD
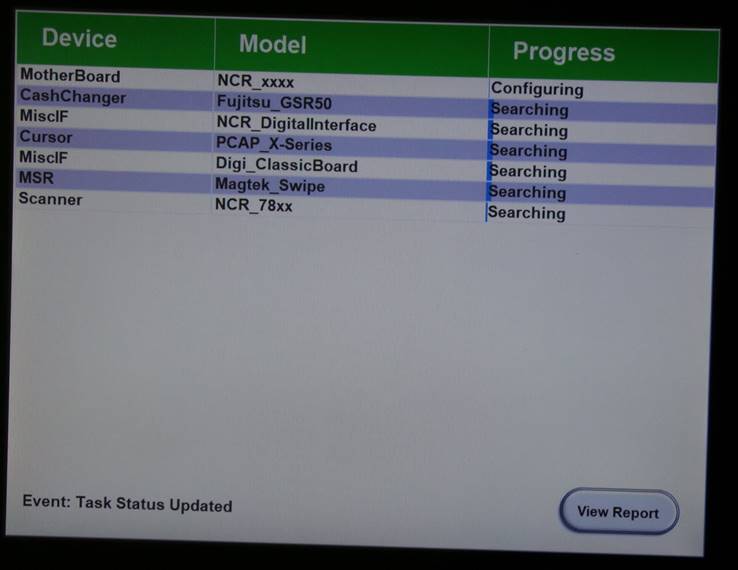
Espere a que termine la configuración
Wait for configuration to finish
Se manda la unidad al área de calidad
The unit is sent to the quality area
El área de calidad probara con el [programa de GLORY
The quality area will test with the [GLORY program
Verificar que la información del track este correcta
Verify that the track information is correct
INSTALACION Y CONFIGURACIÓN / INSTALLATION AND SETUP
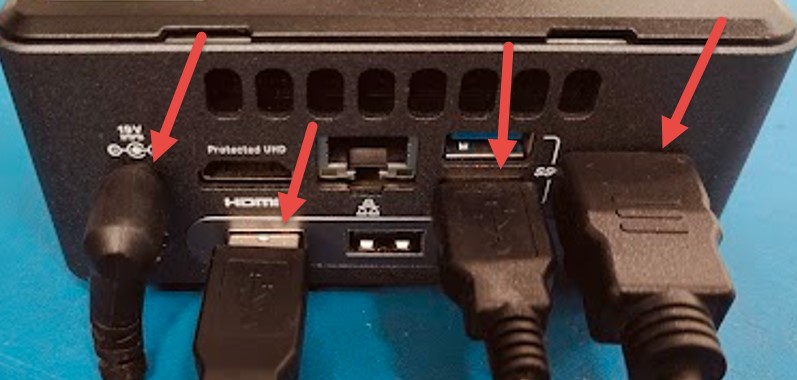
Conexiones de la computadora
1.FUENTE DE ALIMENTACION
2. CONVERTIDOR HDMI
3. PANTALLA TACTIL
4. CONEXIÓN GSR50 USB
PC CONNECTIONS
1. POWER SUPPLY
2. HDMI CONVERTER
3.TOUCH SCREEN
4.GSR50 USB
|
|
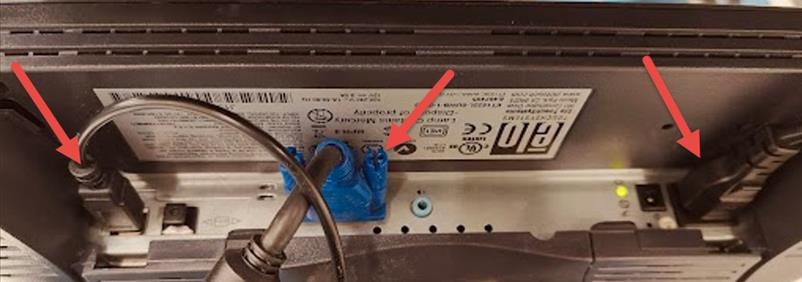
CONEXIONES DEL MONITOR
1. FUENTE DE ALIMENTACION
2. VGA
3. PANTALLA TACTIL
MONITOR CONNECTIONS
1. POWER SUPPLY
2. VGA
3. TOUCH SCREEN
|
|
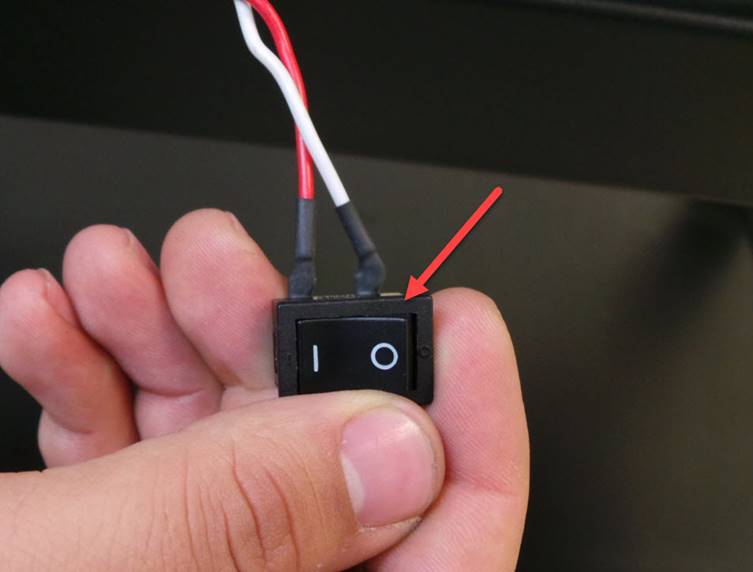
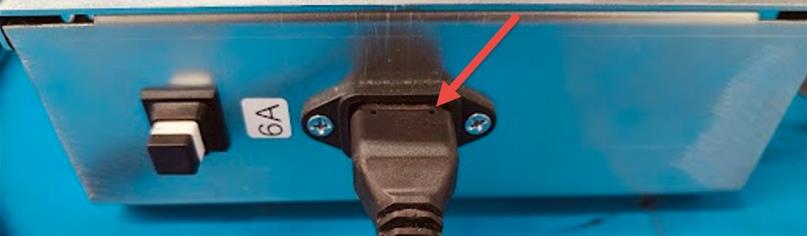
CONEXIONES DE LA FUENTE DE ALIMENTACION
1. ADAPTADOR AC
2. BOTON DE ENCENDIDO/APAGADO
POWER SUPPLY CONNECTIONS
1. AC ADAPTER
2. POWER ON/OFF BUTTON
|
|
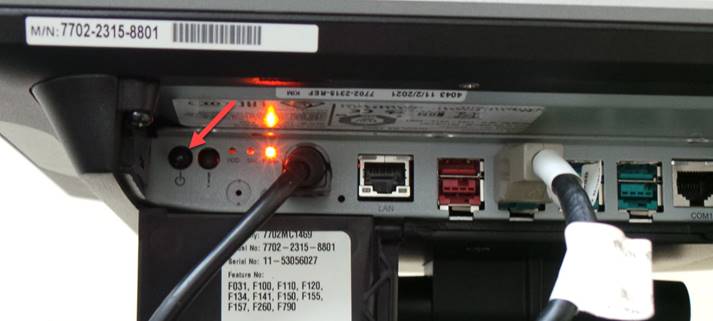
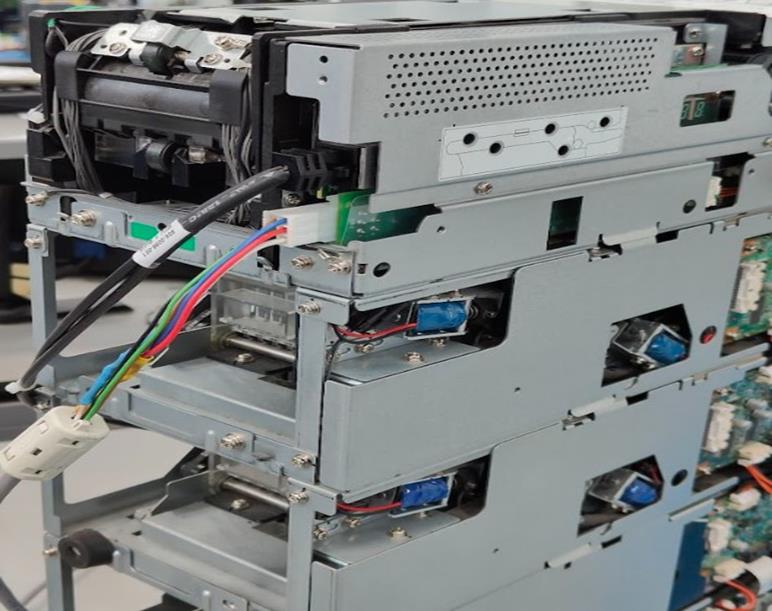
CONEXIONES TOP MODULE
1. CABLE DE COMUNICACIÓN
2. FUENTE DE ALIMENTACION
TOP MODULE CONNECTIONS
1. COMMUNICATION CABLE
2. POWER SUPPLY
|
|
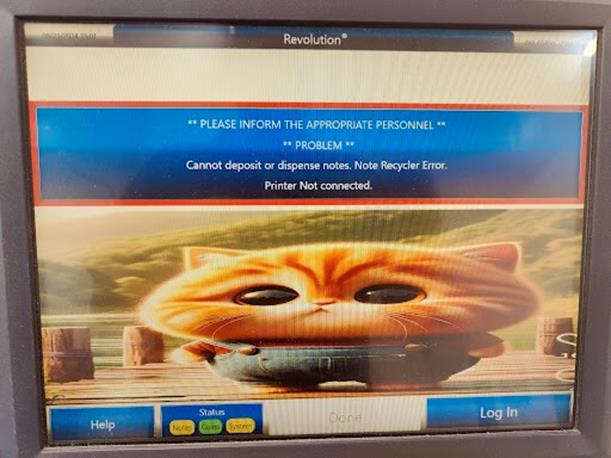
Después de encender la fuente, la computadora de prueba aplicara un reset al top module. Selecciona Status y verifica que la unidad salga OK.
After powering up the power supply, the test computer will apply a reset to the top module. Select Status and verify that the unit displays OK.
|
|
|
Seleccionamos Go Back presiona Log In
We select Go Back Press Log In
|
|
|

Presionamos en el centro de la pantalla para abrir el teclado. Presionamos el número 9 y enter.
We press in the center of the screen to open the
keyboard.
We press the number 9 and
enter. 
|
|
|
Presionamos MORE Luego presionamos ADD Cash para activar la prueba de billetes
We press more. Then we press ADD CASH to activate the banknote test.
|
|
|
Se abre el siguiente menú donde la maquina esta lista para realizar se utilizan billetes de $1 dólar con cupones
la aceptación
The following menu opens where the machine is ready to perform the acceptance $1 dollar bills with coupons will be used
|
|
|
El bezel encenderá en color verde indicando que la unidad Coloque los billetes en cantidades 20 incluyendo los cupones
esta lista para aceptar los billetes
The bezel will light green indicating that the unit is ready to accept banknotes. Place the bills in amounts 20 including the coupons
|
|
|

Los cupones serán rechazados hacia la parte de abajo del bezel Una vez que haya ingresado los 50 billetes seleccione DONE
Coupons will be rejected towards the bottom of the bezel Once you have entered the 50 bills select DONE
|
|
|
Para Dispensar los billetes introducidos seleccionamos Cash Out Seleccione con el teclado la cantidad de billetes que deseas retirar
y selecciona Dispense.
To dispense the inserted bills, select Cash Out select the amount of bills you wish to withdraw using the keyboard and select Dispense.
|
|
|
La unidad entregara los billetes en múltiplos de 20.
The unit will deliver the bills in multiples of 20
|
|
Nota: El personal de reparación y el inspector de calidad deben realizar una inspección visual, asegurándose de que todos los tornillos y cubiertas estén bien colocados, que no tenga cables expuestos, piezas rotas o faltantes, además de sonaja ni piezas sueltas dentro de la unidad, sin pasar por alto la limpieza (vidrio, rodillos, correas, según corresponda).
Note: Repair personnel and the quality inspector should perform a visual inspection, ensuring that all screws and covers are secure, that there are no exposed wires, broken or missing parts, and no rattles or loose parts inside the unit, including cleaning (glass, rollers, belts, as applicable).
Terminada la prueba correctamente la unidad se manda Al área de almacén
Once the test is completed correctly, the unit is sent to the warehouse area.
|
|
WI#:1420 |
Originator/ Originador: Freddy Avila |
||||
|
Rev / revisión: 2 |
Rev Date/ fecha de reviaión: 28-03/2025 |
Name/ Nombre: Freddy Avila |
Update: New document / Nuevo documento |
Next Review/ Próxima Revision: NA |
Approval/ Aprobado Por: Tom St John |
|
|
3 |
06/18/2025 |
H Bailón |
Note: Test with different denominations. |
NA |
Tom St John |
|
|
4 |
07/30/2025 |
H Bailón |
Parts Numbers: KD04011 R901/KD04011-C301 |
NA |
Tom St John |
|