WI# 1306
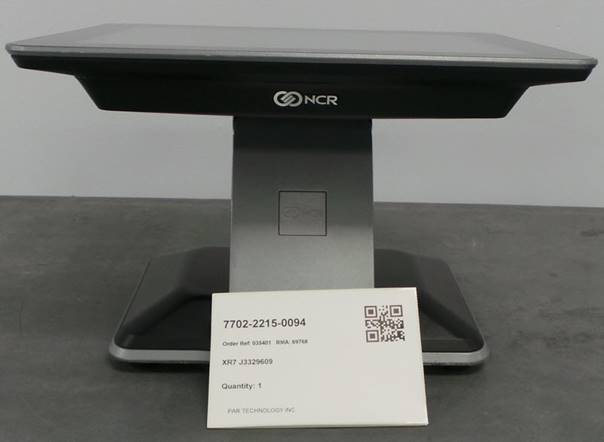
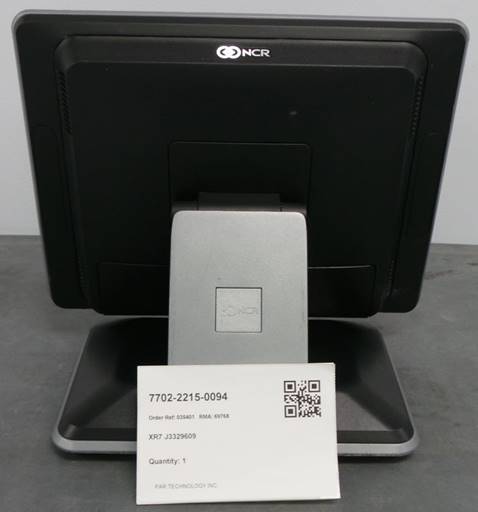
7702-2215-0094
|
|
|
|
|
|
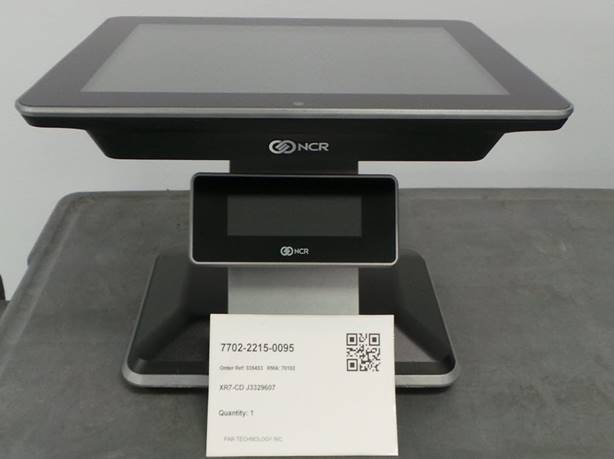
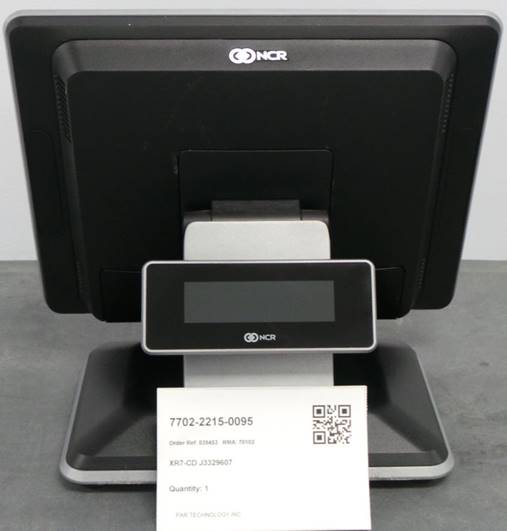
7702-2215-0095
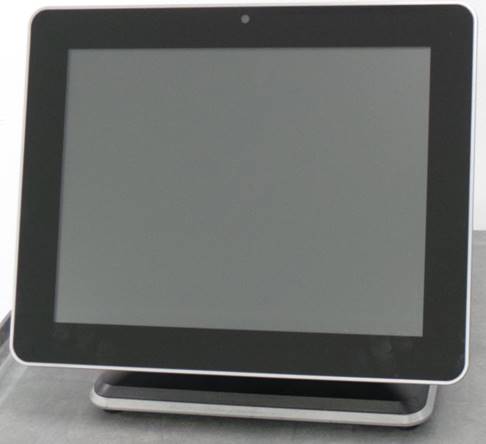
INSPECCION INICIAL / INITIAL INSPECTION
Realice una inspección visual en busca de partes dañadas o quebradas.
Perform a visual inspection for damaged or broken parts.
Instale un teclado y un ratón.
Install a keyboard and a mouse.
Conecte el cable de corriente y encienda la unidad presionando el botón de On-Off.
Plug in the power cord and turn on the unit by pressing the On-Off button.
|
|
|

Espere a que la unidad encienda.
Wait for the unit to turn on.
Apague la unidad.
Turn off the unit.
Desconecte el cable de alimentación de corriente.
Disconnect the power supply cable.
Desinstale el teclado y el ratón.
Uninstall the keyboard and mouse.
Desconecte la fuente de poder.
Disconnect the power source.
PRUEBAS / TESTS
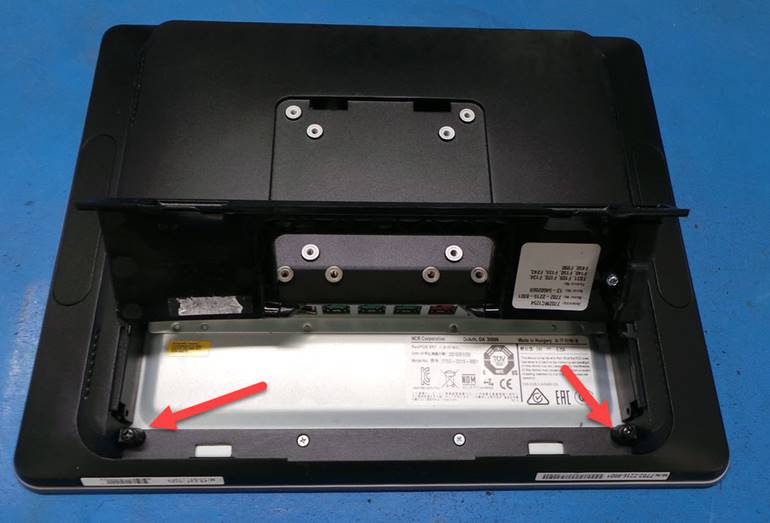
Coloque la unidad con la pantalla hacia abajo.
Place the unit with the screen facing down.
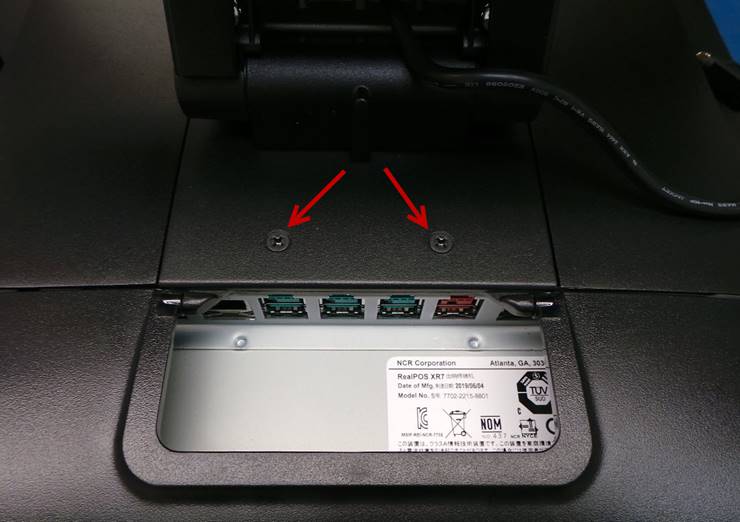
Retire los 2 tornillos señalados en la imagen:
Remove the 2 screws indicated in the image:
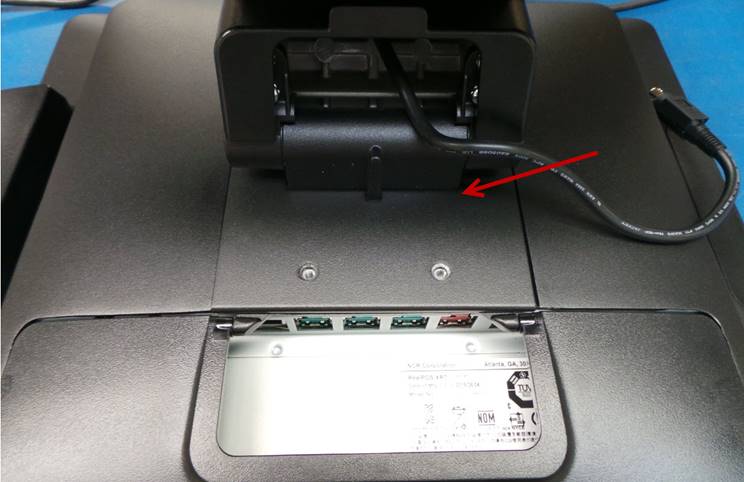
Desinstale la base.
Uninstall the base.
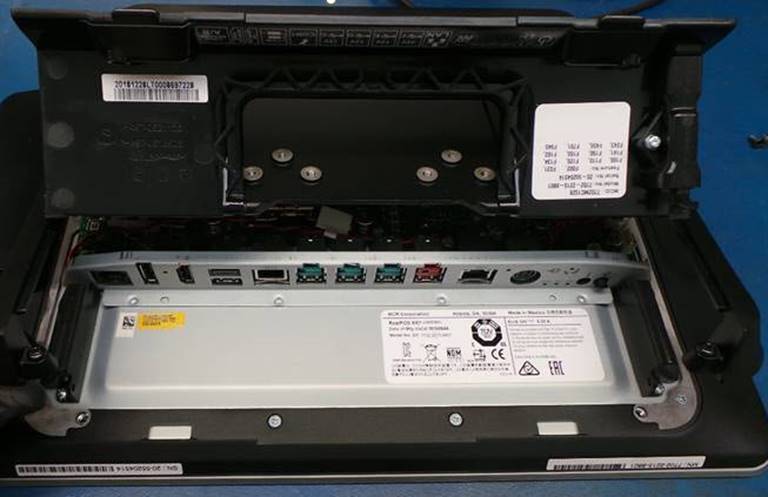
Destornille los tornillos señalados en la imagen:
Unscrew the screws indicated in the image:
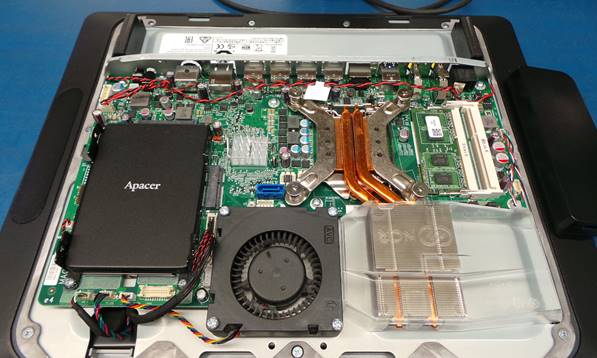
Levante la cubierta para tener acceso a la Tarjeta Madre.
Lift the cover to access the Motherboard.

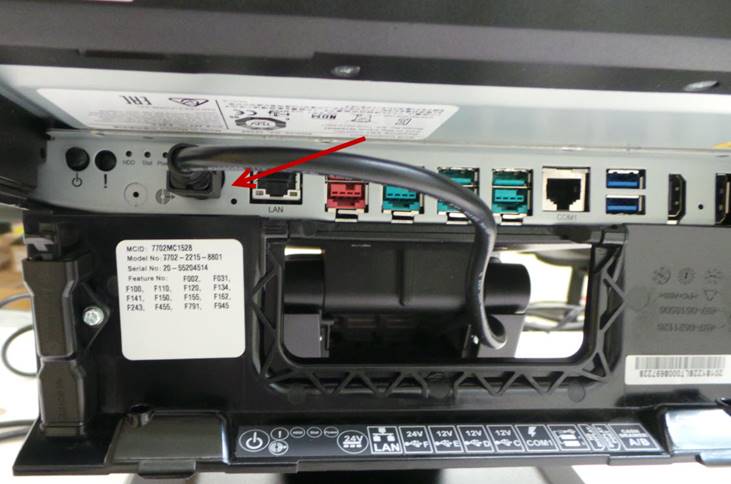
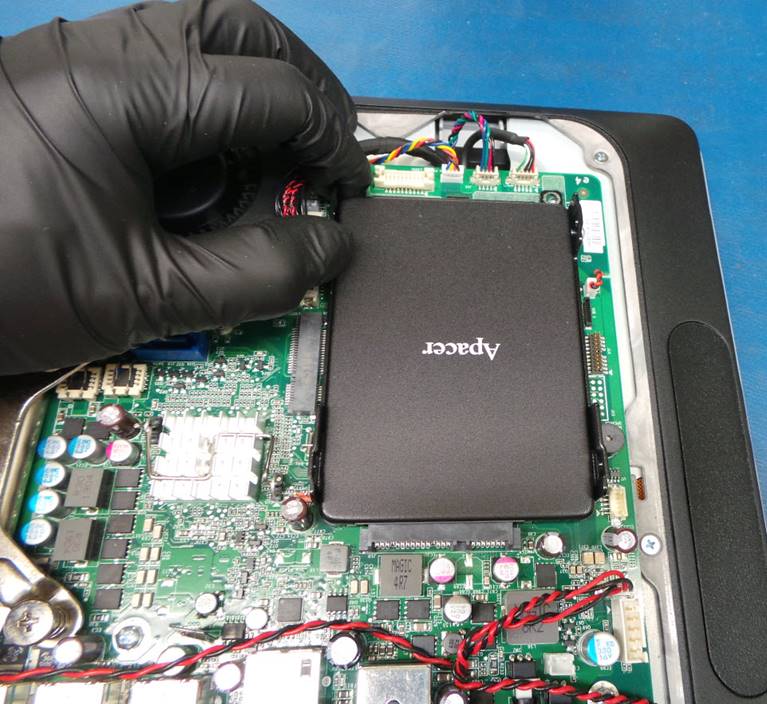
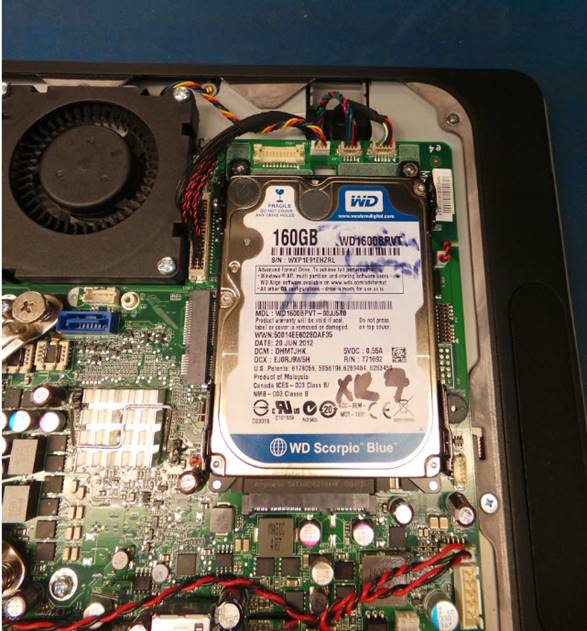
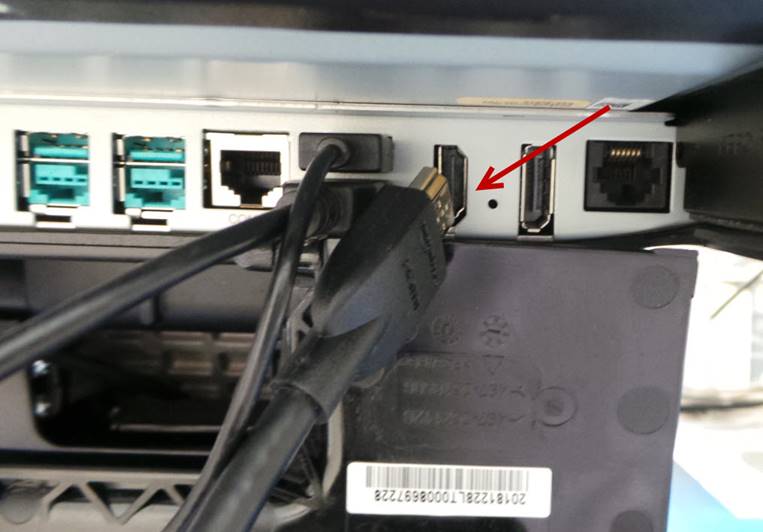
Localice el disco duro, retire los 2 tornillos señalados en la imagen.
Locate the hard drive, remove the 2 screws indicated in the image.
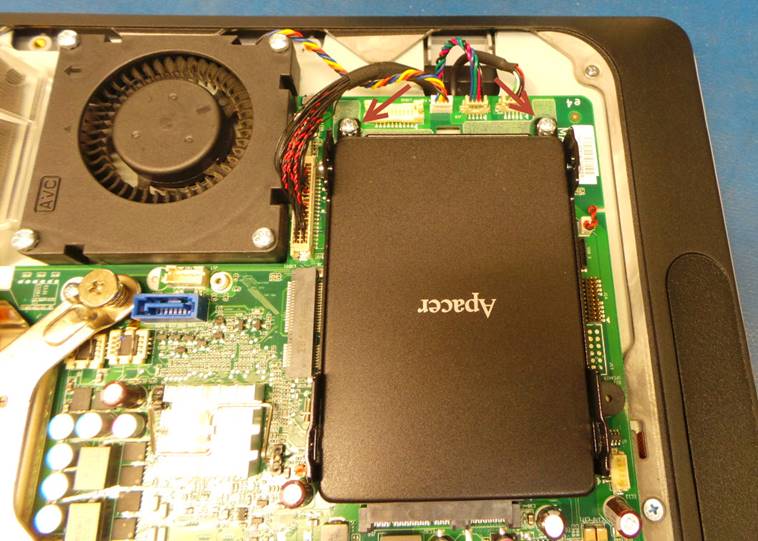
Deslice ligeramente hacia atrás para desinstalarlo de la Tarjeta Madre.
Slide back slightly to uninstall it from the Motherboard.
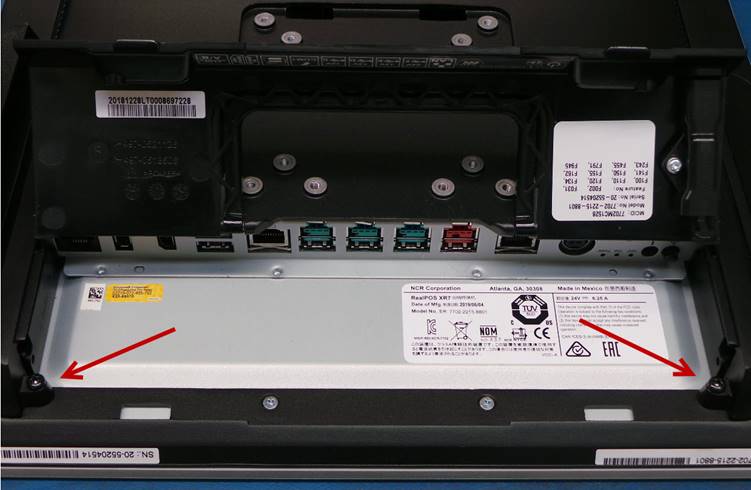
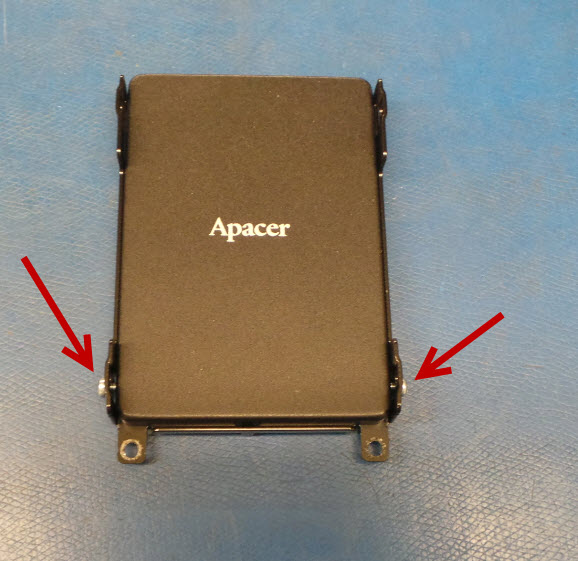
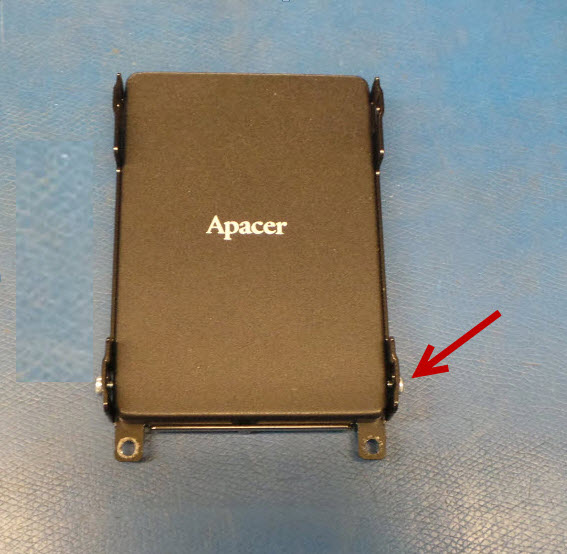
Desinstale el disco duro de la base retirando los tornillos señalados en la imagen:
Uninstall the hard drive from the base by removing the screws indicated in the image:
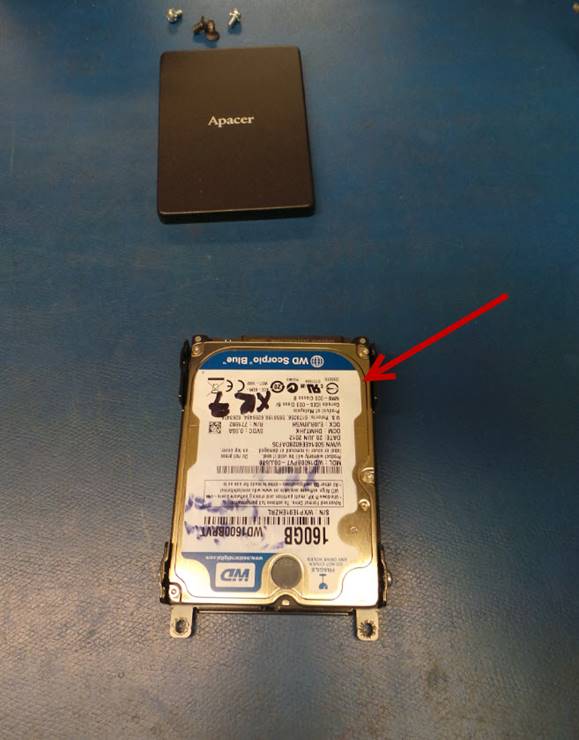
Instale en la base el disco duro de prueba.
Install the test hard drive into the base.
Instale el disco duro en la Tarjeta Madre.
Install the hard drive on the Motherboard.
Instale los 2 tornillos.
Install the 2 screws.

Realice una inspección visual en la Tarjeta Madre.
Perform a visual inspection on the Motherboard.
En caso de que encuentre capacitores reventados, reemplácelos.
In case you find busted capacitors, replace them.
Instale un teclado y un ratón.
Install a keyboard and a mouse.
Conecte la fuente de poder y encienda la unidad presionando el botón de On-Off.
Plug in the power cord and turn on the unit by pressing the On-Off button.
Espere a que la unidad encienda.
Wait for the unit to turn on.
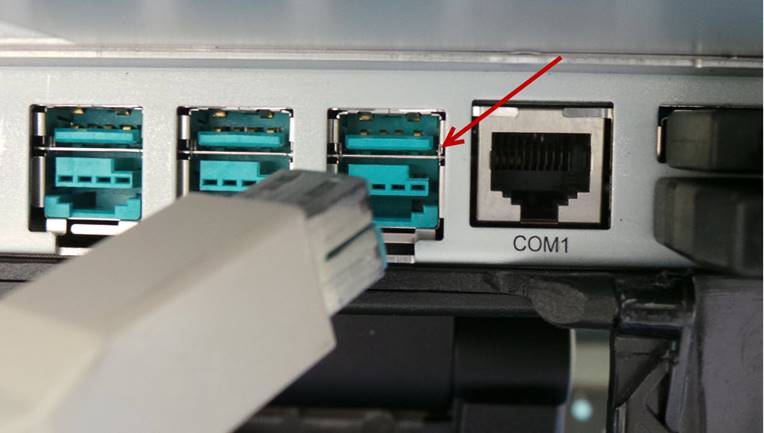
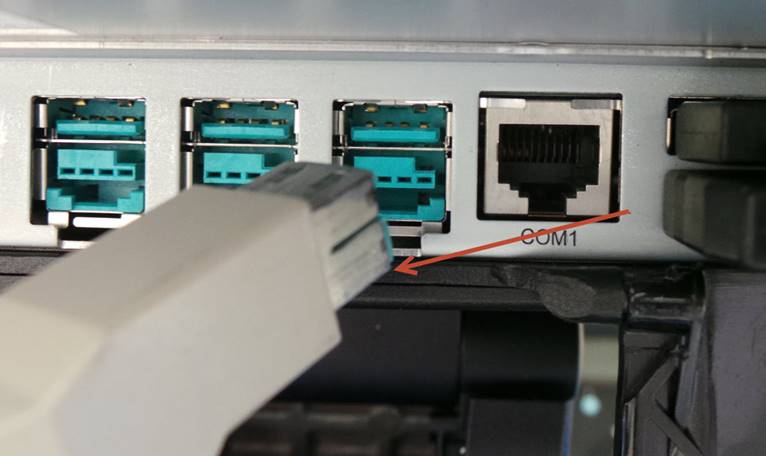
Aplique calor a la resistencia y al capacitor que están junto a Q30 y Q31 por aproximadamente 5 segundos.
Apply heat to the resistor and capacitor next to Q30 and Q31 for approximately 5 seconds.
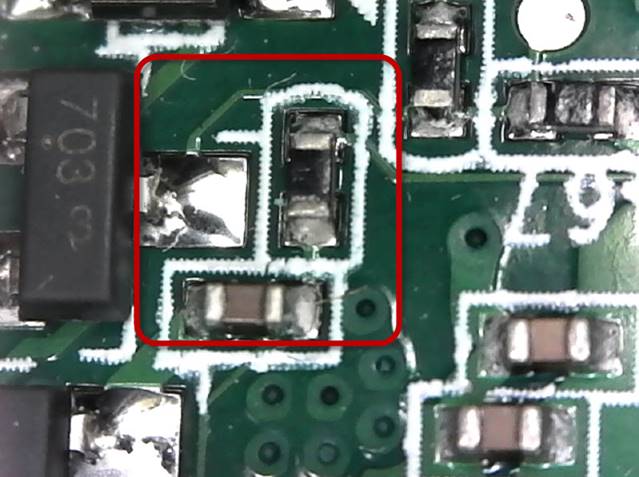
En caso de que la unidad no se apague al aplicarle calor, continúe con las pruebas.
In case the unit does not turn off when heat is applied, continue testing.
Si la unidad se apaga al aplicarle calor:
-Apague por completo la unidad y desconecte la fuente de poder, aplique flux y re-solde la resistencia y el capacitor
-Realice todas las pruebas a la unidad.
If the unit shuts down when heat is applied:
-Turn off the unit completely and disconnect the power source, apply flux and re-solder the resistor and the capacitor
-Perform all tests on the unit.
Coloque la cubierta y ajuste los tornillos.
Install the cover and tighten the screws.

Instale la base y ajuste los tornillos.
Install the base and tighten the screws.

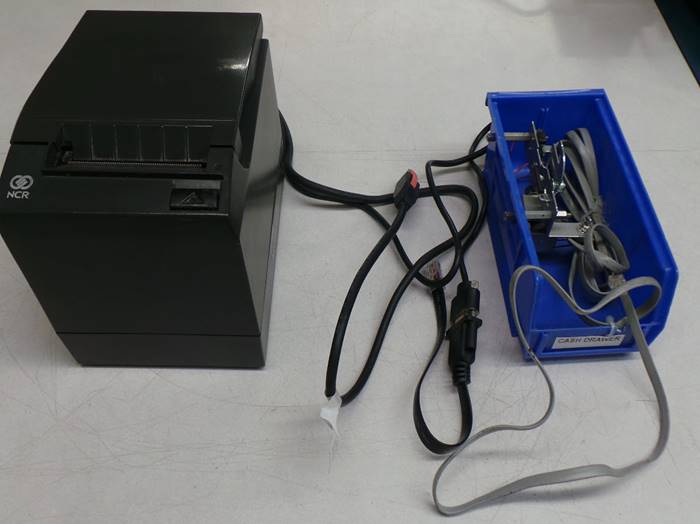
Ubique la impresora 7197 y el simulador de la caja de efectivo.
Locate the 7197 printer and the cash box simulator.
Conecte la fuente de poder.
Connect the power source.
Instale el ratón y el teclado.
Install the mouse and keyboard.
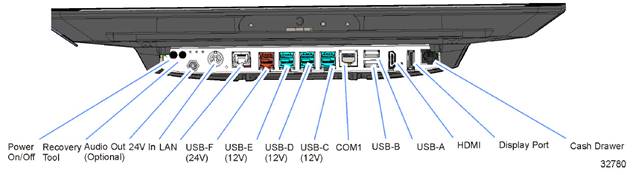
Instale la impresora al puerto de 24 Voltios.
Install the printer to the 24 Volt port.
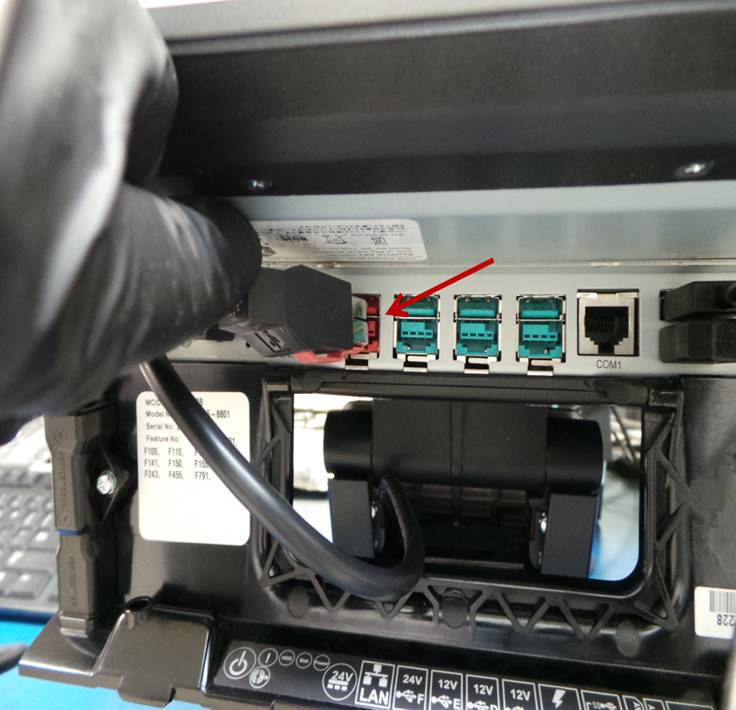
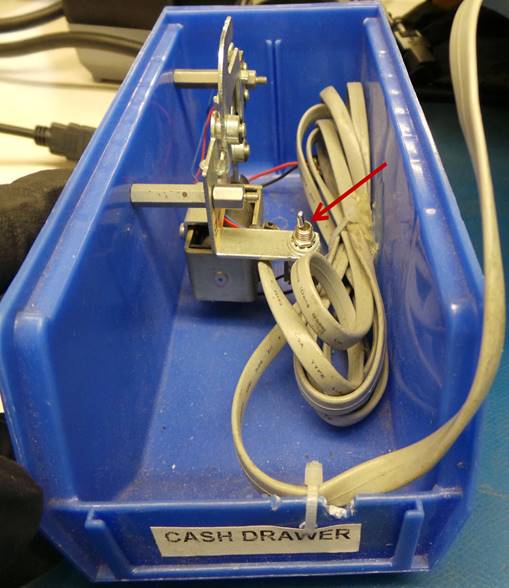
Instale el simulador de la caja en el puerto de Cash Drawer.
Install the box simulator in the Cash Drawer port.
Conecte el cable de alimentación de corriente y encienda la unidad.
Plug in the power cord and turn on the unit.
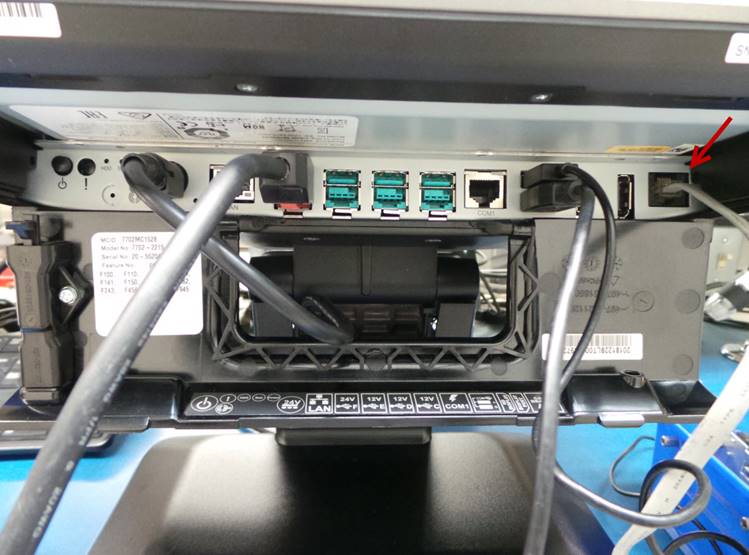
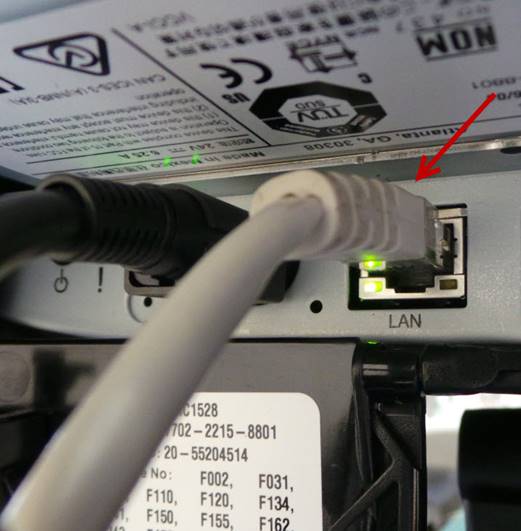
Instale el cable de Ethernet.
Install the Ethernet cable.
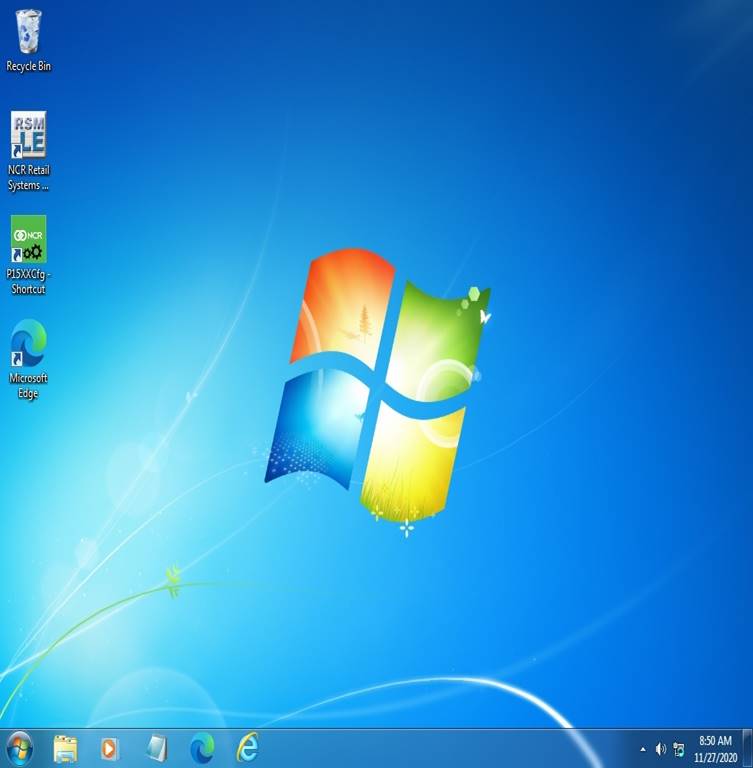
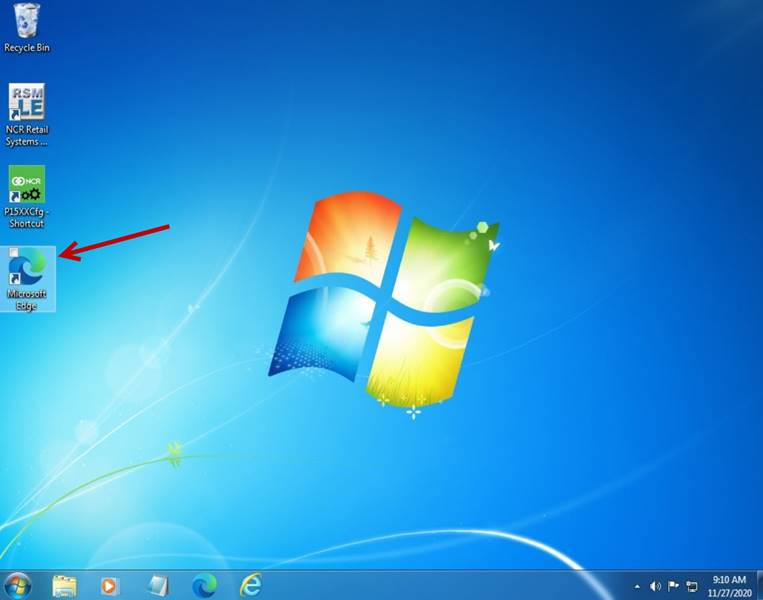
Ubique y ejecute el icono de Microsoft Edge.
Locate and run the Internet Explorer icon.
La página de inicio de Internet será desplegada.
The Internet home page will be displayed.
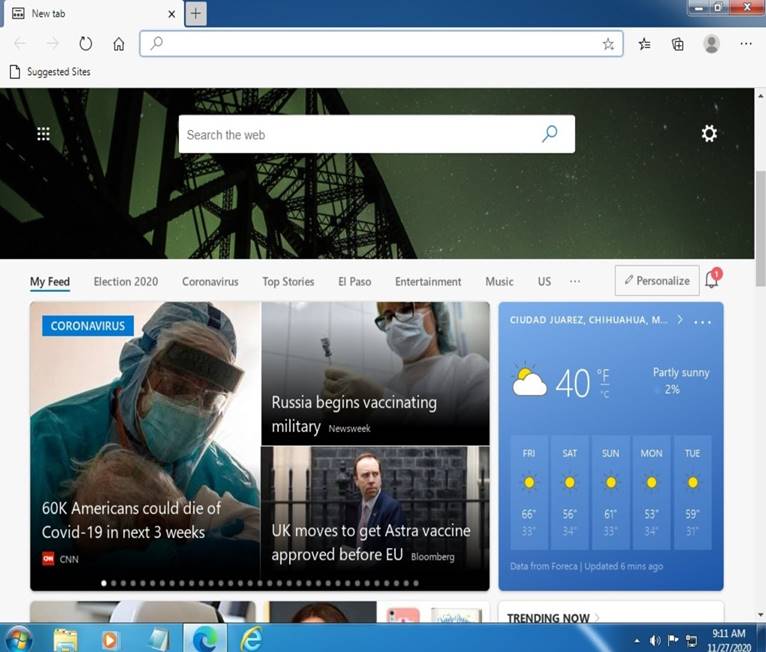
Cierre la página de internet.
Close the website.
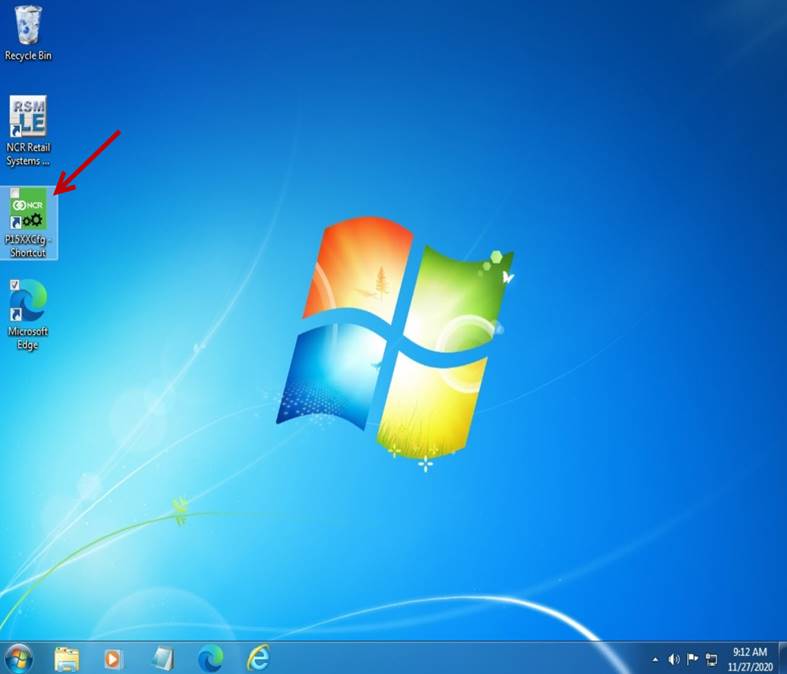
Ejecute el icono P15XXCfg-Shortcut
Run the P15XXCfg-Shortcut icon
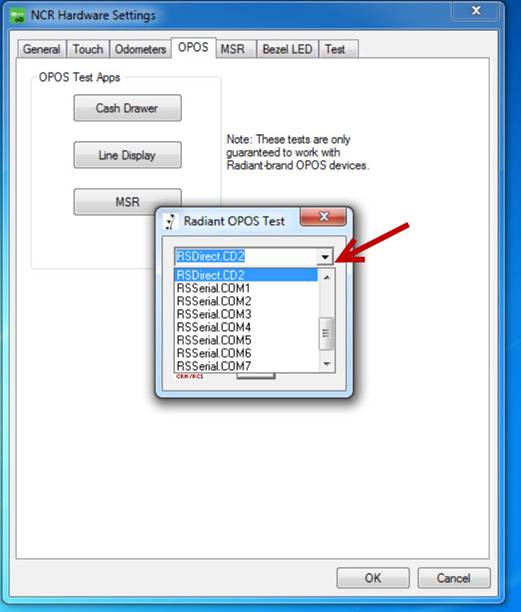
Seleccione – Select OPOS
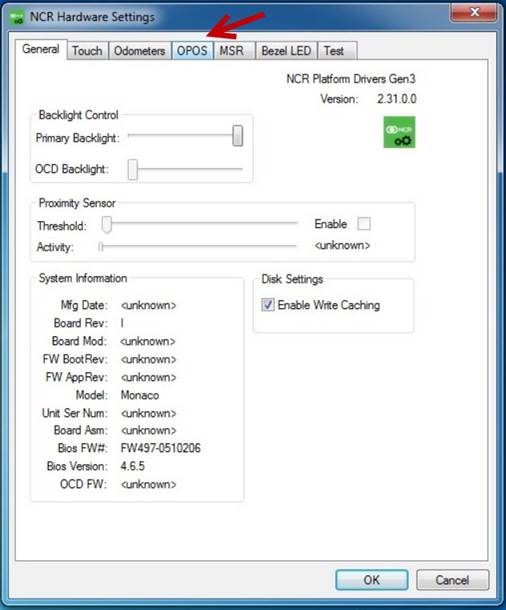
Seleccione – Select Cash drawer
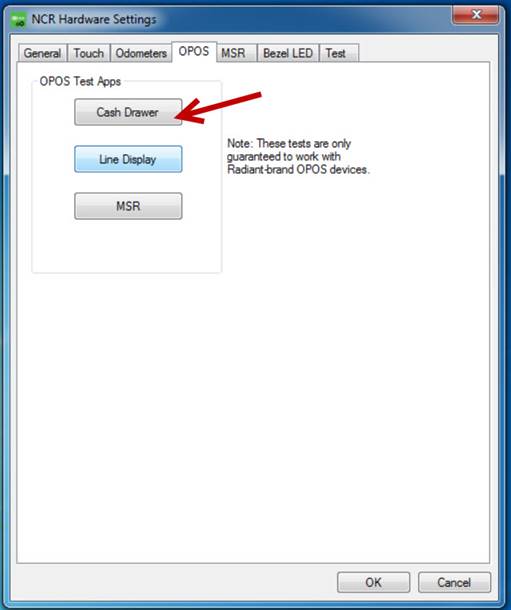
Seleccione – Select RSDirect.CD1
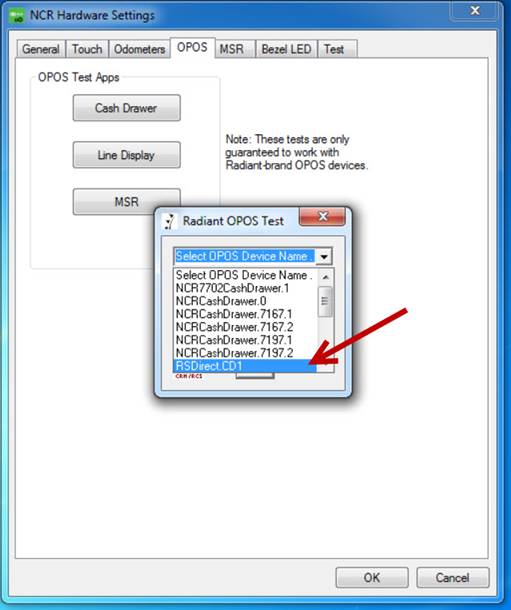
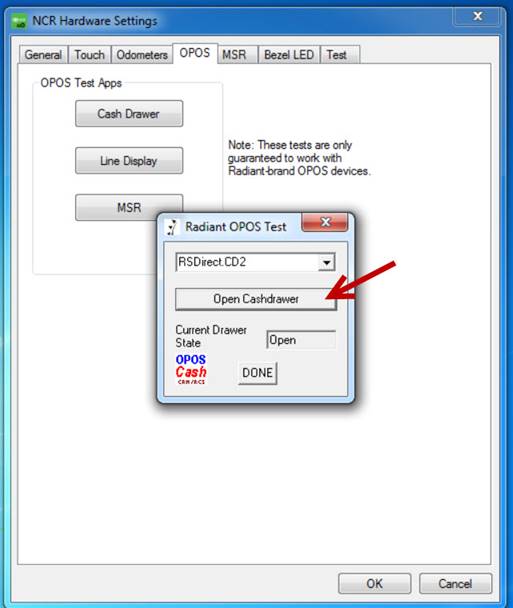
Seleccione – Select Open Cashdrawer
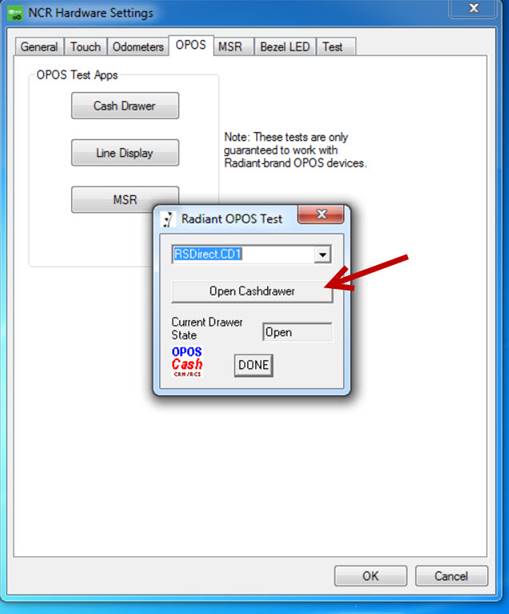
El simulador de la caja se debe abrir, cierre manualmente el simulador y repita la prueba varias veces.
The box simulator must open, manually close the simulator and repeat the test several times.
Cambie a posición B el interruptor del simulador de la caja.
Set the box simulator switch to position B.
Seleccione – Select RSDirect.CD2
Seleccione – Select Open Cashdrawer
El simulador de la caja se debe abrir, cierre el simulador de la caja manualmente y repita la prueba varias veces.
The box simulator must open, close the box simulator manually and repeat the test several times.
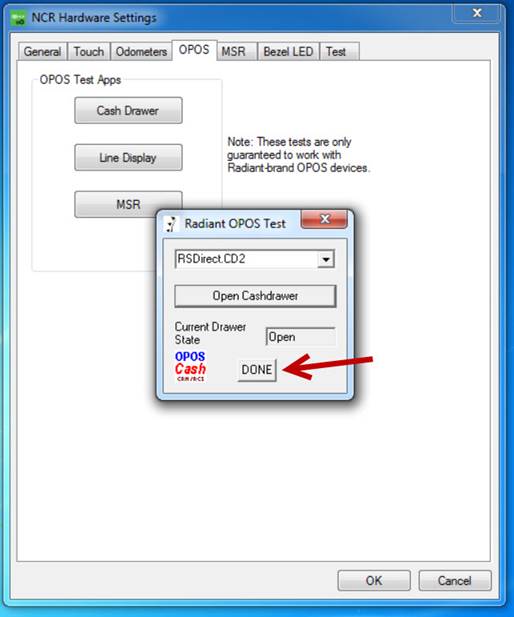
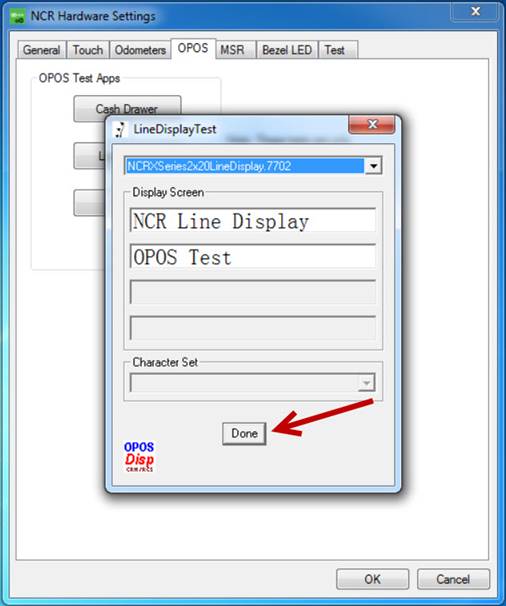
Seleccione – Select Done
Seleccione – Select Line Display
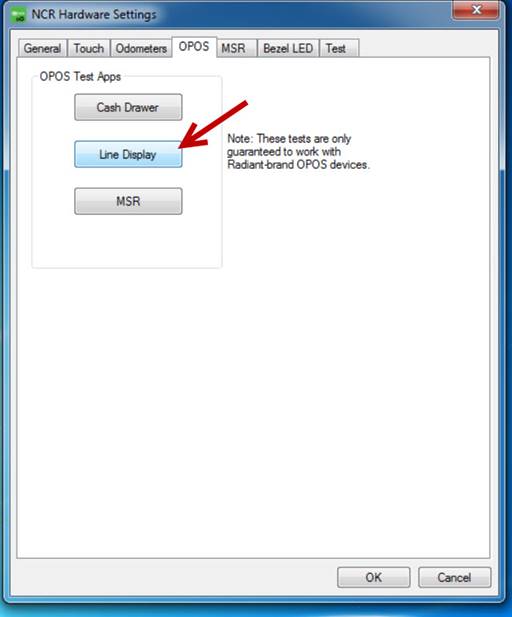
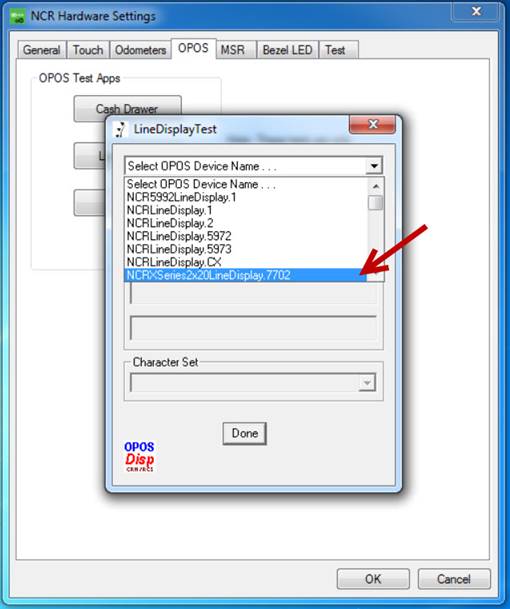
Seleccione – Select NCRXSeries2x20LineDisplay.7702
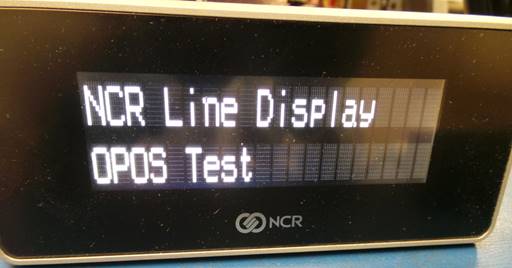
En la pantalla se desplegará el mensaje: NCR Line Display OPOS Test
The screen will display the message: NCR Line Display OPOS Test
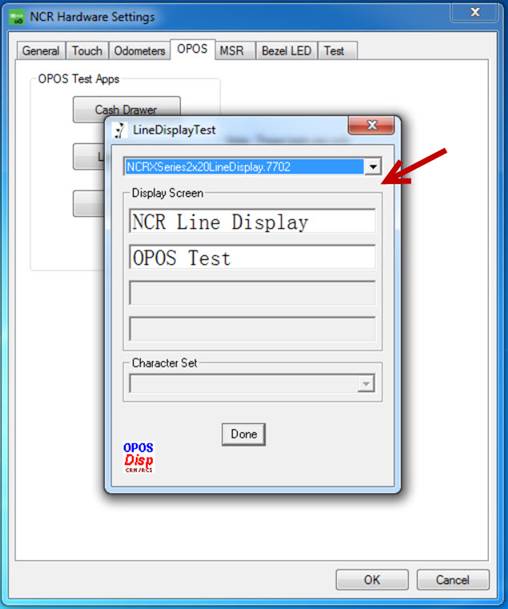
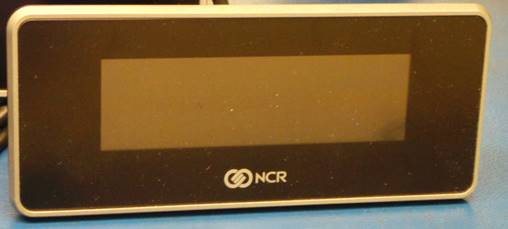
Revise que en el display también se ha desplegado el mensaje: NCR Line Display OPOS Test.
Check that the message has also been displayed on the screen: NCR Line Display OPOS Test.
Seleccione – Select Done
El display se debe apagar.
The display should turn off.
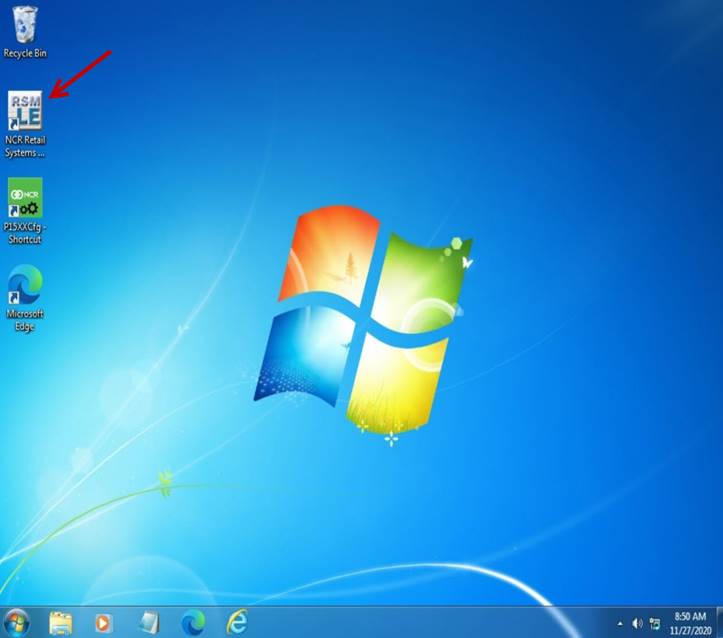
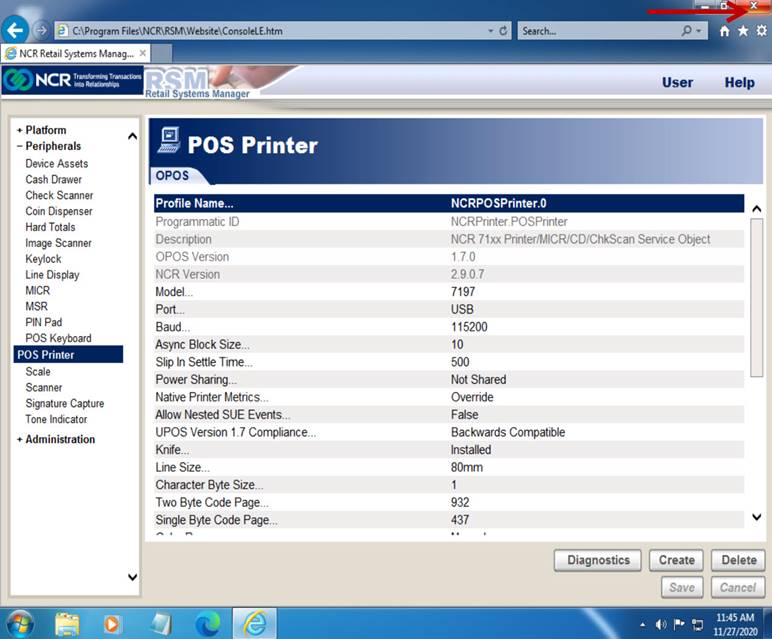
Ubique en el escritorio el icono NCR Retail Systems y ejecútelo.
Locate the NCR Retail Systems icon on your desktop and launch it.
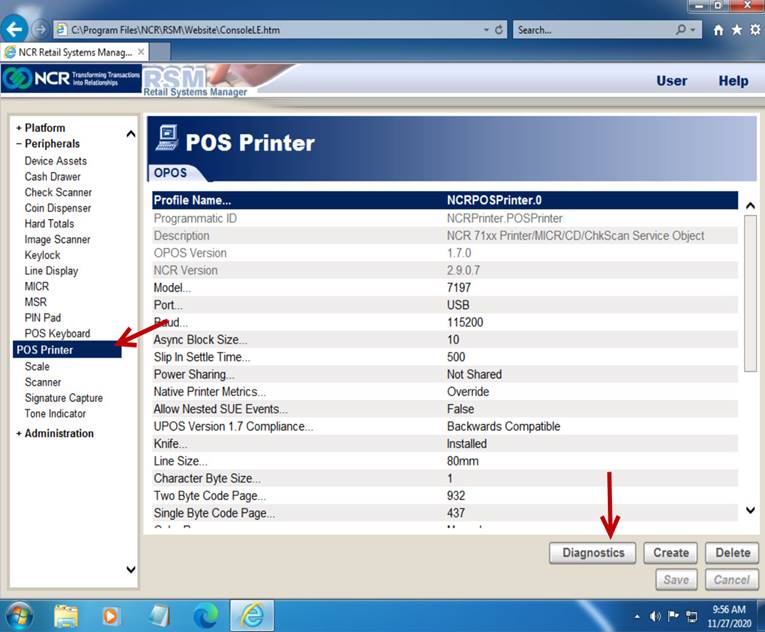
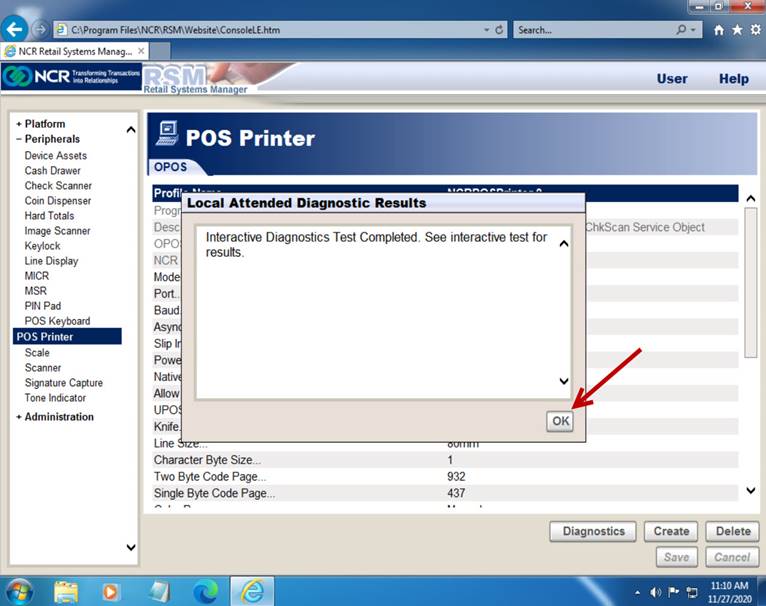
Seleccione POS Printer y luego seleccione Diagnostics.
Select POS Printer and then select Diagnostics.
Seleccione – Select Local Attended
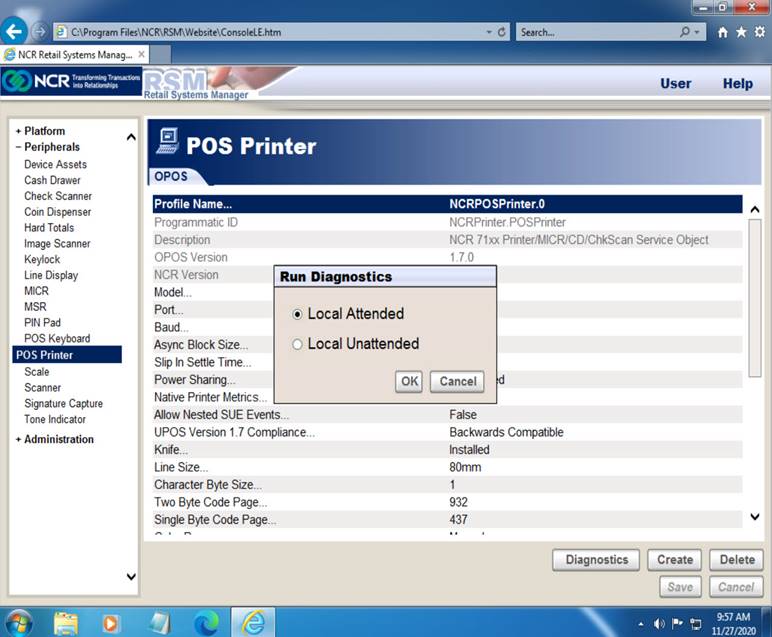
Seleccione – Select Print
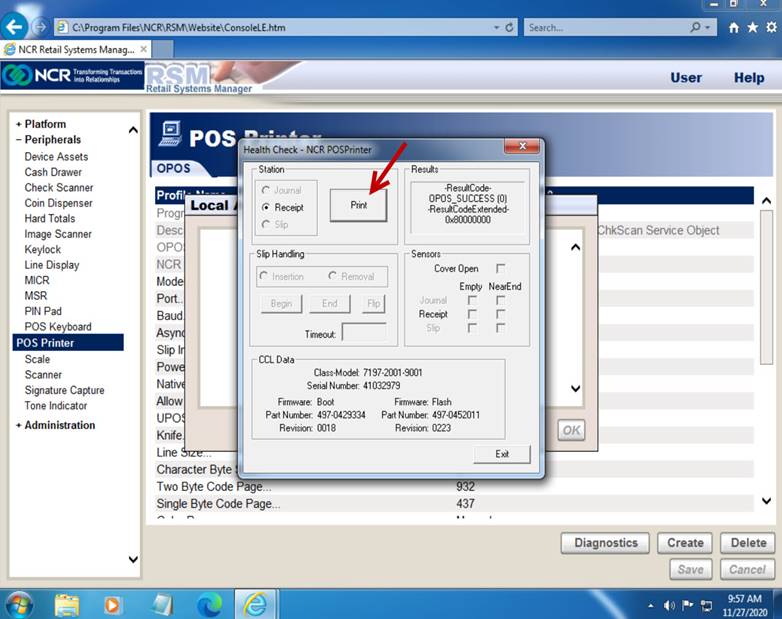
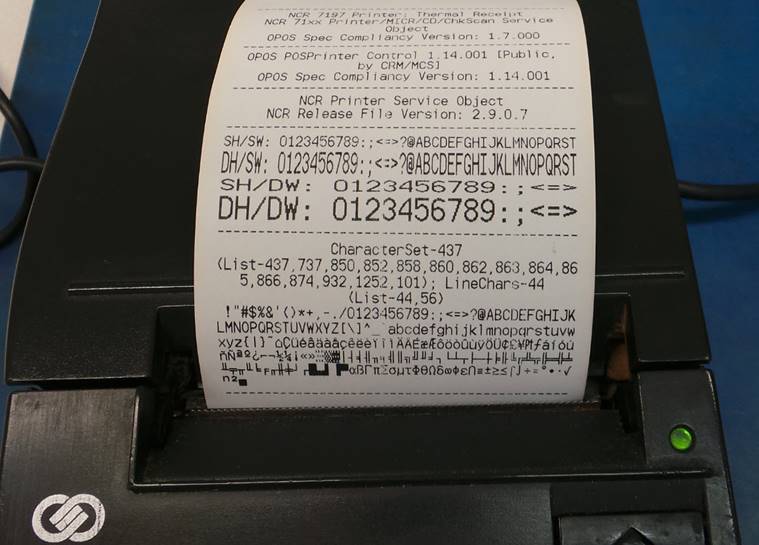
La impresora imprimirá el recibo de demostración.
The printer will print the demo receipt.
Seleccione – Select Exit
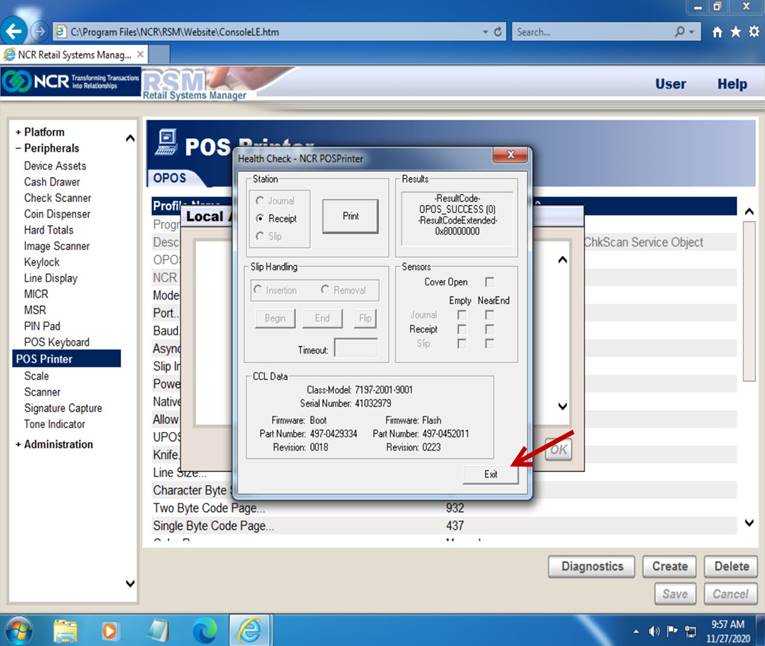
Seleccione – Select OK
Cierre el programa.
Close the program.
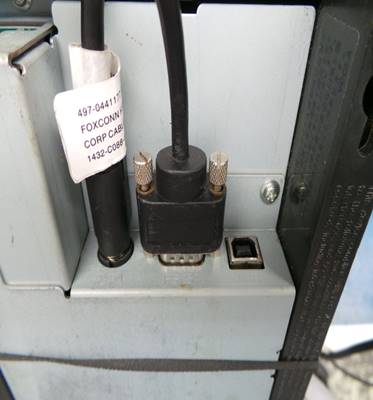
Desconecte el cable USB de la impresora y desconecte el cable del puerto rojo (24V) para apagarla.
Disconnect the USB cable from the printer and disconnect the cable from the red port (24V) to turn it off.
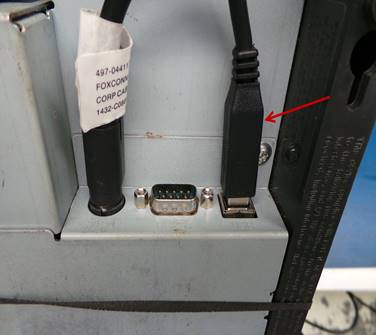
Conecte el cable del puerto RS232 en la impresora y conecte el cable rojo (24V) para encender la impresora.
Connect the RS232 port cable on the printer and connect the red cable (24V) to turn on the printer.

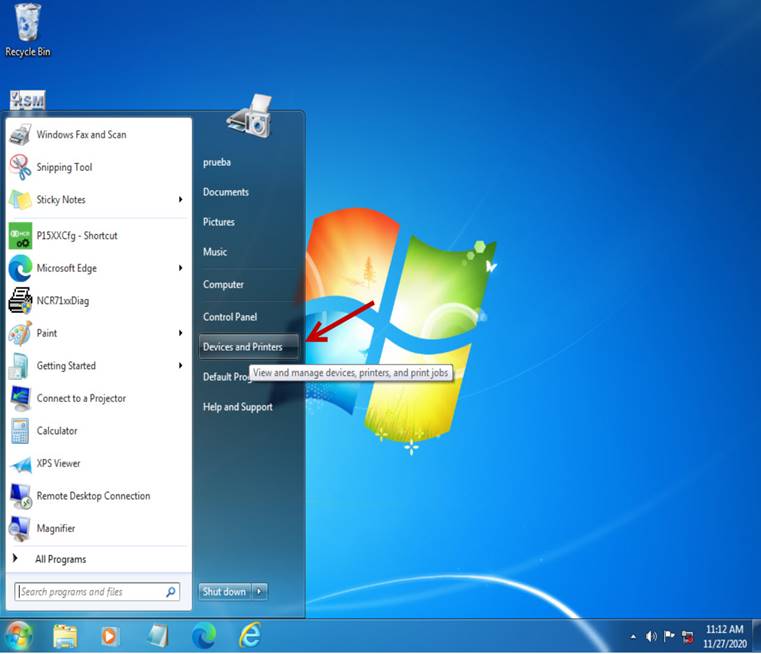
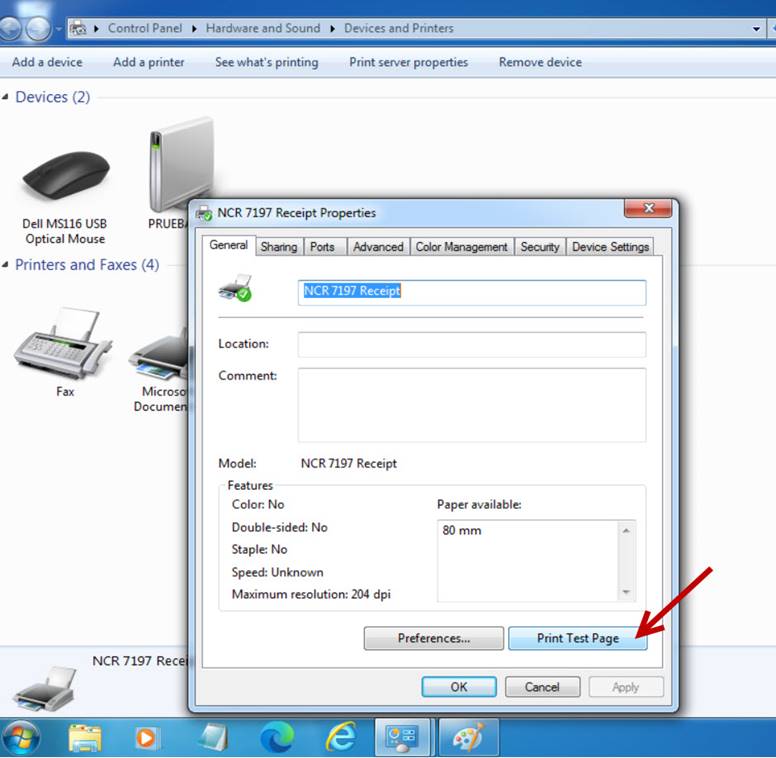
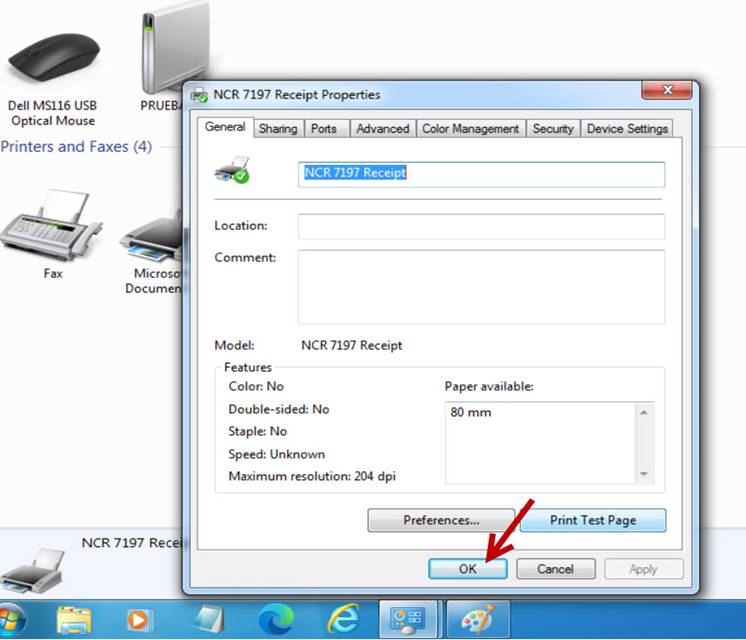
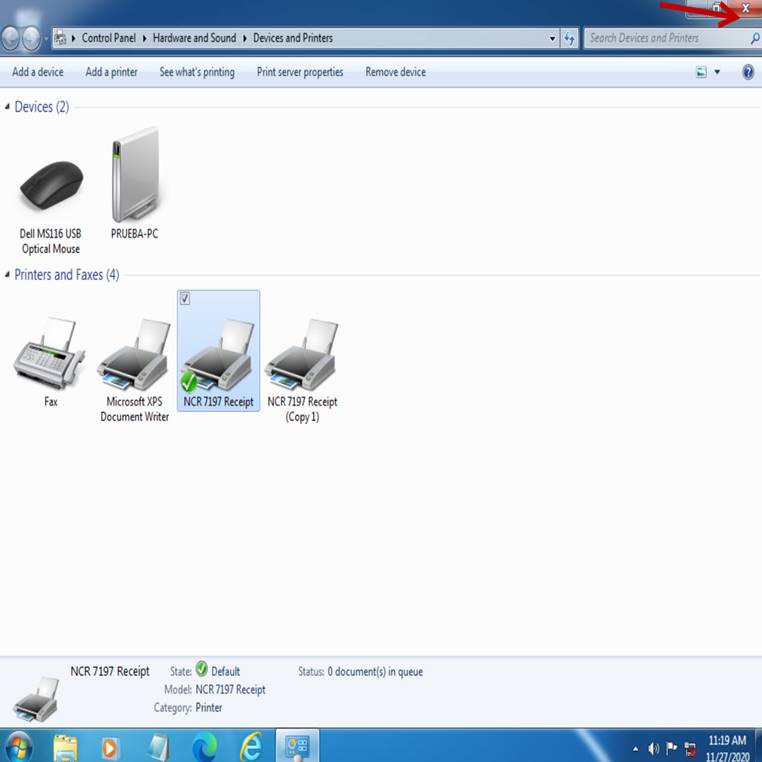
Seleccione Inicio à Devices and Printers
Select Start à Devices and Printers
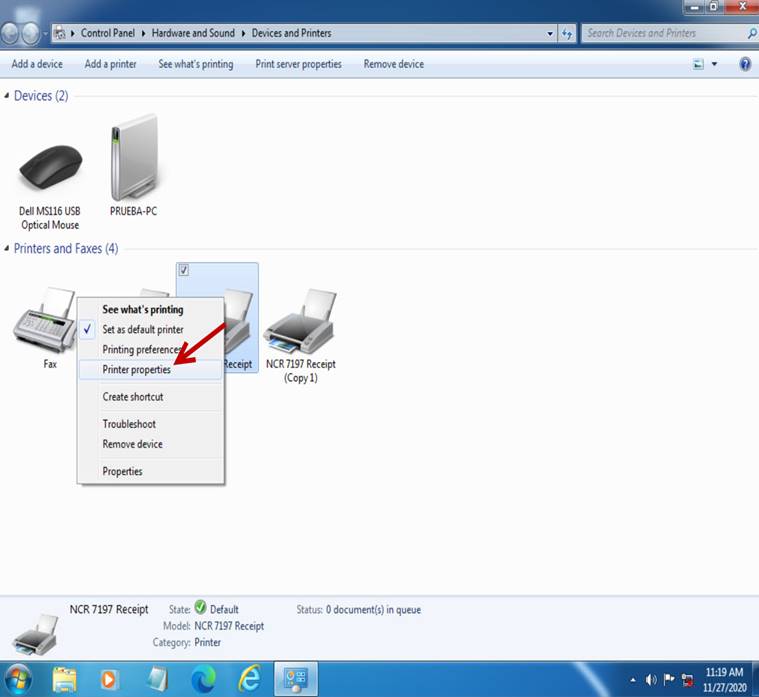
Seleccione – Select NCR 7197 Receipt
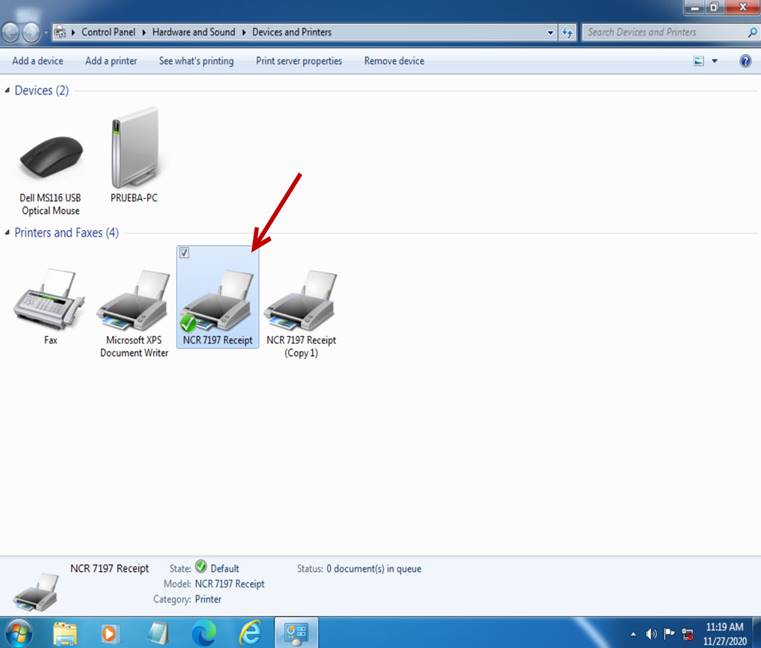
Seleccione – Select Printer Properties
Seleccione – Select Print Test Page
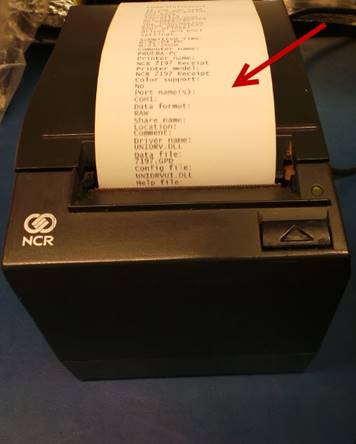
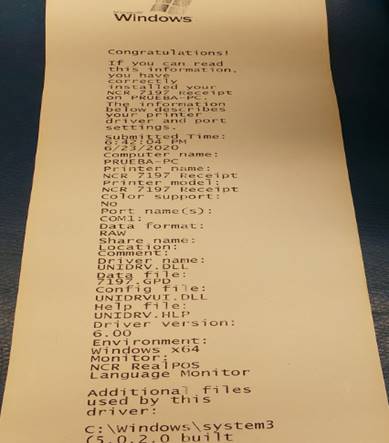
La impresora va a imprimir la hoja de prueba.
The printer will print the test sheet.
|
|
|
Seleccione – Select Close
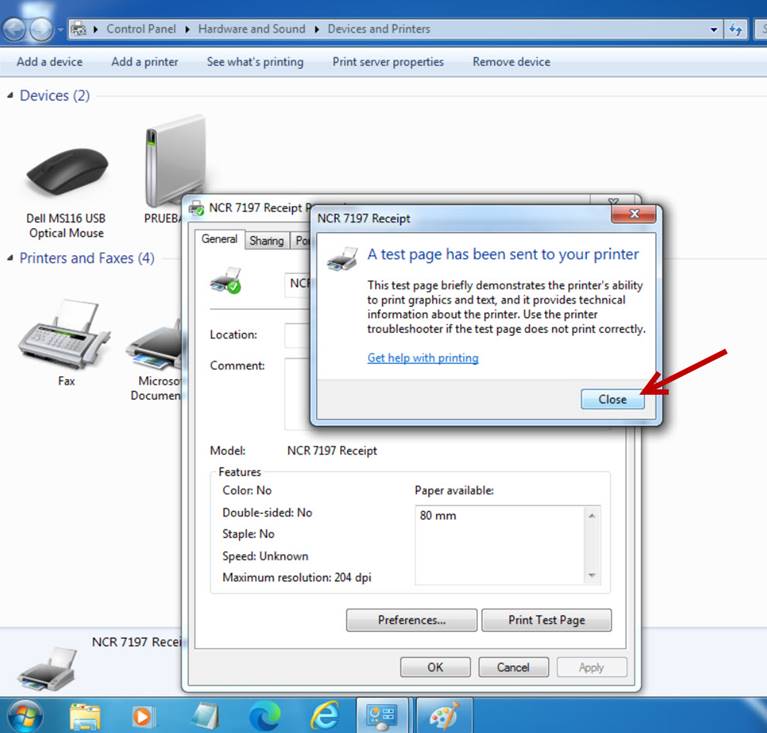
Seleccione – Select OK
Cierre la pestaña de Devices and Printers.
Close the Devices and Printers tab.
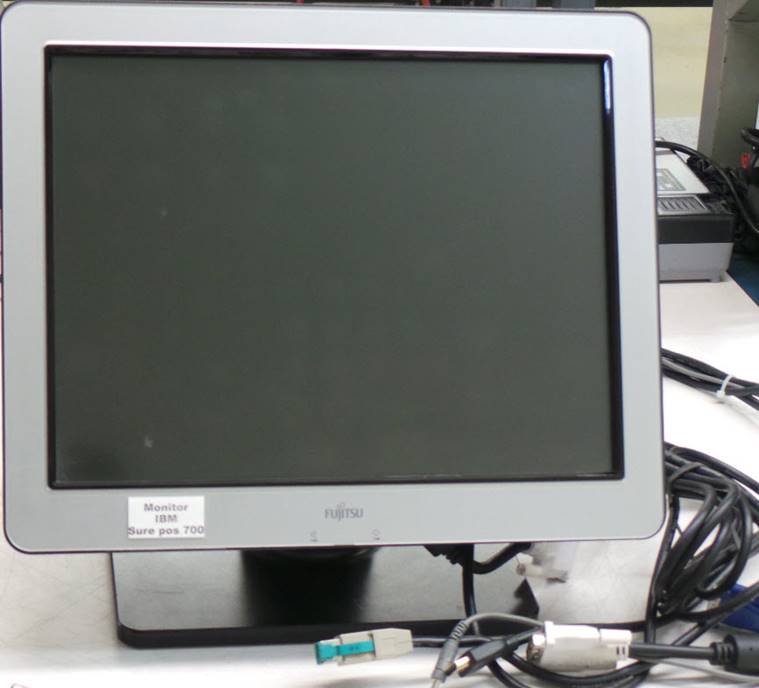
Instale el monitor IBM Sure POS 700.
Install the IBM Sure POS 700 monitor.
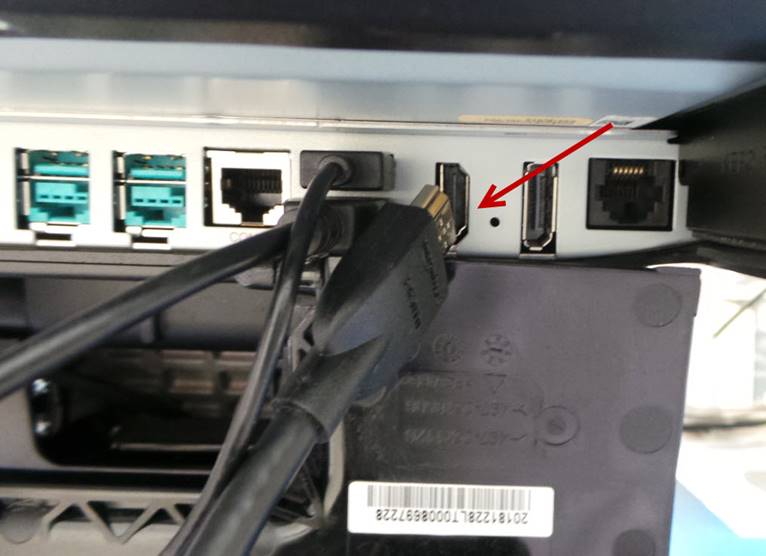
Conecte el cable de HDMI.
Connect the HDMI cable.
Conecte el cable de alimentación de corriente.
Plug in the power cord.
Encienda la unidad.
Turn on the unit.
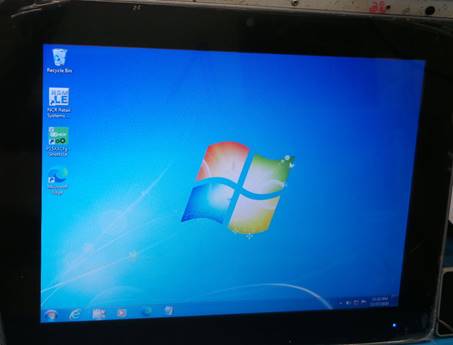
El video será desplegado en ambos monitores, verifique que la pantalla táctil funciona correctamente en ambos monitores.
The video will be displayed on both monitors.
|
|
|

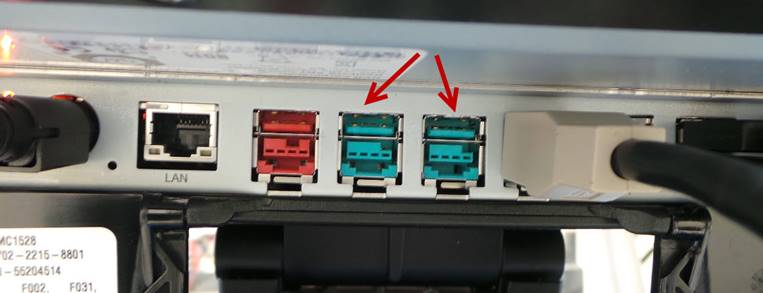
Cambie el cable de alimentación de corriente a los demás puertos de color verde y revise que el monitor secundario siga desplegando video y la pantalla táctil funcionando correctamente.
Change the power cord to the other green ports and check that the secondary monitor continues to display video correctly.
Apague la unidad y desconecte el cable de alimentación de corriente del monitor secundario.
Turn off the unit and disconnect the power cord from the secondary monitor.
Desconecte el cable HDMI.
Disconnect the HDMI cable.
Desconecte la fuente de poder.
Disconnect the power source.
Desinstale el disco duro de pruebas.
Uninstall the test hard drive.
Instale el disco duro de la unidad.
Install the unit's hard drive.
LIMPIEZA O FORMATEO DE DATOS DEL DISCO DURO / CLEANING OR FORMATTING HARD DRIVE DATA
Instale el disco duro de la unidad en el módulo UNITEK.
Install the unit's hard drive into the UNITEK module.
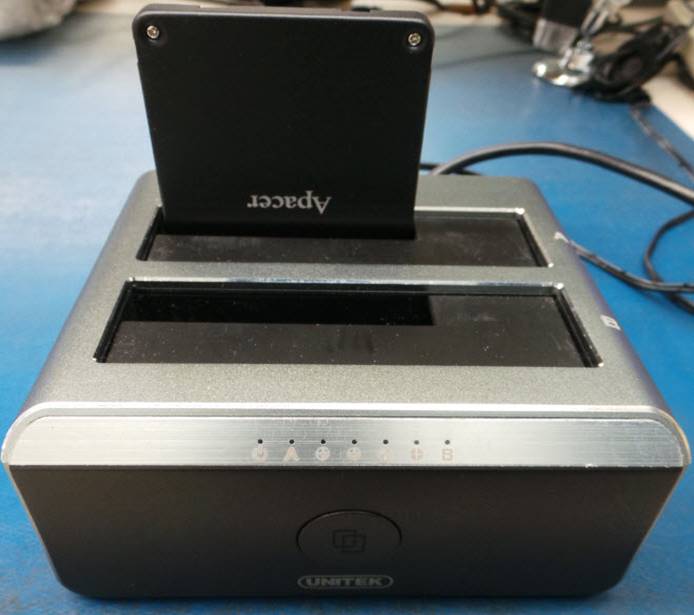
Encienda el módulo UNITEK y conecte el cable de USB al puerto de la computadora.
Turn on the UNITEK module and connect the USB cable to the computer port.
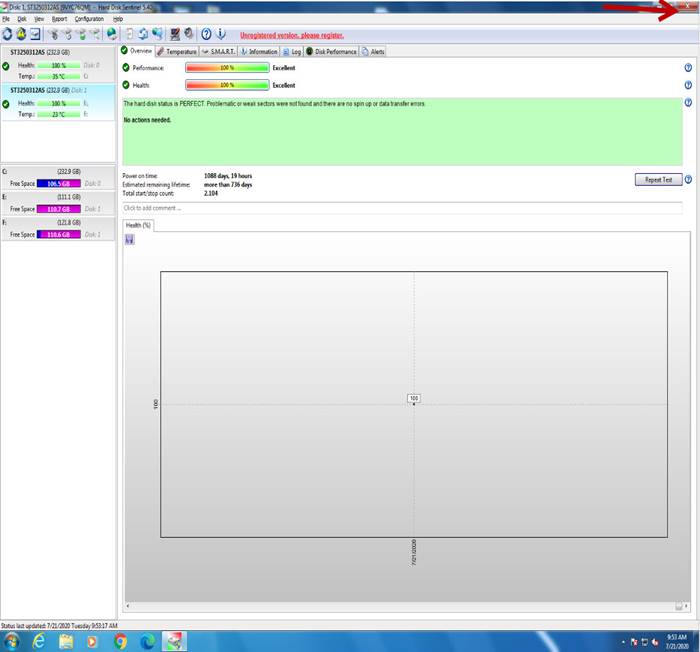
Ejecute el icono Hard Disk Sentinel como administrador.
Run the Hard Disk Sentinel icon as administrator.

Seleccione el disco para verificar los valores de Performance y Health, los cuales deben estar dentro del rango de Good y Excellent. En caso de que alguno de los 2 este debajo de ese rango, el disco duro deberá ser reemplazado.
Select the disk to check the Performance and Health values, which should be within the range of Good and Excellent. In case any of the 2 is below that range, the hard drive will need to be replaced.
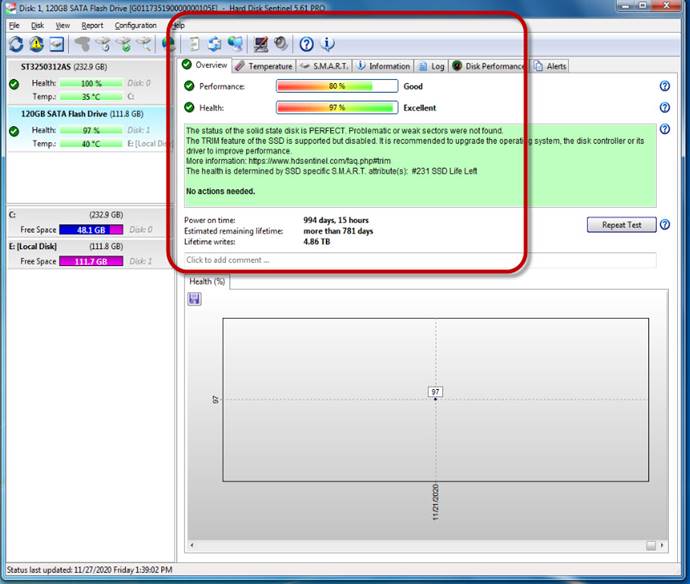
Cierre el programa.
Close the program.
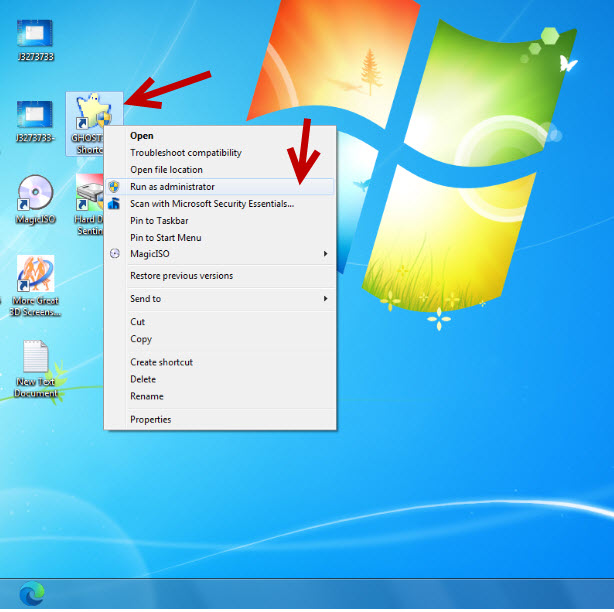
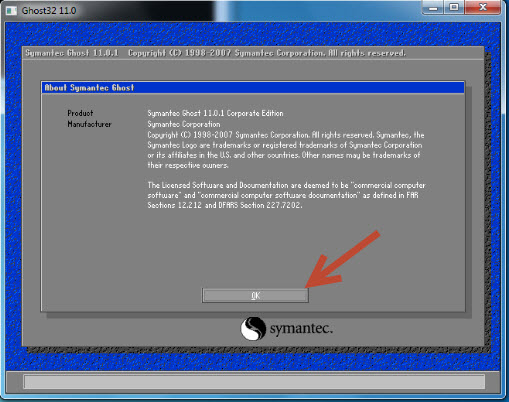
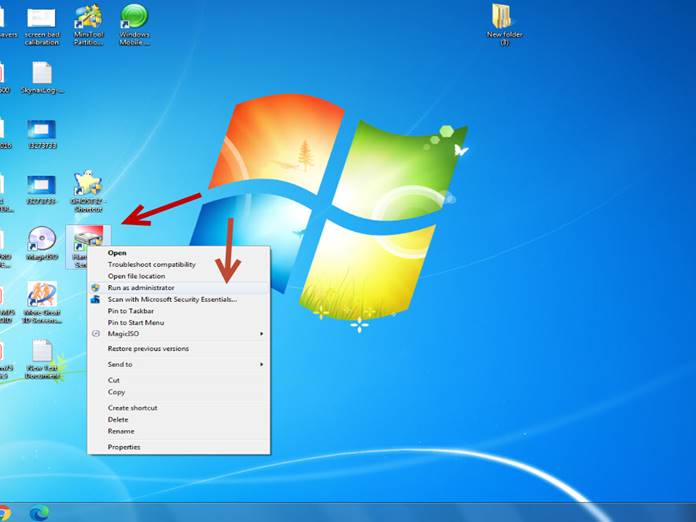
Ejecute el icono GHOST 32 Shortcut como administrador.
Run GHOST 32 Shortcut icon as administrator.
Seleccione – Select OK
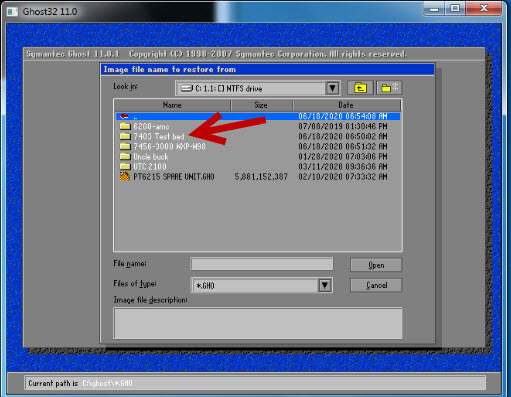
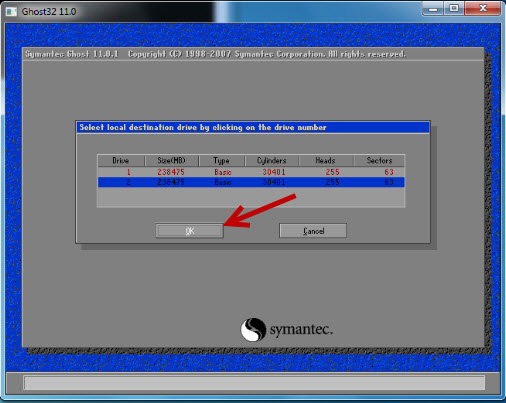
Seleccione – Select Local à Disk à From Image

Seleccione cualquier imagen disponible, en este caso vamos a seleccionar 7403-Test bed.
Select any available image, in this case we are going to select 7403-Test bed.
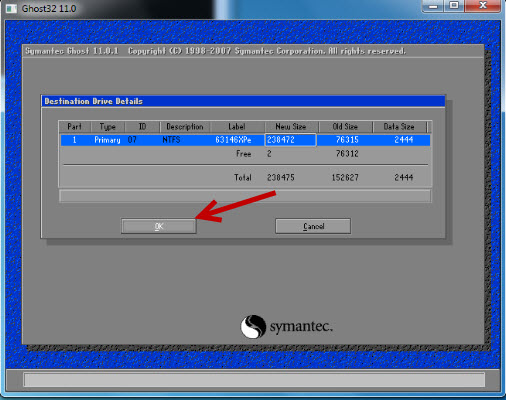
Vuelva a seleccionar la imagen.
Select the image again.
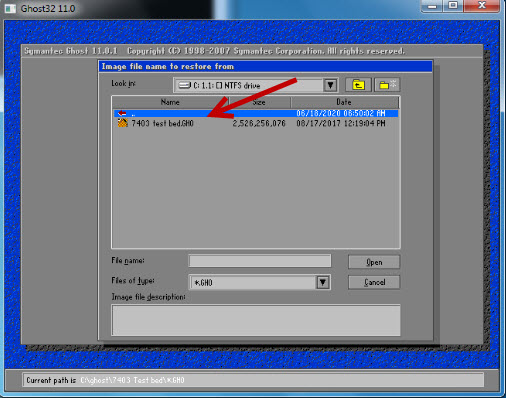
Seleccione – Select OK
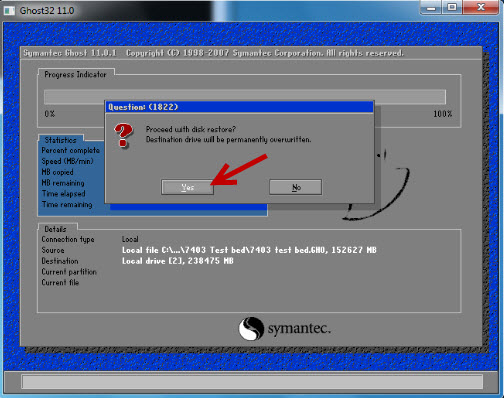
Seleccione – Select OK
Seleccione – Select Yes
Seleccione – Select Continue
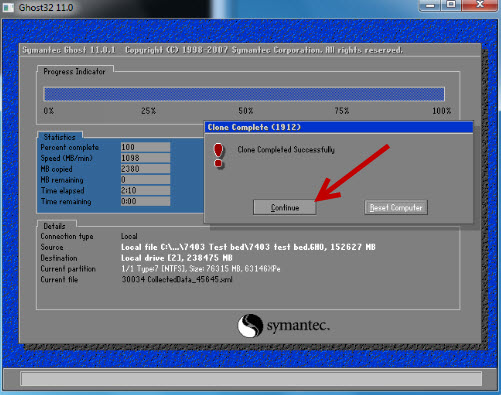
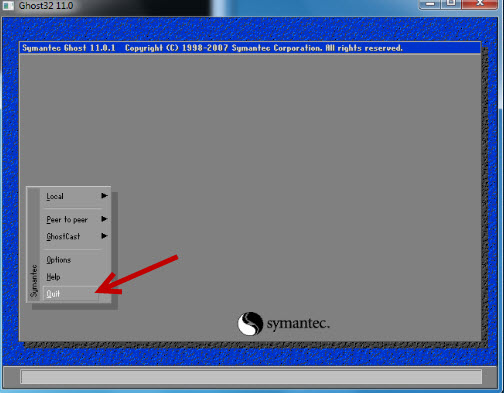
Seleccione – Select Quit
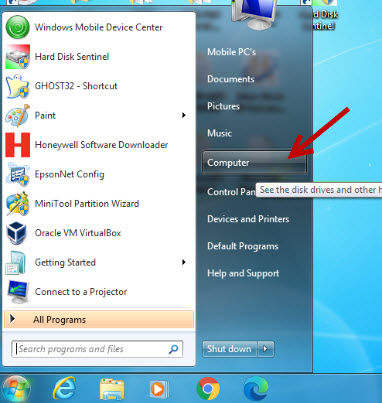
Seleccione Inicio
Select Start.
Seleccione – Select Computer
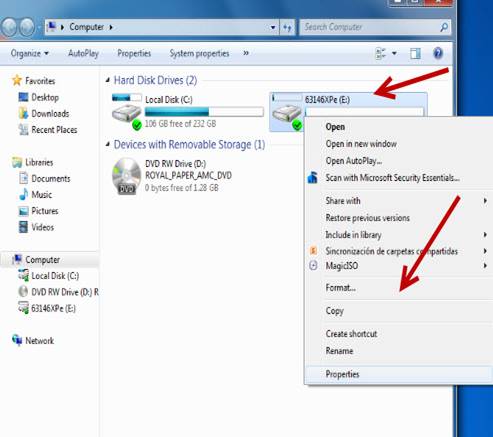
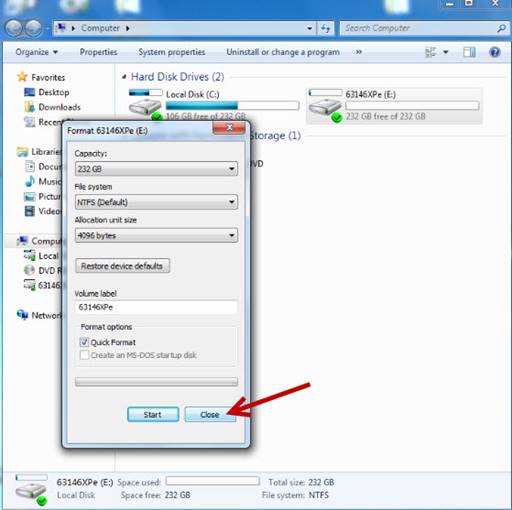
Seleccione el disco duro dando clic derecho y seleccione Format.
Select the hard drive by right-clicking and select Format.
Seleccione – Select Start
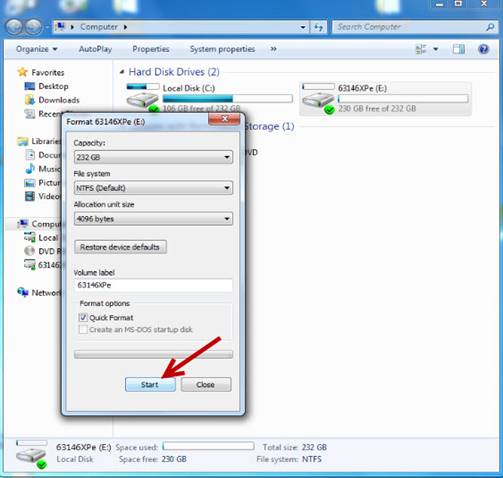
Seleccione – Select OK
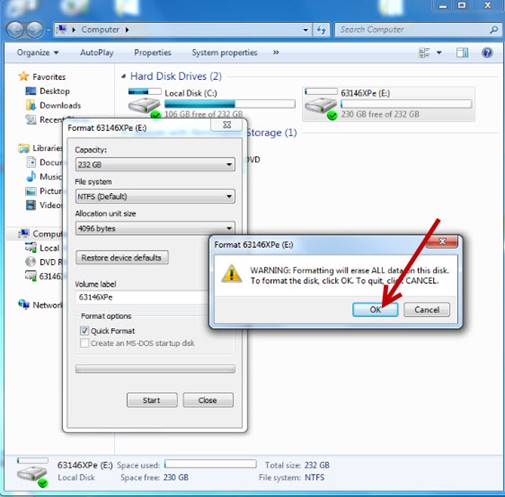
Seleccione – Select OK
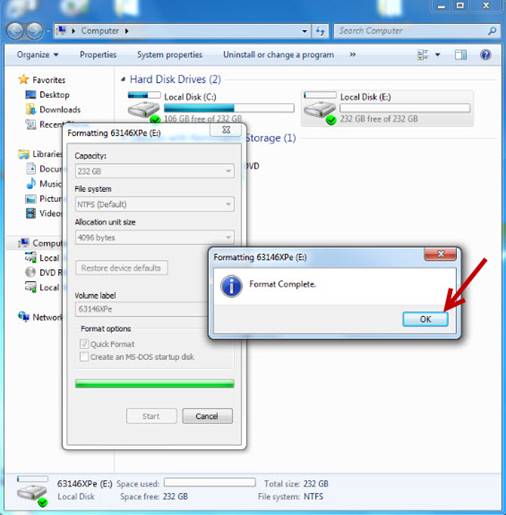
Seleccione – Select Close
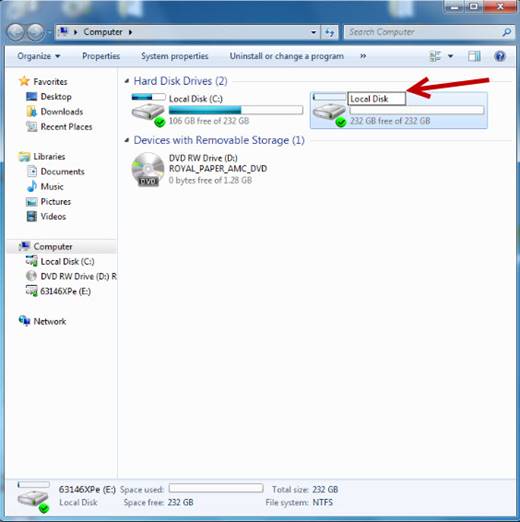
Seleccione nuevamente el disco dando clic derecho y seleccione Rename.
Select the disk again by right-clicking and select Rename.
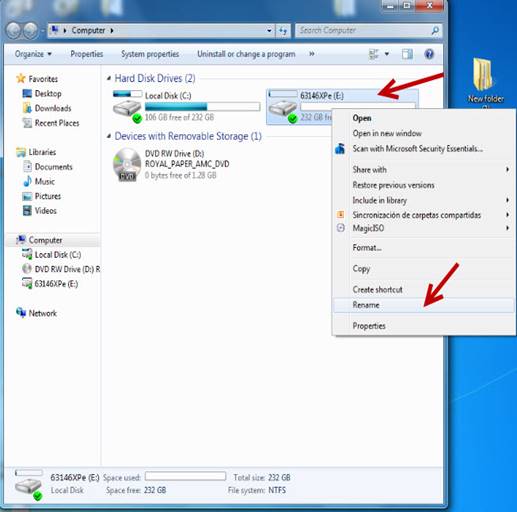
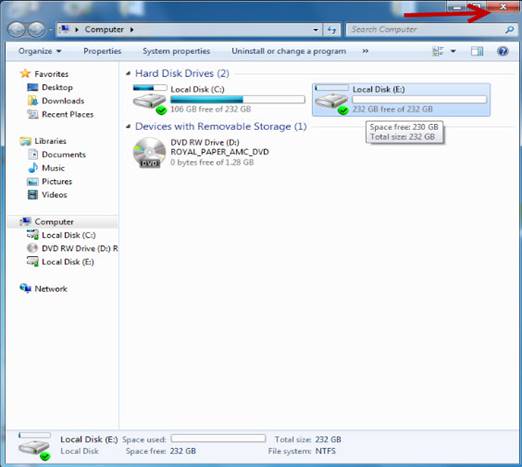
Renómbrelo como Local Disk.
Rename it as Local Disk.
Cierre la ventana de Computer.
Close the Computer window.
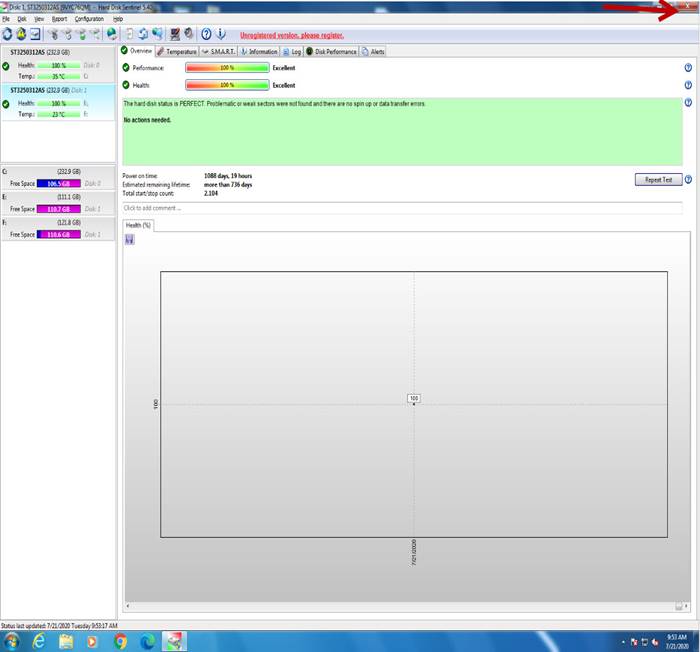
Ejecute nuevamente el icono Hard Disk Sentinel como administrador.
Run the Hard Disk Sentinel icon again as administrator.
Seleccione el disco para verificar los valores de Performance y Health, los cuales deben estar dentro del rango de Good y Excellent, en caso de que alguno de los 2 este debajo de ese rango, el disco duro deberá ser reemplazado.
Select the disk to verify the Performance and Health values, which must be within the range of Good and Excellent, in case any of the 2 is below that range, the hard disk must be replaced.

Cierre el programa.
Close the program.
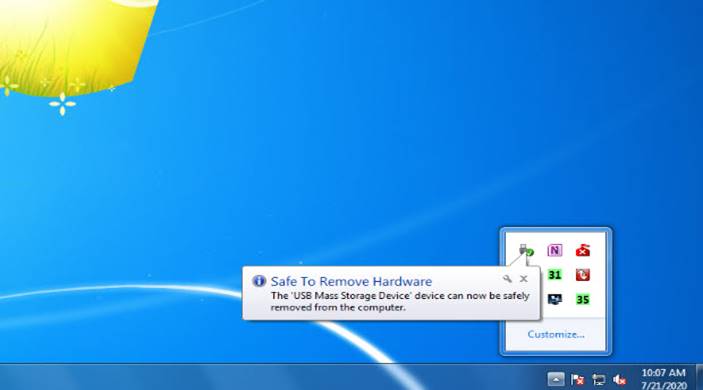
Desconecte el disco duro de forma segura.
Disconnect the hard drive safely.
Retire el disco duro del módulo UNITEK, colóquelo nuevamente en su base e instálelo en la unidad.
Remove the hard drive from the UNITEK module, place it back on its base and install it in the unit.
MANTENIMIENTO Y LIMPIEZA / MAINTENANCE AND CLEANING
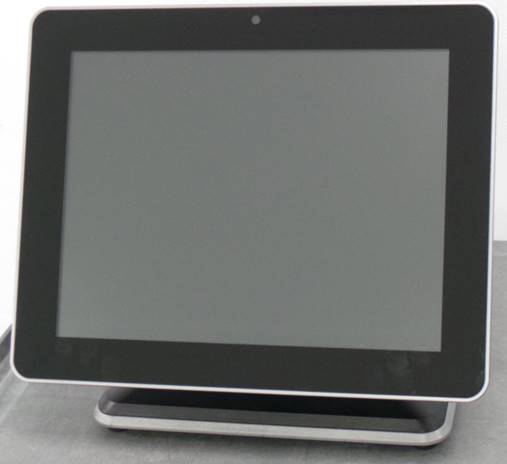
Coloque la unidad con la pantalla hacia abajo.
Place the unit with the screen facing down.
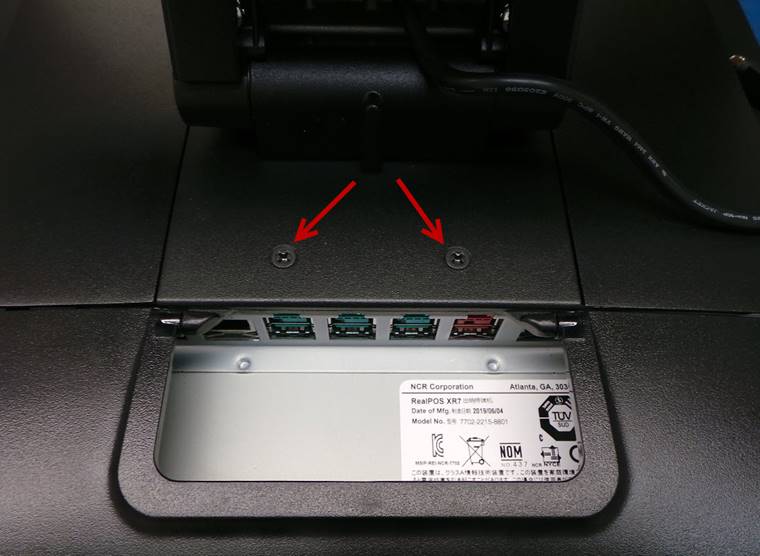
Desinstale la base de la unidad retirando los 2 tornillos señalados en la imagen:
Uninstall the base of the unit by removing the 2 screws indicated in the image:
Destornille los tornillos señalados en la imagen:
Unscrew the screws indicated in the image:
Levante la cubierta para desinstalarla y tener acceso a la Tarjeta Madre.
Lift the cover to uninstall it and access the Motherboard.
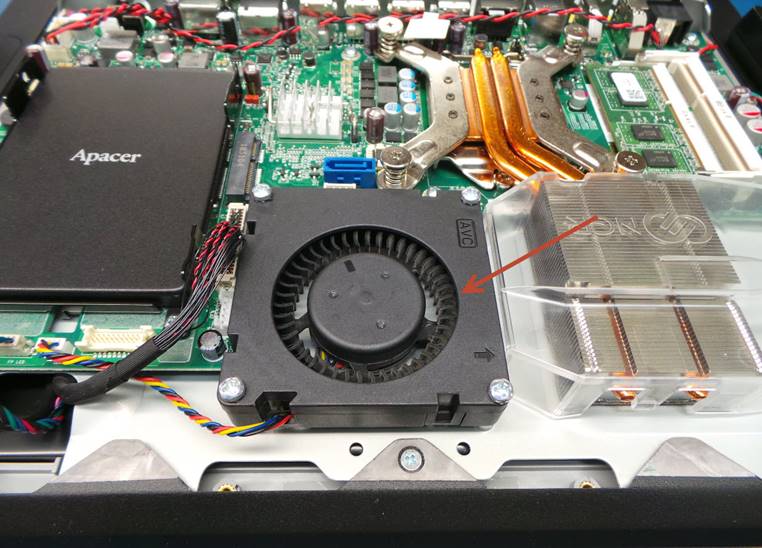
Limpie toda la suciedad y polvo del abanico.
Clean all dirt and dust from the fan.
PRUEBA FINAL / FINAL TEST
Encienda la unidad.
Turn on the unit.
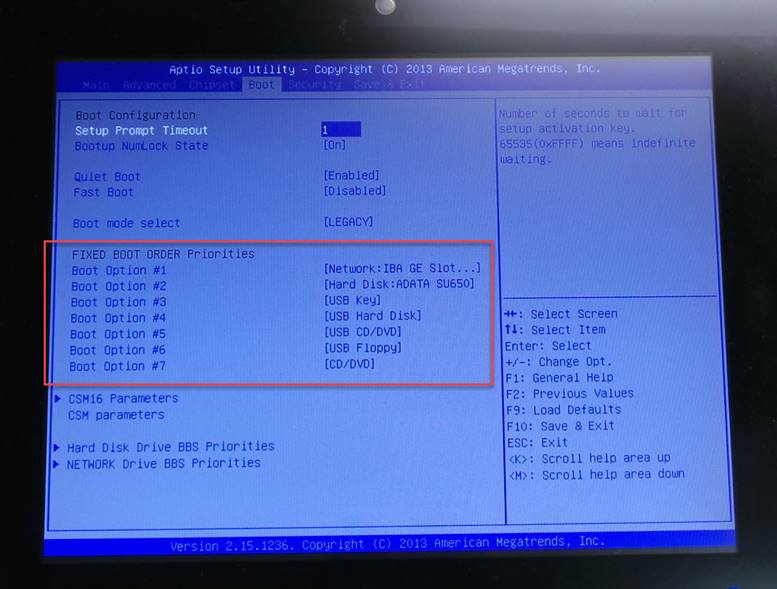
Verifique que la secuencia de arranque este configurada exactamente igual que en la siguiente imagen
Verify that the boot sequence is configured exactly the same as in the following image
Reinicie la unidad
Restart the unit

Apague la unidad.
Turn off the unit.
ASEGURAMIENTO DE CALIDAD / QUALITY ASSURANCE
Pida a una inspectora de Calidad que realice las pruebas a la unidad.
Ask a Quality Inspector to test the unit.
Todas las pruebas deben realizarse con el disco duro de prueba.
All tests must be done with the test hard drive.
Si la unidad pasa todas las pruebas, desinstale el disco duro de pruebas e instale el disco duro con el que será enviada la unidad. Envíe al área de empaque.
If the unit passes all tests, uninstall the testing hard drive and install the hard drive that the unit will be shipped with. Send to the packing area.
FALLAS COMUNES / COMMON FAILURES
|
FALLA |
POSIBLES CAUSAS |
SOLUCION |
|
No funciona pantalla táctil |
Pantalla táctil defectuosa |
Reemplace la pantalla táctil |
|
|
|
|
|
FAULT |
POSSIBLE CAUSES |
SOLUTION |
|
Touch screen does not work |
Defective touch screen |
Replace touch screen |
|
|
WI#: 1306 NCR 7702 |
Originator / Originador: S Anaya 11/30/20 |
||||
|
Revision / Revisión: 01 |
Revision Date / Fecha de revisión: 11/30/20 |
Name / Nombre: K Tovar |
Update / Actualización: New format |
Next Review / Proxima Revision: NA |
Approval / Aprobado por: Tom St John |
|
|
02 |
06/13/22 |
S Anaya |
New images |
NA |
Tom St John |
|