WI# 1088 MEI LOADER
674764001
|
LOADER |
|
|
|
|
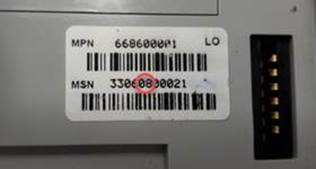
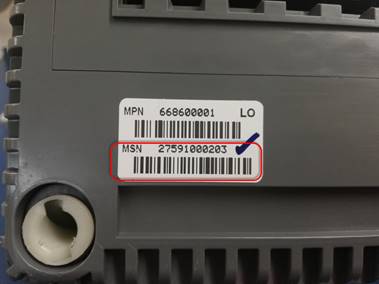
Antes de realizar cualquier prueba debe verificar la revisión del MSN de la etiqueta ubicada en la parte posterior de la unidad. La revisión es el 5to y 6to digito del MSN, si la revisión es 07 o anterior, debe mandar la unidad a SCRAP, ya que solo se reparan las unidades con revisión 08 o posteriores (está sujeta a cambios).
Before performing any tests, you should check the MSN in the label located on the back of the unit. The revision is the 5th and 6th digit of the MSN, if the revision is 07 or earlier, you must send the unit to SCRAP, since only units with revision 08 or later are repaired (it is subject to changes).
|
|
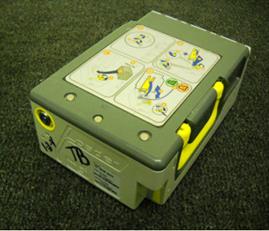
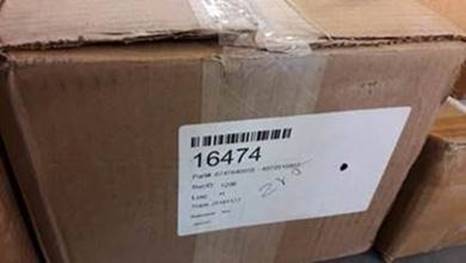
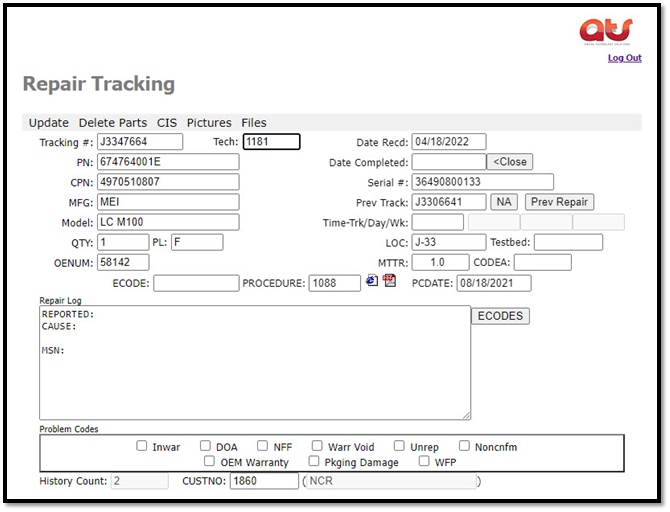
Saque la unidad de su empaque e ingrese la información del Tracking # en la página ATS como lo indican las instrucciones de trabajo.
Remove the unit from its packaging and enter the Tracking # information on the AMCOR page as indicated in the work instructions.
|
|
|
Nota: deberá de verificar en todas las unidades que no tengan partes sueltas es muy común que vengan quebrados los seguros y es por eso que se sueltan los componentes internos como engranes, resortes, banderas etc. etc. Si es así no la meta a probar puede proceder a su mantenimiento o reparación según sea el caso.
Note: you should check in all the units that they do not have loose parts, it is very common for the locks to come broken and that is why the internal components such as gears, springs, flags, etc. are released. etc. If so, the goal to be tested is not, you can proceed to its maintenance or repair as the case may be.
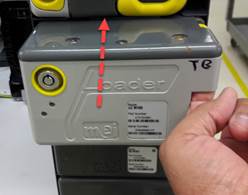
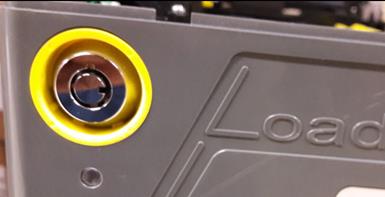
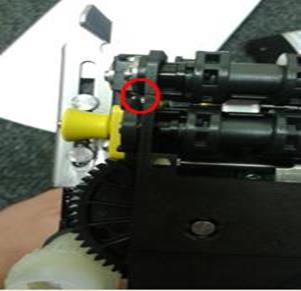
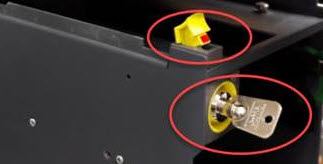
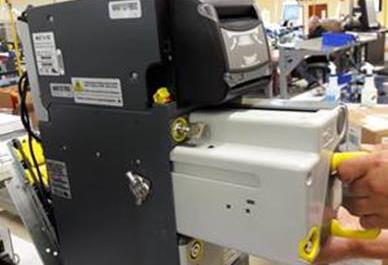
Con la cama de prueba encendida, abra la llave girando hacia la derecha y levante bandera amarilla.
With the test bed on, open the key by turning clockwise and raise the yellow marker.
|
|

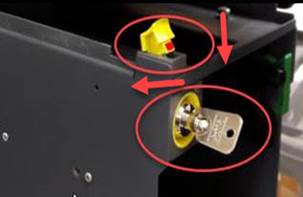
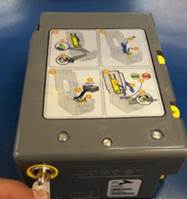
Coloque el Loader en la cama de prueba, baje la bandera y cierre la llave.
Install the loader on the test bed, lower the marker and close the key.
|
|
|
|

PRE-PRUEBAS / PRE-TESTS
Nota: los diagnósticos se guardan si el cliente lo solicita.
Note: Diagnostics are saved if requested by the customer.
|
TECNICO: Deberá de guardar los diagnósticos. |
TECHNICIAN: Should save the diagnostics. |
Únicamente los técnicos realizaran los siguientes pasos:
Only technicians will perform the following steps:
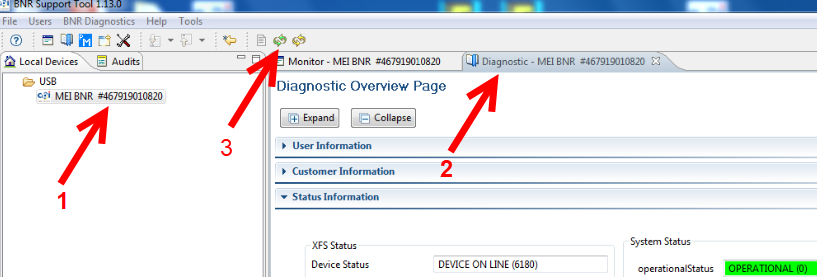
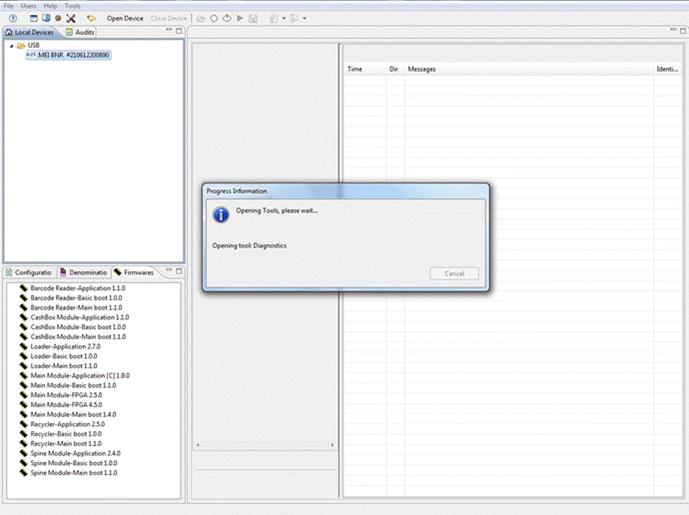
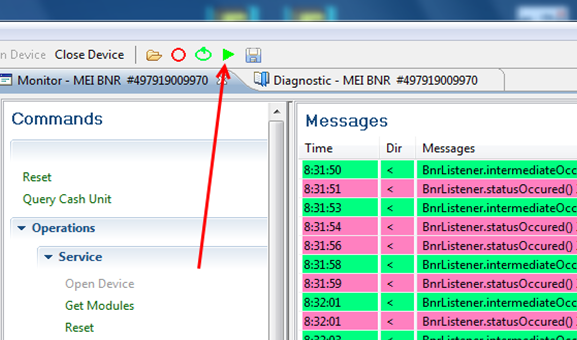
Con la unidad encendida, localice y seleccione en la computadora
de prueba el icono mei: 
With the unit on, locate and select the mei icon on the test computer:
1.-Seleccione Mei BNR – Select Mei BNR
2.-Seleccione Diagnostic – Select Diagnostic
3.-Seleccione Refresh – Select Refresh
|
|
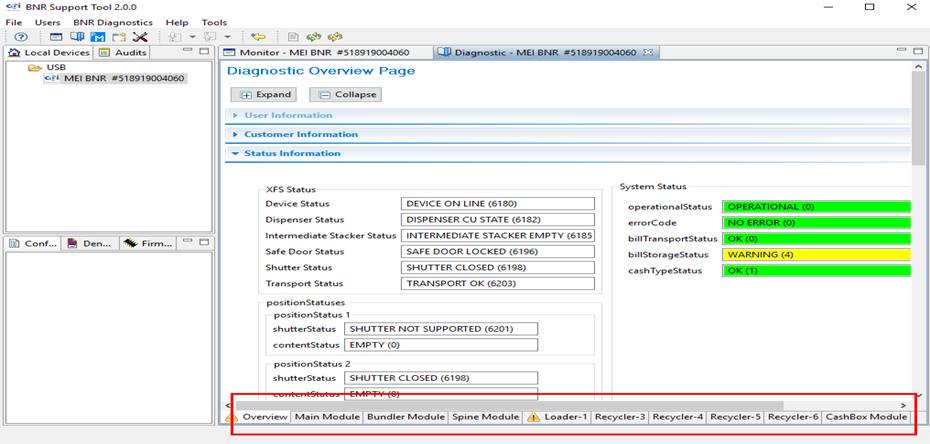
Cuando el cabezal o cualquier otro modulo tenga un error, será detectado en esta sección.
When the head or any other module has an error, it will be detected in this section.
|
|
Seleccione User information.
Select User Information.
|
En la página oficial de ATS seleccione la opción (ECODES) ,localice la barra gris y deslice hacia arriba y hacia abajo para escoger el código de error enumerado y su descripción que le encontró a la unidad. On the official ATS page select the (ECODES) option, locate the gray bar and slide up and down to choose the listed error code and its description found on the unit.
|
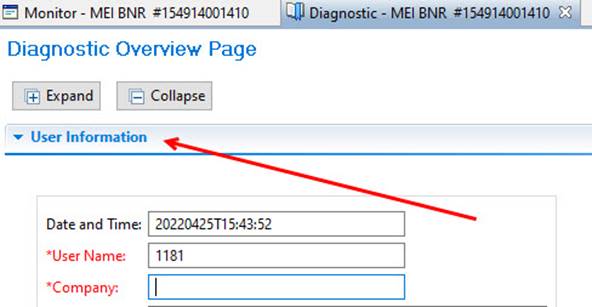

Llene las siguientes casillas: User Name – Company – Comments.
Fill in the following blanks: User Name-Company-Comments.
|
|
|
|

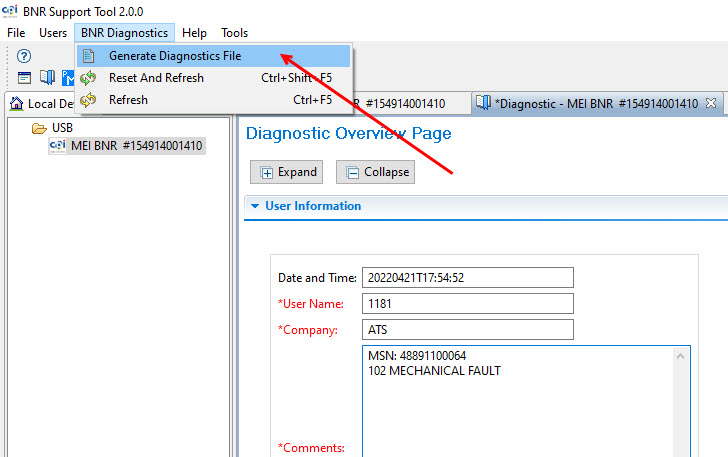
En la barra de herramientas seleccione BNR Diagnostics.
In the toolbar select BNR Diagnostics.
Seleccione Generate Diagnostics File.
Select Generate Diagnostics File.
|
|
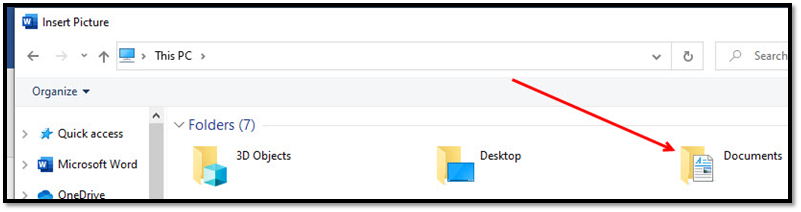
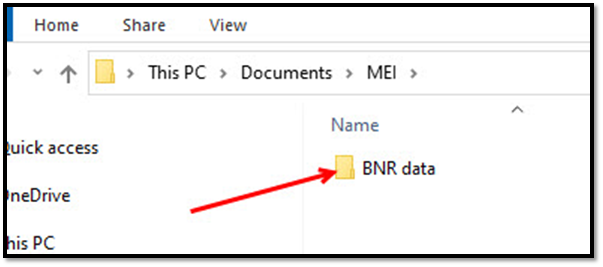
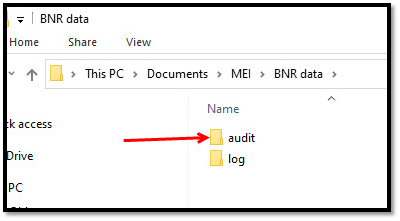
En su PC localice y vaya abriendo los folder: Documents,MEI,bnr data, Audit hasta encontrar el Folder loader diagnostic
On your PC locate and open the folders: Documents, MEI, bnr data, Audit until you find the Folder loader diagnostic
Documents
MEI

BNR data
Audit
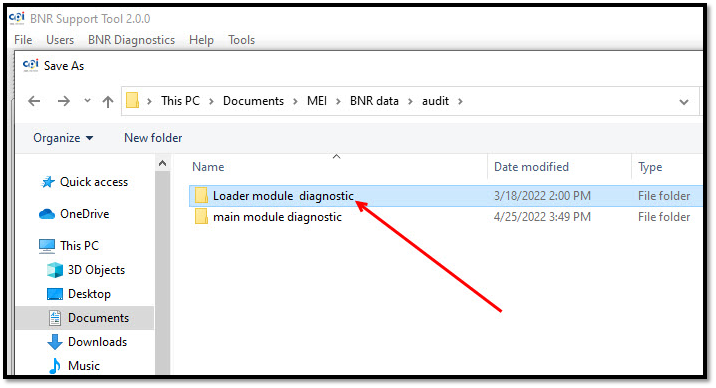
Seleccione el folder loader diagnostic.
Select the loader diagnostic folder.
|
|
Para nombrar el archivo necesita el MSN, el cual se encuentra en la etiqueta ubicada en la parte posterior de la unidad.
To name the file, you need the MSN, which is located on the label located on the back of the unit.
|
|
En el área de nombre del archivo (File name) ingrese la siguiente información tal y como se indica:
In the File name area, enter the following information as indicated:
El nombre del modelo, en este caso es loader, msn, fecha y .mei al final.
The model name, in this case is loader, msn, date and .mei at the end.
|
|
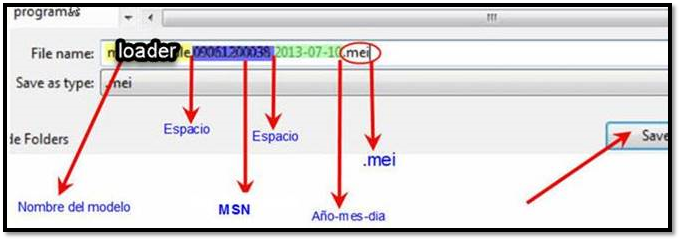
Al terminar seleccione guardar (Save).
When finished select Save.
|
|

Comenzará a cargar la información.
The information will start to load.
|
|
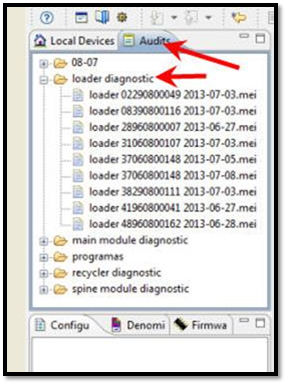
COMO REVISAR EL DIAGNÓSTICO DE LA UNIDAD / HOW TO CHECK THE DIAGNOSIS OF THE UNIT.
Diríjase a la pestaña superior en el lado izquierdo de su pantalla y ubique Audit.
Go to the upper tab on the left side of your screen and locate Audit.
Después ubique la carpeta del modelo que se encuentre reparando, ubique MSN de la unidad.
Then locate the model folder that is being repaired, locate the MSN of the unit.
|
|
COMO OBTENER LOS CICLOS DEL LOADER / HOW TO GET THE LOADER CYCLES
Seleccione el icono: 
Select the icon:
1.-Seleccione – Select Mei BNR
2.-Seleccione – Select Diagnostic
3.-Seleccione – Select Refresh
|
|
· La unidad empieza a prepararse al seleccionar reset refresh.
The unit starts preparing by selecting reset refresh.
Seleccione la pestaña de Loader.
Select the Loader tab.
|
|
1. Seleccione History
1. Select History
2. Seleccione Module Use History
2. Select Module Use History
3. cycleCount: xxxxx; anotar y guardar la cantidad de ciclos
3. cycleCount: xxxxx; write down and save the number of cycles
|
|

ACTUALIZACION DEL LOADER / LOADER UPDATE
La unidad debe de llevar la versión 2.7.0 por el momento es la más actual (está sujeta a cambios).
The unit must have version 2.7.0 at the moment it is the most current (it is subject to change).
Nota: si las unidades son RR se enviarán con el firmware que tiene programado solamente se actualizara por falla o si el cliente lo solicita como es en el caso de las unidades Toshiba.
Note: if the units are RR, they will be shipped with the firmware that is programmed, it will only be updated due to failure or if the customer requests it, as is the case with Toshiba units.
Para verificar la versión, siga los siguientes pasos:
To verify the version, follow the next steps:
Seleccione el icono:
Select the icon:
Seleccione MEI BNR #XXXXXXXXXXX (información de la unidad).
Select MEI BNR #XXXXXXXXXXX (unit information).
|
|
Seleccione reset refresh; la unidad empieza a prepararse.
Select reset refresh; the unit begins to prepare.
Seleccione la pestaña de Diagnostic.
Select the Diagnostic tab.
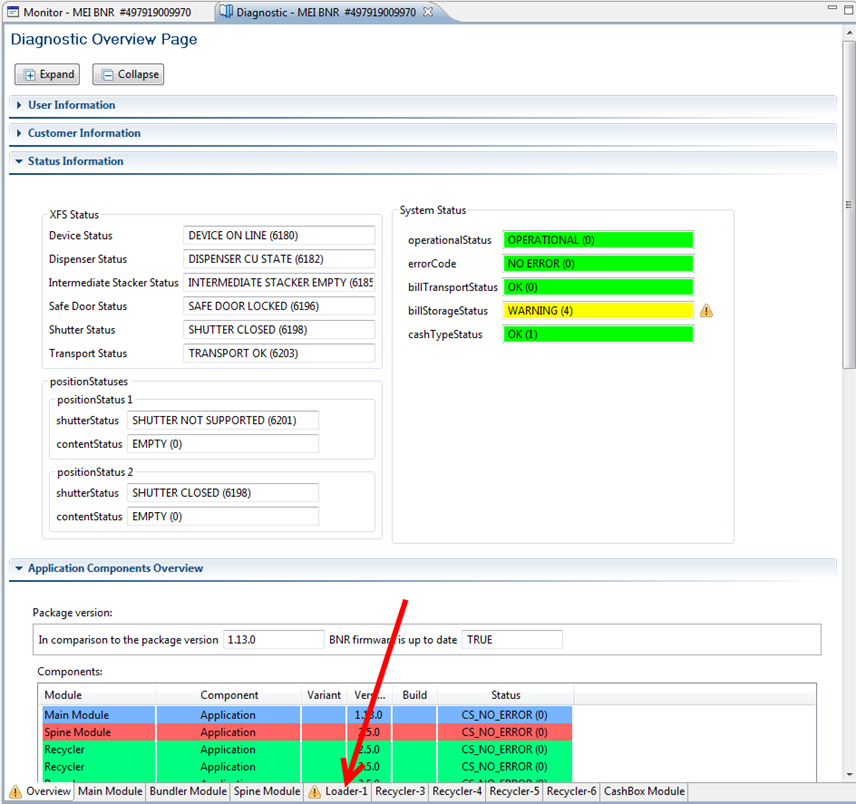
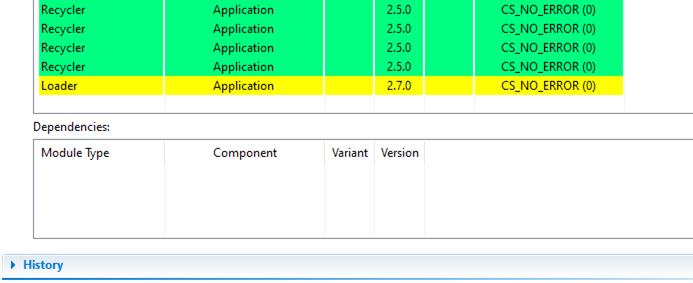
Seleccione Application Components Overview; observe la versión que trae la unidad.
Select Application Components Overview; look at the version that comes with the unit.
|
|

CAMBIO DE VERSIÓN / CHANGE VERSION
En caso de requerir el cambio de versión, siga los siguientes pasos:
If you require the version change, follow the steps below:
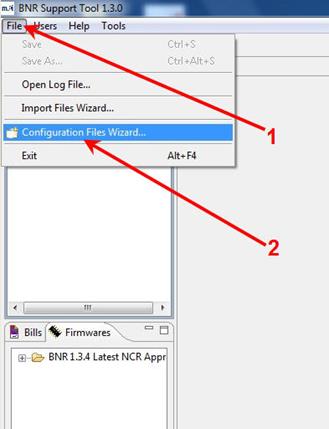
Se abrirá el programa, del cual seleccionará la opción File (1) después seleccione Configuration Files Wizard (2)
The program will open, from which you will select the option File (1) then select Configuration Files Wizard (2)
|
|
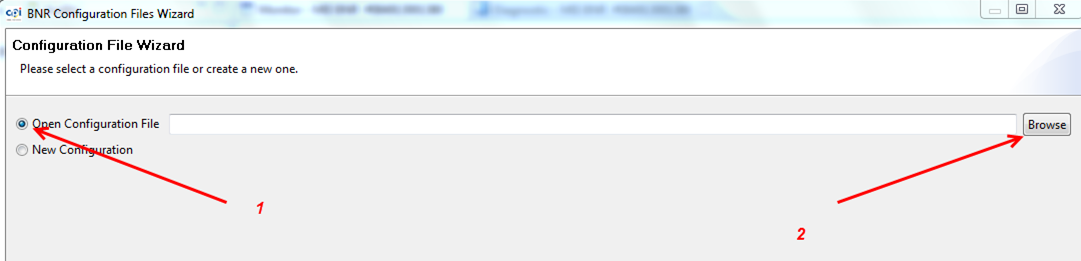
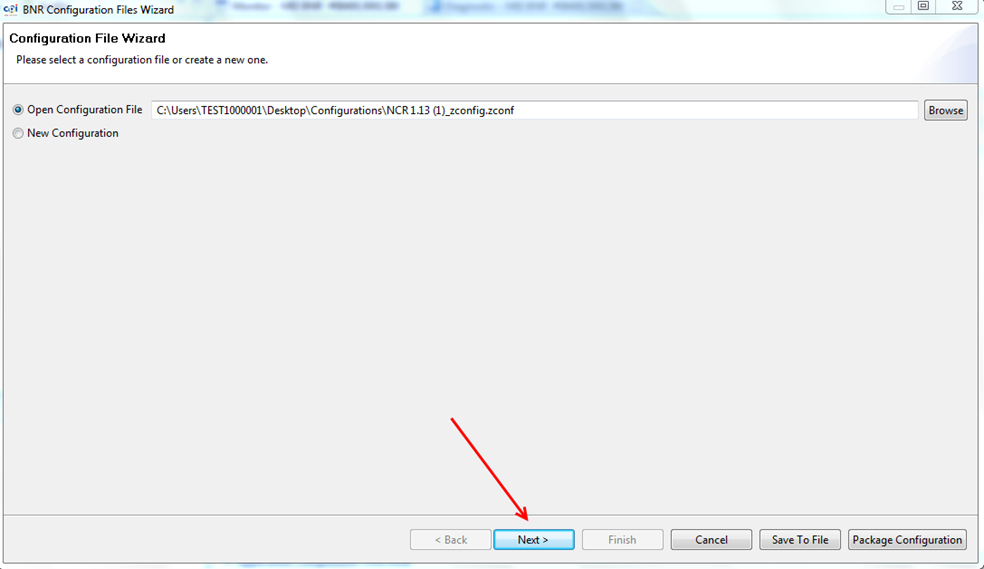
En la siguiente ventana que aparece:
In the next window that appears:
1- Seleccione – Select Open Configuration File
2- Seleccione – Select Browse
|
|
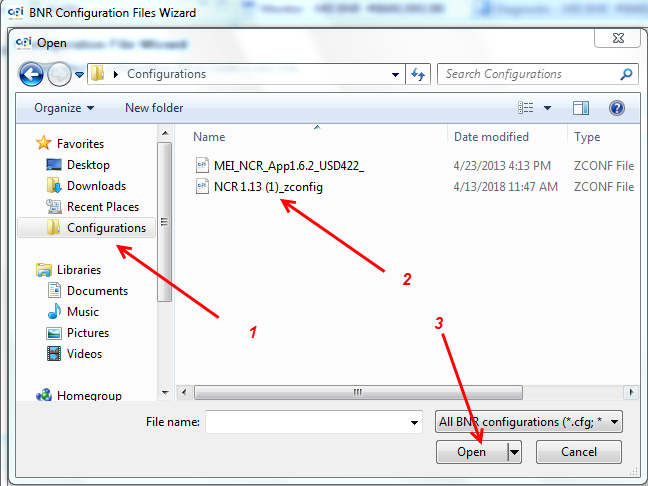
1- Seleccione – Select Configurations
2- Seleccione – Select NCR 1.13 (1)_zconfig
3- Presione – Press Open
|
|
Seleccionar – Select: Next
|
|
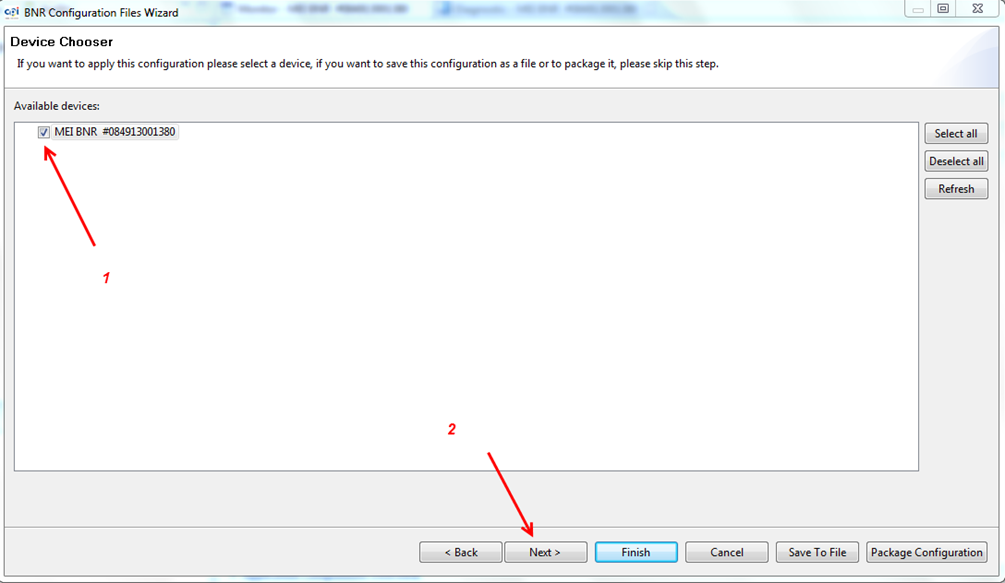
1- En la siguiente ventana seleccione MEI BNR #xxxxxxxxxxx
1- In the next window select MEI BNR #xxxxxxxxxxx
2- Seleccione Next
2- Select Next
|
|
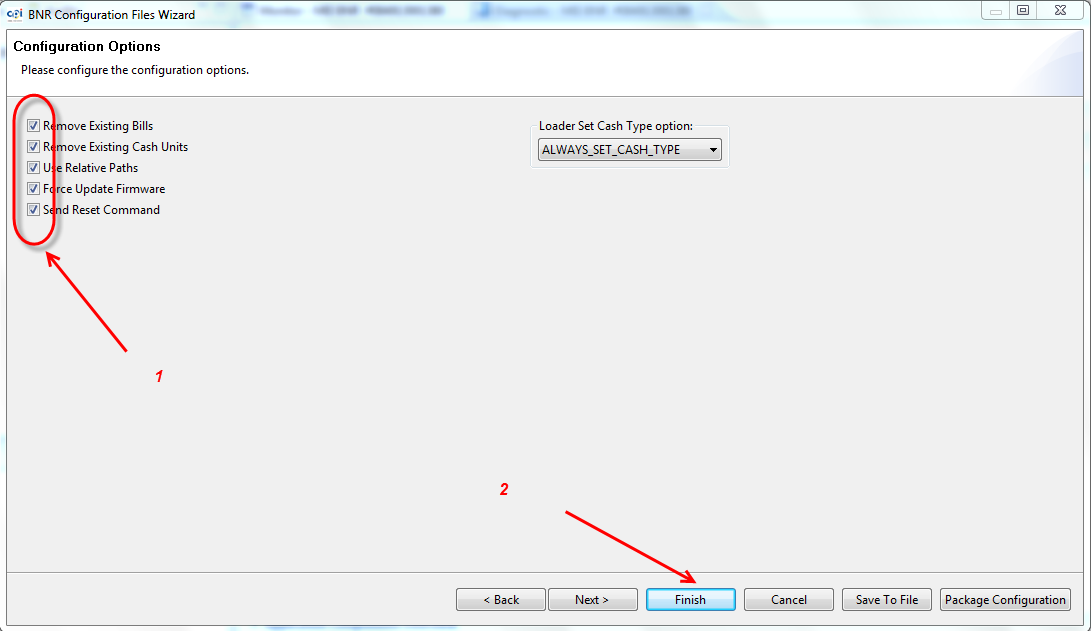
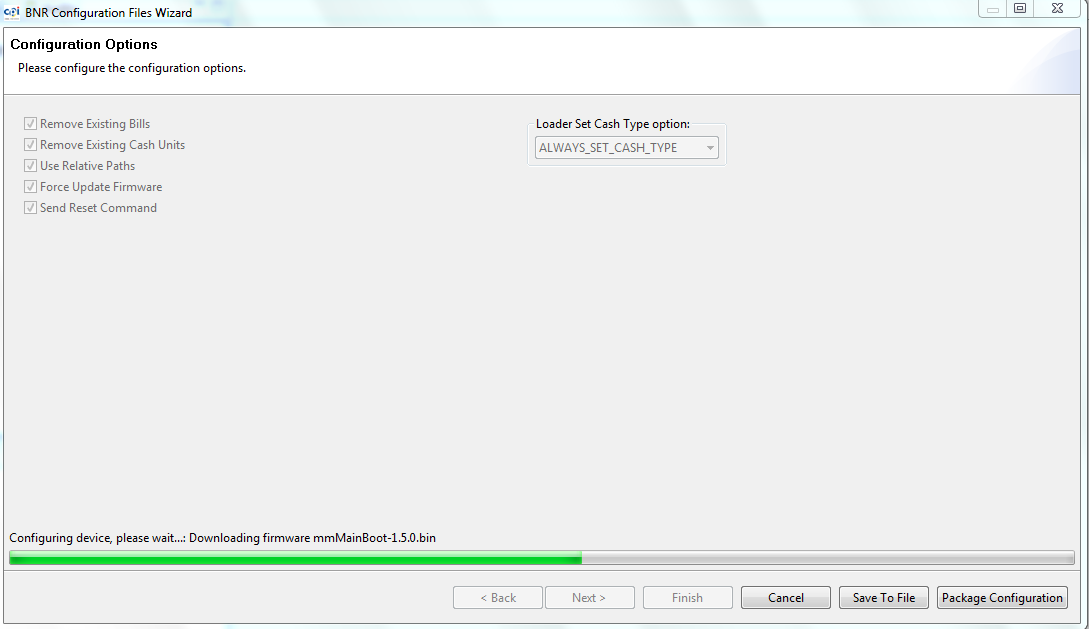
1- Verifique que estén todas las opciones seleccionadas.
1- Verify that all options are selected.
2- Seleccione Finish; la versión comenzará a cargarse.
2- Select Finish; the version will start loading.
|
|
Seleccionar OK.
Select OK.
|
|
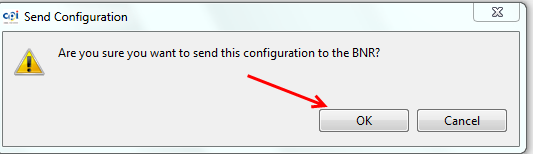
Empieza a cargar Firmware.
Firmware starts to load.
|
|
Al finalizar presionar OK.
When finished press OK.
Revisar que se haya cargado la versión correctamente Loader 2.7.0
Check that the Loader 2.7.0 version has been loaded correctly.
|
|
|
|
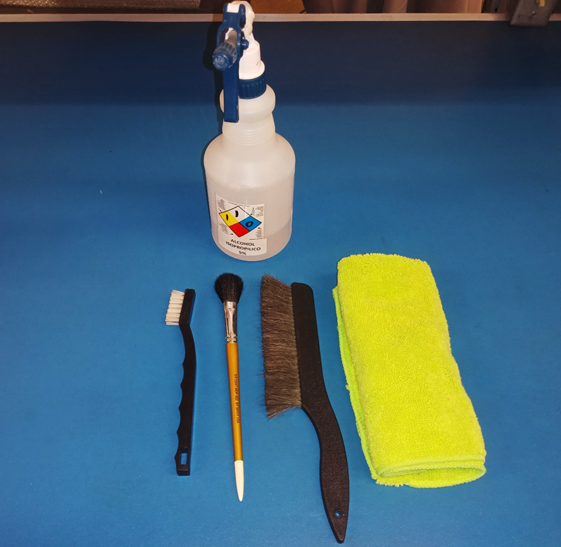
Artículos requeridos para realizar limpieza general.
Items required to perform general cleaning.
· Alcohol isopropílico al 5%
· 5% isopropyl alcohol
· Cepillo antiestático
· Antistatic bristle brush
· Brochas antiestáticas
· Antistatic brushes
· Franela de Microfibra
· Microfiber Flannel
Herramienta necesaria para mantenimiento o reparación:
Tools required for maintenance or repair:
· Pinzas de punta
· Tip tweezers
· Desarmador torx 8 y 6
· Torx 8 and 6 screwdrivers
· Desarmador plano chico
· Small flat screwdriver

MANTENIMIENTO Y REPARACION / MAINTENANCE AND REPAIRING
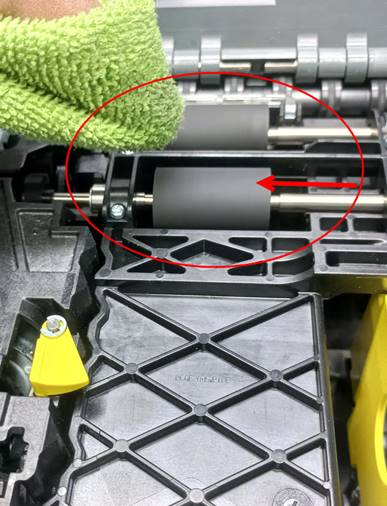
Plan de mantenimiento para los cargadores de todas las versiones.
Maintenance plan for chargers of all versions.
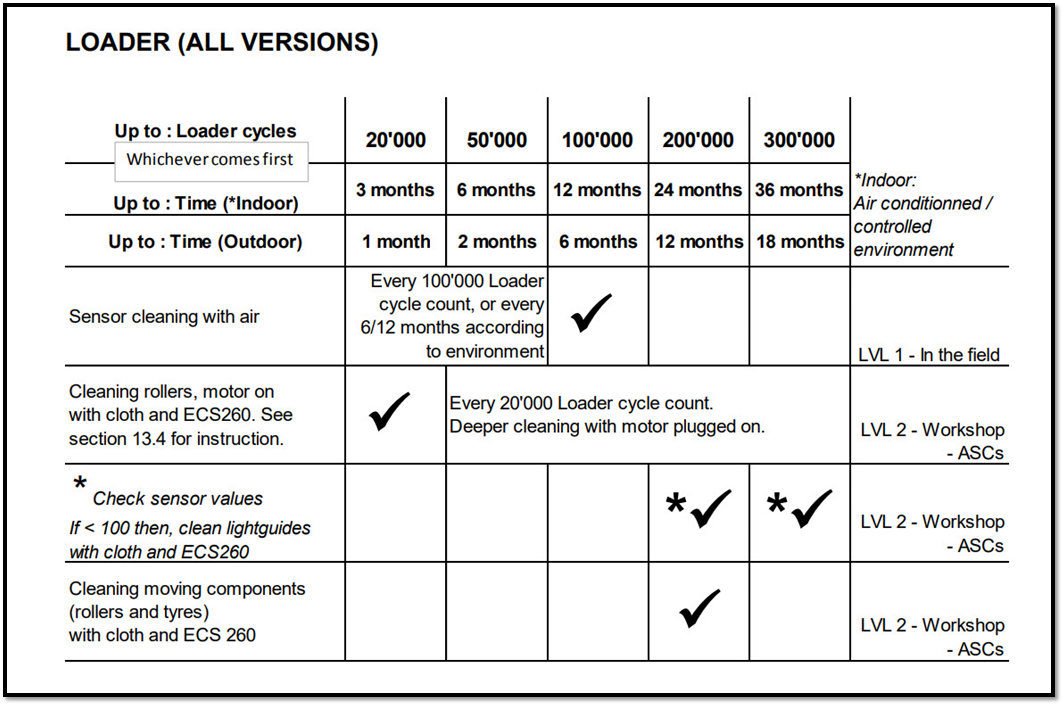
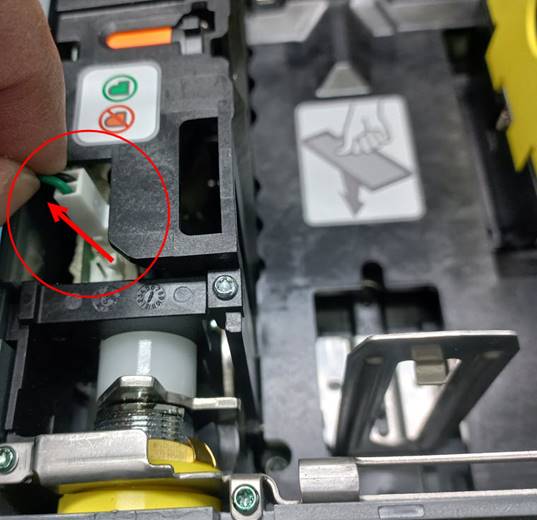
Como realizar limpieza de los rodillos conectando una fuente ajustándola 7 o 8 vcd para hacerlos girar esto se debe realizar cundo llegue o sobrepase los 20,000 ciclos.
How to clean the rollers by connecting a source adjusting it to 7 or 8 vdc to make them turn, this must be done when it reaches or exceeds 20,000 cycles.
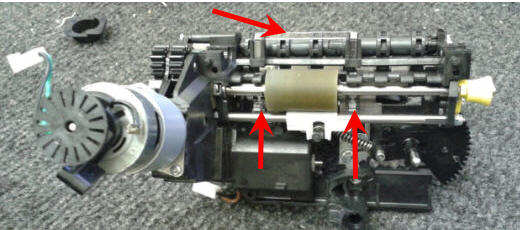
Localice el conector del motor, los cables son de color verde - negro y conecte la fuente la corriente directa deberá de ser de 7 o 8 Volts, puede invertir la polaridad.
Locate the motor connector, the cables are green - black and connect the source, the direct current must be 7 or 8 Volts, you can invert the polarity.
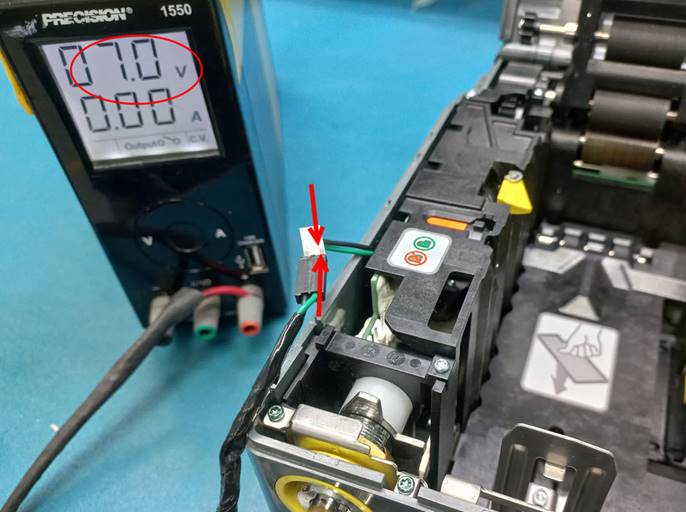
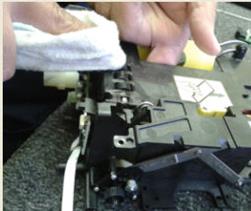
Con la fuente encendida limpie con una franela de microfibra y alcohol al 5% el rodillo de en medio y el inferior, para limpiar el rodillo superior baje la placa superior al terminar desconecte la fuente.
With the fountain on, clean the middle and lower rollers with a microfiber flannel and 5% alcohol. To clean the upper roller, lower the upper plate. When finished, disconnect the fountain.

Realice la limpieza en los rodillos de la plataforma
Perform cleaning on the deck rollers

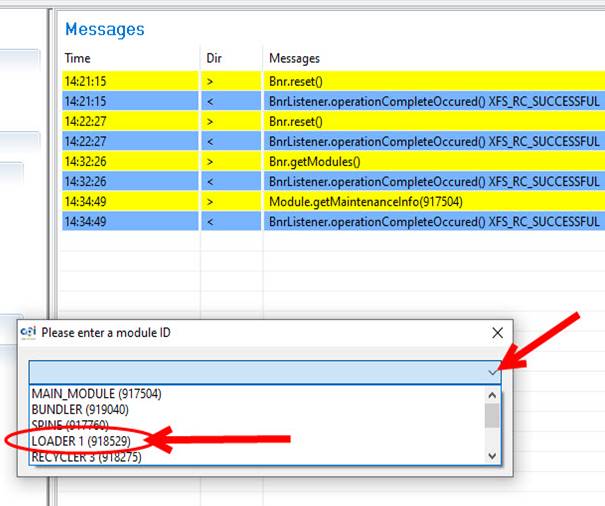
Para verificar el porcentaje de los sensores, con la unidad reseteada realice lo siguiente:
En la pestaña de monitor seleccione:
Open Device
Get Modules
Module Get Maintenance Info
To verify the percentage of the sensors, with the unit reset, do the following:
In the monitor tab select:
Open Device
Get Modules
Module Get Maintenance Info

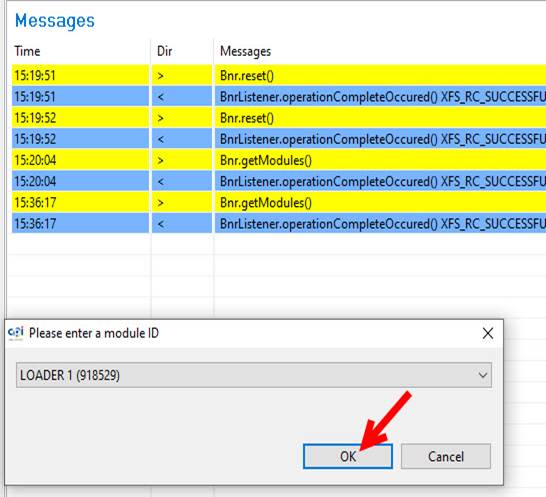
Se abrirá un menú donde deberá localizar la flechita lado derecho, seleccione Loader y la opción Ok.
A menu will open where you must locate the little arrow on the right side, select Loader and the Ok option.
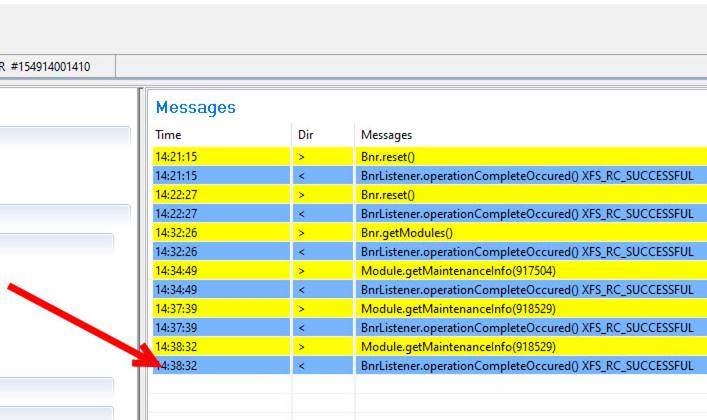
Debera de dar dos click en el renglon azul para que nos muestre la informacion de los ciclos del ultimo mantenimiento,el porcentaje de los cristales y ok.
You must click twice on the blue line to show us the information of the cycles of the last maintenance, the percentage of the crystals and ok.
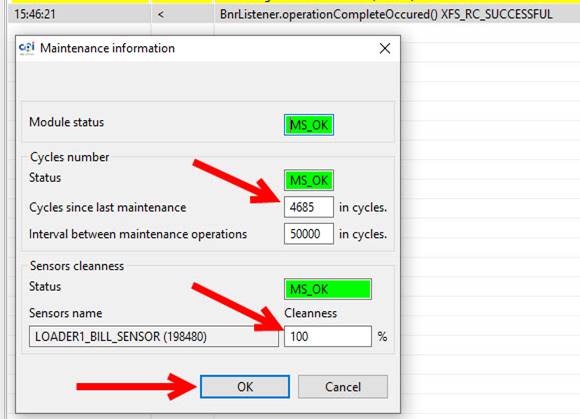
Si el porcentaje es menor de 100% , se le debe de dar mantenimeinto a los cristales con una franela o Qiutip y teniendo la unidad ya armada y lista,en el software debera de seleccionar la opcion Module Maintenance Done y volver a seleccionar Module Get Maintenance Info, esto es para verificar que el porcentaje haya incrementado al 100% y presione ok.
Ejemplo del porcentaje bajo:
If the percentage is less than 100%, the crystals must be maintained with a flannel or Qiutip and having the unit already armed and ready, in the software you must select the Module Maintenance Done option and select Module Get Maintenance Again Info, this is to verify that the percentage has increased to 100% and press ok.
Example of the low percentage:


Porcentaje al 100% después de su mantenimiento
Percentage at 100% after maintenance

NOTA: Si las unidades tienen revisión menor (07) se hacen SCRAP, la revisión la puede checar en la etiqueta que trae pegada la unidad en la parte posterior, es el quinto y sexto digito del MSN.
NOTE: If the units have minor revision (07) they are SCRAP, the revision can be checked on the label that the unit has attached on the back, it is the fifth and sixth digit of the MSN.
Unidades demasiado dañadas por el cliente se mandan a SCRAP.
Units too damaged by the customer are sent to SCRAP.
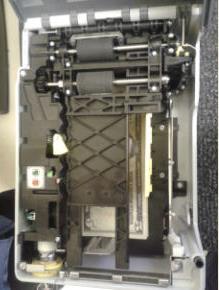
Para empezar a realizar mantenimiento debe desinstalar el Loader de la cama de prueba.
To start performing maintenance, you must uninstall the Loader from the test bed.
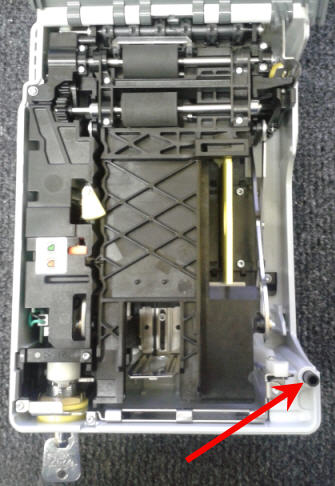
§ Asegurarse que el Lock no esté dañado, revise con la llave de prueba que la cerradura metálica funcione correctamente.
§ Make sure that the lock is not damaged, check with the test key that the metal lock works correctly.
|
|
|
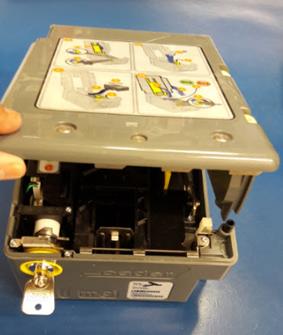
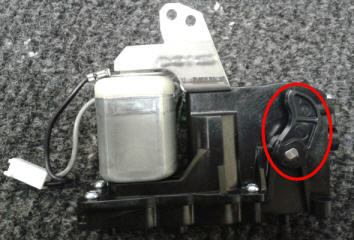
§ Revise que la cubierta abra y cierre correctamente, que no esté quebrada o dañada.
§ Check that the cover opens and closes properly, that it is not broken or damaged.
|
|
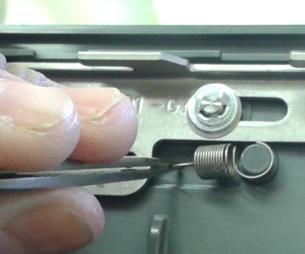
§ Revise que los resortes estén en buenas condiciones, de no ser así, remplácelos.
§ Check that the springs are in good condition, if not, replace them.
|
|
§ Revise que no se encuentre quebrada la bandera indicadora de billetes, de ser así, remplácela.
§ Check that the banknote indicator marker is not broken, if so, replace it.
|
|
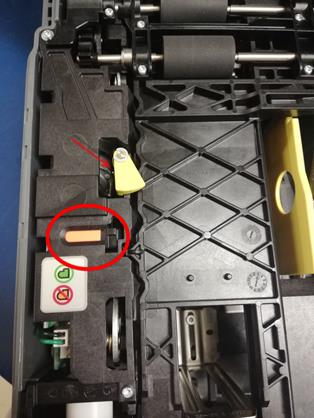
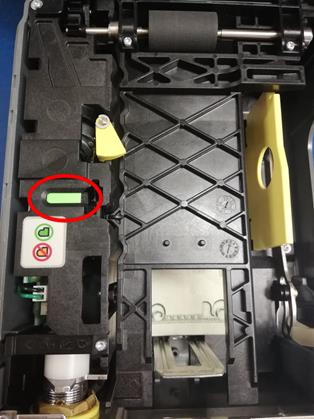
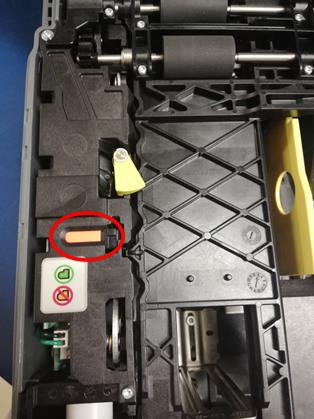
§ Revise que la bandera indicadora de billetes se encuentre en color naranja al momento de levantar la cubierta negra, esto indica que está vacío el Loader.
§ Check the banknote indicator marker is orange when lifting the black cover, this indicates that the Loader is empty.
|
|
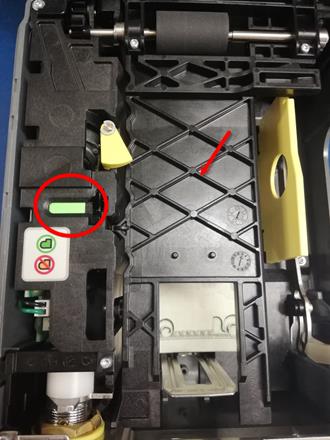
§ Revise que la bandera indicadora de billetes se encuentre en color verde al momento de introducir los billetes y bajar la cubierta negra, esto indica que el Loader tiene billetes.
§ Check that the banknote indicator marker is green when entering the banknotes and lowering the black cover, this indicates that the Loader has banknotes.
|
|
§ Revise que la cubierta negra se levante y se baje correctamente. Introduzca los billetes cerciorándose que el mecanismo funcione correctamente.
§ Check that the black cover is raised and lowered correctly. Insert the banknotes making sure that the mechanism works correctly.
|
|
|

Como desarmar y dar mantenimiento y reparación más a fondo.
How to disassemble and give maintenance and repair more thoroughly.
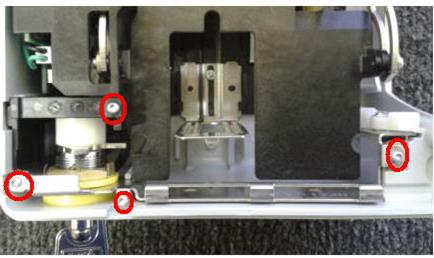
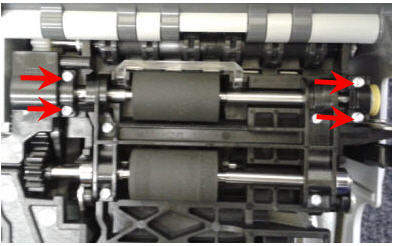
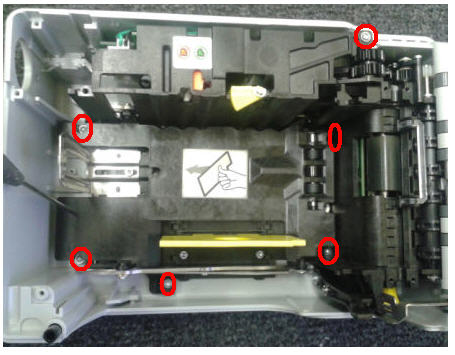
Retire los cuatro tornillos marcados en la siguiente imagen:
Remove the four screws marked in the following image:
|
|
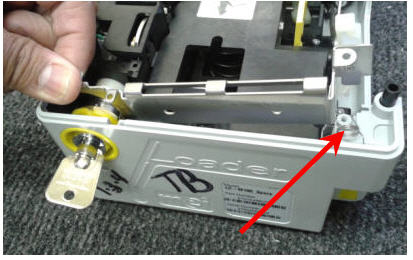
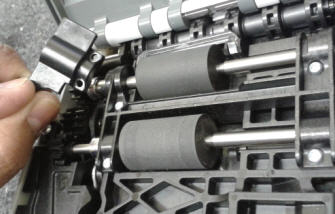
Retire la guía y retire el resorte lateral.
Remove the guide and remove the side spring.
|
|
Retire la carcasa de la llave.
Remove the key housing.
|
|
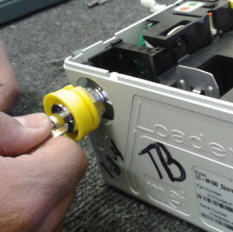
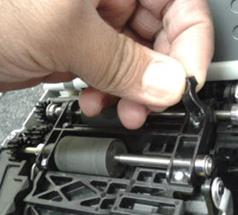
Retire la base de la llave.
Remove the base of the key.
|
|
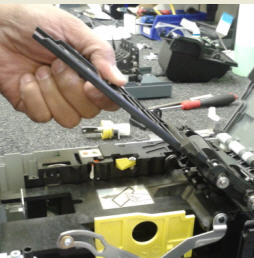
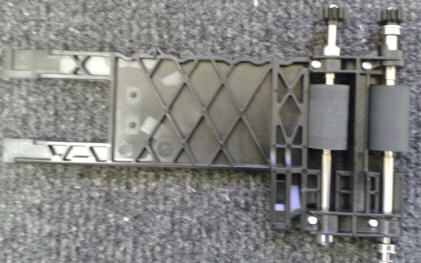
Retire los 4 tornillos del Top Rubber Drums (pieza con rodillos).
Remove the 4 screws of the Top Rubber Drums.
|
|
Retire los soportes de los rodillos.
Remove the roller supports.
|
|
|
Retire la cubierta.
Remove the cover.
|
|
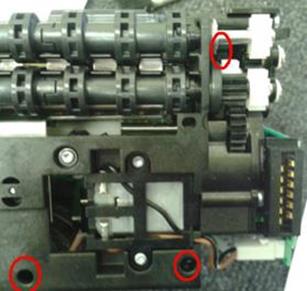
Retire los 6 tornillos indicados en la siguiente imagen:
Remove the 6 screws indicated in the following image:
|
|
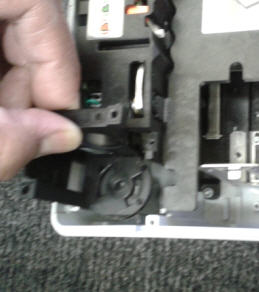
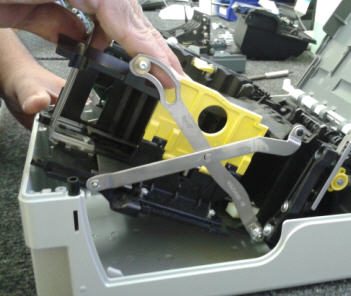
Retire el mecanismo.
Remove the mechanism.
|
|
Retire los cristales.
Remove the crystals.
|
|
Revise que los rodillos del Top Rubber Drum se encuentren en buenas condiciones (sin daños ni desgaste).
Check that the Top Rubber Drum rollers are in good condition (no damage or wear).
|
|
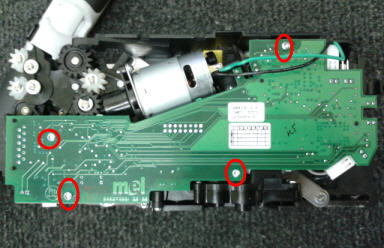
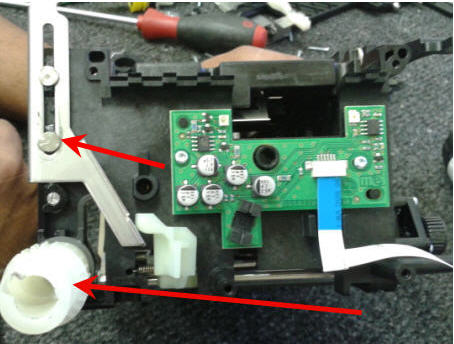
Para retirar la tablilla lógica retire los cuatro tornillos que se indican a continuación:
To remove the logic board, remove the four screws indicated below:
|
|
Desconecte los arneses.
Disconnect the harnesses.
|
|
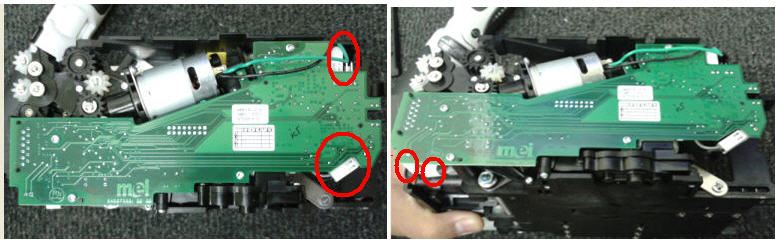
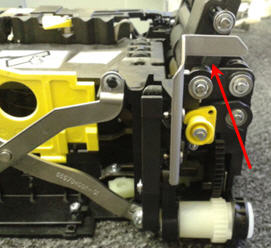
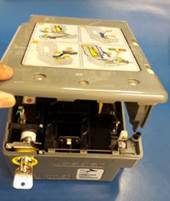
Retire los dos tornillos del motor que se muestran en la imagen.
Remove the two motor bolts shown in the picture.
|
|
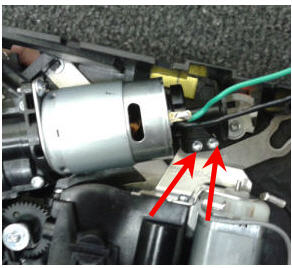
Retire los tres tornillos de la parte trasera del motor.
Remove the three screws from the back of the motor.
|
|
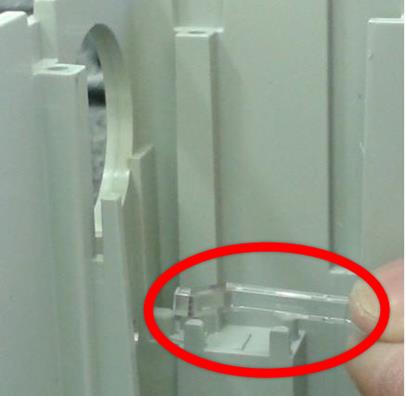
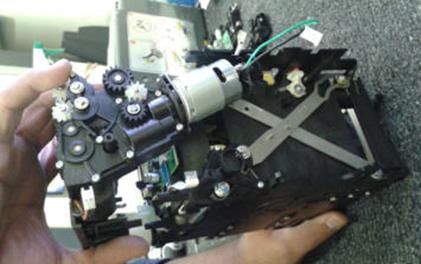
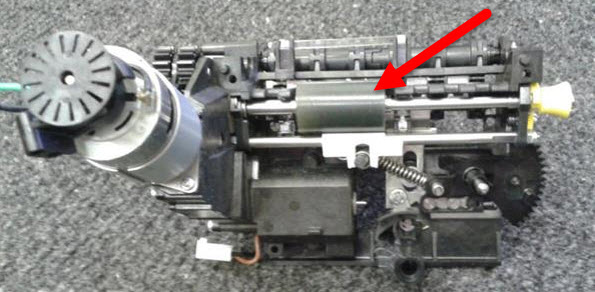
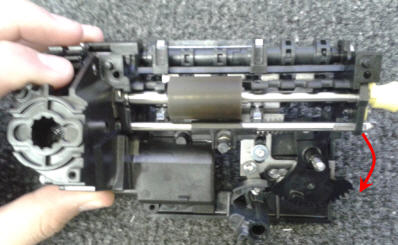
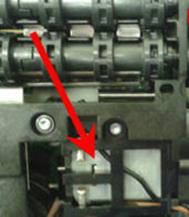
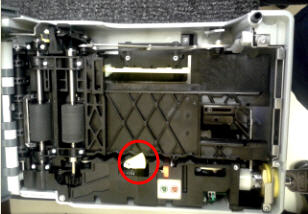
Retire el motor y revise que el área señalada no se encuentre quebrada:
Remove the engine and check that the indicated area is not broken:
|
|
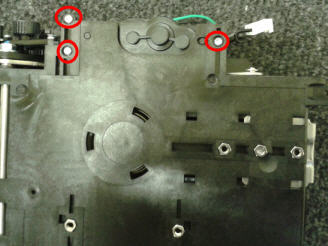
Retire los 4 tornillos que se indican:
Remove the 4 indicated screws:
|
|
|
Desinstale el mecanismo.
Uninstall the mechanism.
|
|
Limpie el rodillo.
Clean the roller.
|
|
Utilice una franela de microfibra humedecida con alcohol isopropílico al 5%
Use a microfiber flannel moistened with 5% isopropyl alcohol.
|
|
|

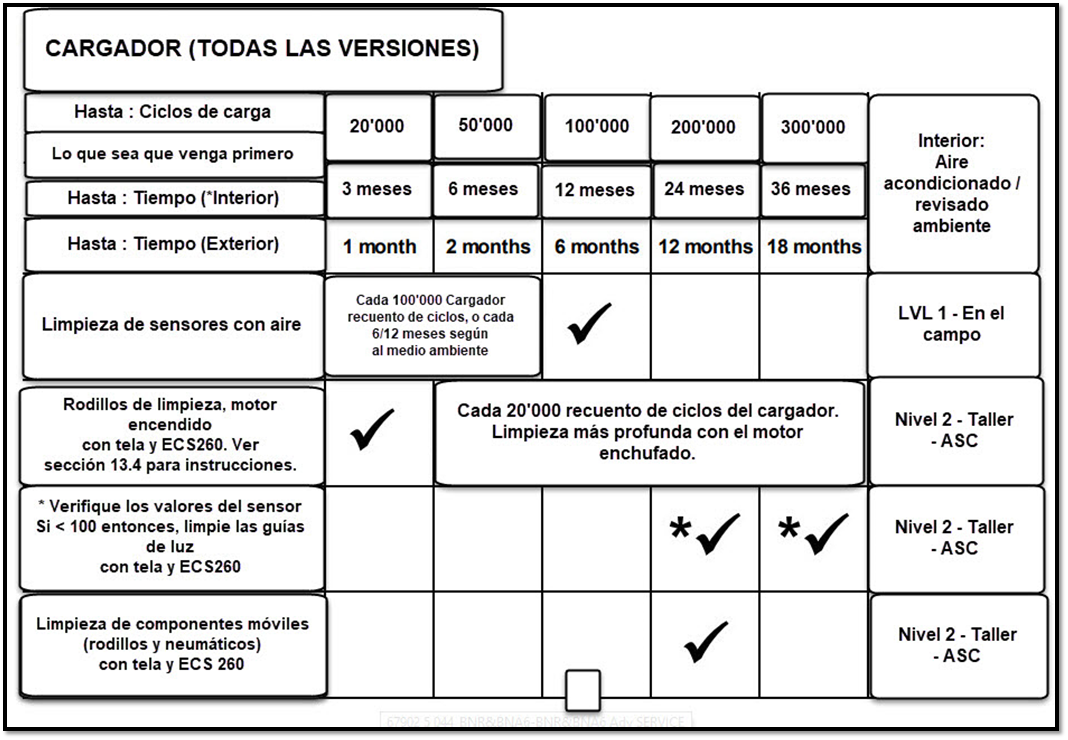
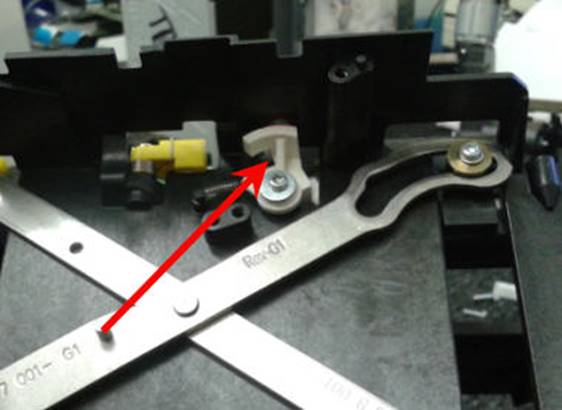
Revise que el indicador de nivel de carga no se encuentre quebrado (el color del indicador pude ser negro).
Check that the charge level indicator is not broken (the color of the indicator may be black).
|
|

En caso de estar quebrado, retire la parte quebrada y continúe con las siguientes instrucciones:
If it is broken, remove the broken part and continue with the following instructions:
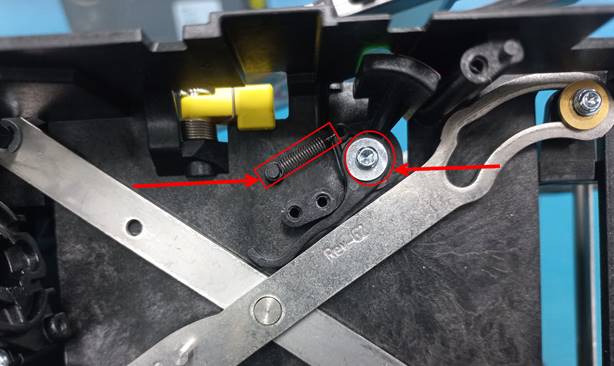
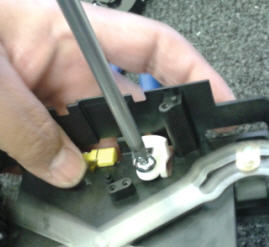
Si la bandera es negra solo retire el tornillo y el resorte para retirar la bandera dañada instale la bandera nueva y el resorte.
If the marker is black just remove the screw and spring to remove the damaged marker install the new marker and spring.
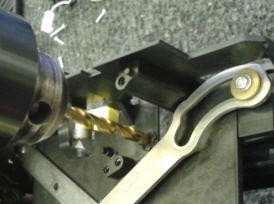
Nota: esto se realizaba si estaba dañado el orificio del tornillo en los loader de revisión anteriores (8) que traen la banderita blanca
Note: this was done if the screw hole was damaged in previous revision loaders (8) that have the white flag
Utilice una broca para crear un orificio pequeño como se muestra:
Use a drill to create a small hole as shown:
|
|
Coloque el nuevo indicador de nivel de carga y coloque un tornillo que no quede ajustado y permita el movimiento.
Install the new charge level indicator and insert a screw that is not tight and allows movement.
|
|
Coloque el resorte.
Install the spring.
|
|
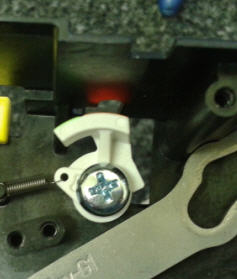
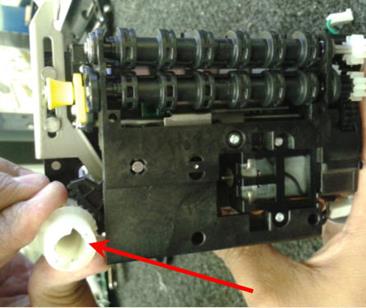
Limpie el engranaje blanco, engrase la parte metálica y revise que no le falte el resorte.
Clean the white gear, grease the metal part and check that the spring is not missing.
|
|
Limpie los cristales.
Clean the crystals.
|
|
Después de la limpieza vuelva a ensamblar la unidad como se muestra:
After cleaning reassemble the unit as shown:
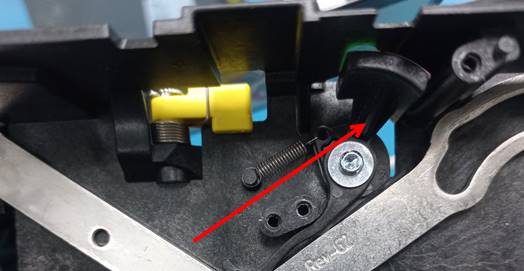
Posicionar el engranaje negro hacia abajo como se muestra en la imagen:
Position the black gear down as shown in the image:
|
|
Ensamble el mecanismo en su base.
Assemble the mechanism in its base.
Revisar que esté bien ensamblado.
Check that it is well assembled.
|
|

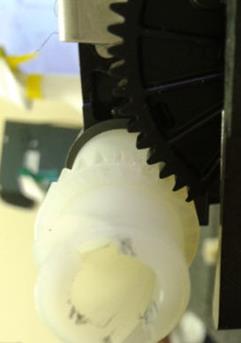
Acomode el engranaje blanco en su posición correcta, la muesca deberá coincidir con el engranaje negro, como se muestra en la imagen:
Adjust the white gear in its correct position, the notch should match the black gear, as shown in the image:
|
|
|
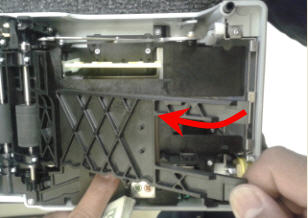
Tenga cuidado al colocar la guía metálica, debe quedar hacia arriba, como se muestra:
Be careful when placing the metal guide, it must face up, as shown:
|
|
|

Ensamblar todo a su posición original.
Assemble everything to its original position.
Verificando que el seguro de la puerta amortigüe correctamente.
Verifying that the door lock cushions correctly.
|
|
FALLAS COMUNES / COMMON FAILURES
§ La unidad no enciende à Cargar versión.
§ The unit does not turn on à Load version.
§ No se prepara la unidad à Tablilla defectuosa (retocar IC).
§ The unit does not prepare à Defective board (retouch IC).
|
|

Revisar motor lateral.
Check lateral motor.
|
|
Limpiar cristales.
Clean the crystals.
|
|
§ No marca cuando tiene billetes à Reemplazar el indicador de billetes.
§ Does not indicate when you have bills à Replace the bill indicator.
|
|

§ No abre el Lock à Reemplazar el BNR lock.
§ The lock does not open à Replace the BNR lock.
|
|
§ Amontonamiento de billetes al repartir à Checar Motor parte posterior.
§ Stacking banknotes when dispensing à Check rear Motor.
|
|
PRUEBA FINAL TÉCNICA Y DE CALIDAD / FINAL TECHNICAL AND QUALITY TEST
NOTA: La inspectora de calidad debe cerciorarse que el Tracking # de la unidad este cerrado en el log de AMCOR antes de hacer la prueba.
NOTE: The quality inspector must ensure that Tracking # of the unit is closed in the AMCOR log before testing.
El Loader debe estar actualizado con la versión 2.7.0, por el momento es la versión más actual (está sujeta a cambios).
The loader must be updated with version 2.7.0, at the moment it is the most current version (it is subject to change).
|
|

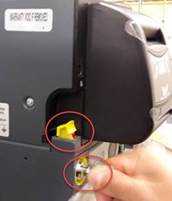
Abra la llave girando hacia a la derecha, suba la bandera amarilla del Interlock, retire el cargador (Loader) de la cama de prueba y coloque todos los billetes dentro del cargador, menos los de 1 dólar. Siga las instrucciones que se muestran a continuación:
Open the key by turning clockwise, raise the yellow Interlock marker, remove the loader from the test bed, and put all the bills into the loader, except the 1-dollar bills. Follow the instructions below:
|
|
|
Introduzca la llave y gire hacia la derecha; abra la cubierta.
Insert the key and turn to the right; open the cover.
|
|

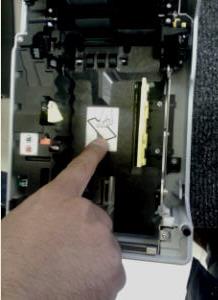
Mueva el Plate Locking Web y levante la guía.
Move the Plate Locking Web and lift the guide.
|
|
|
Empujar hasta que se escuche un clic.
Push until a click is heard.
|
|
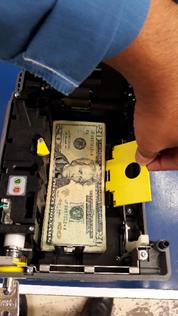
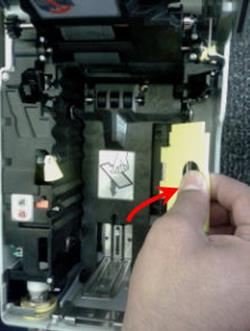
Jalar y mover hacia el lado derecho la bandera amarilla.
Pull and move the yellow marker to the right side.
|
|
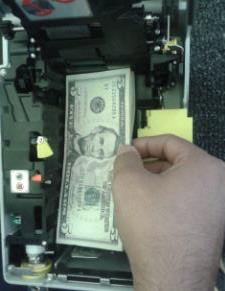
Introduzca todos los billetes no importa el orden
Enter all the bills no matter the order
|
|
Regrese la bandera amarilla a su posición original.
Return the yellow marker to its original position.
|
|
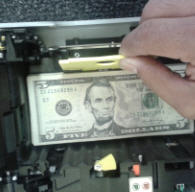
Baje la guía.
Lower the guide.
|
|
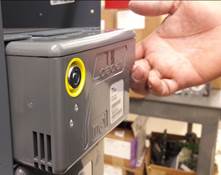
INDICADORES / INDICATORS
El indicador de color verde nos indica que la unidad tiene billetes almacenados dentro del cargador.
The green indicator indicates that the unit has banknotes stored inside the loader.
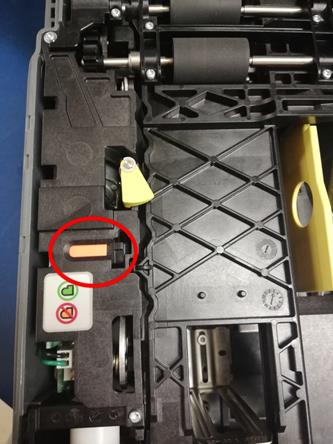
El indicador de color naranja nos indica que la unidad no tiene billetes almacenados.
The orange indicator indicates that the unit has no banknotes stored.
|
Con billetes – With banknotes
|
Sin billetes – Without banknotes
|
|
|
|
Cierre la tapa del cargador de billetes y cierre la llave. Instale el cargador (Loader) en la cama de prueba, baje la bandera amarilla y cerrar la llave del Interlock:
Close the Loader cover and close the key. Install the Loader on the test bed, lower the yellow marker and close the Interlock key:
|
|
|
|
|

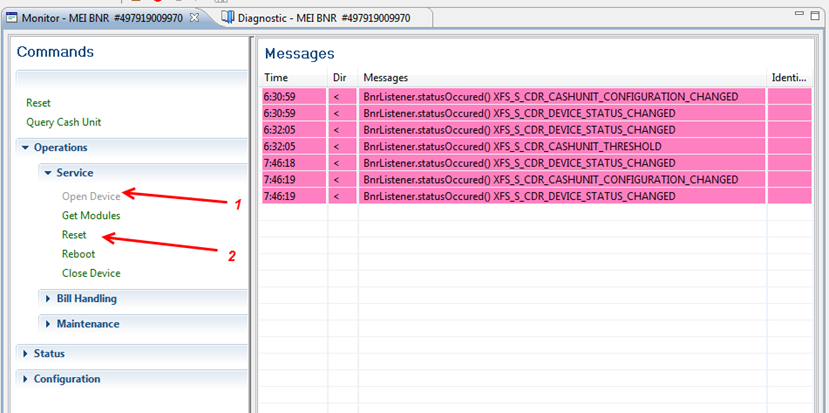
Seleccione – Select Monitor- MEI BNR
1. Seleccione – Select Open device
2. Seleccione – Select Reset
|
|
La unidad se reinicia y empieza a cargar el dinero. Distribuye los billetes a los recicladores y a la caja de efectivo.
The unit restarts and starts loading the money. Distributes the banknotes to the recyclers and to the cash-box.
|
|
Nota: cuando se esta ejecutando la prueba puede pasar dos situaciones, el loader se detiene y el indicador sigue marcando en verde esto significa que se detuvo al momento de repartir los billetes de $1 dollar, siga los pasos como a continuación se le indica, pero si reparte completamente y el indicador marca en rojo esto significa que termino de repartir todos los billetes, lo único que debe de realizar es seleccionar el icono del folder, empty para vaciar.
Note: when the test is running, two situations can happen: the loader stops and the indicator continues to show green, this means that it stopped when distributing the $1 dollar bills, follow the steps as indicated below, but If you distribute completely and the indicator is red, this means that you have finished distributing all the bills, all you have to do is select the icon of the folder, empty to empty.
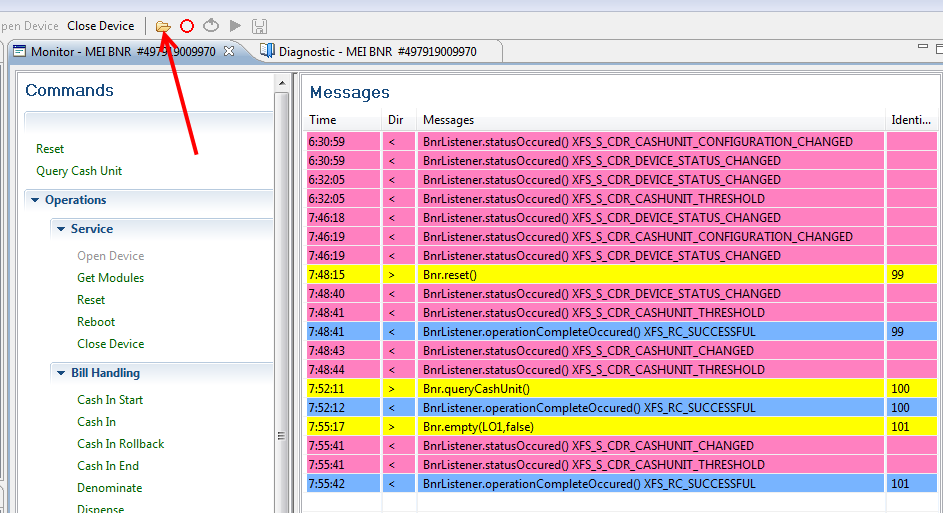
El indicador led debe estar prendido en color verde; esto indica que el Loader sigue cargado de billetes.
The led indicator should be lit in green; this indicates that the Loader is still loaded with bills.
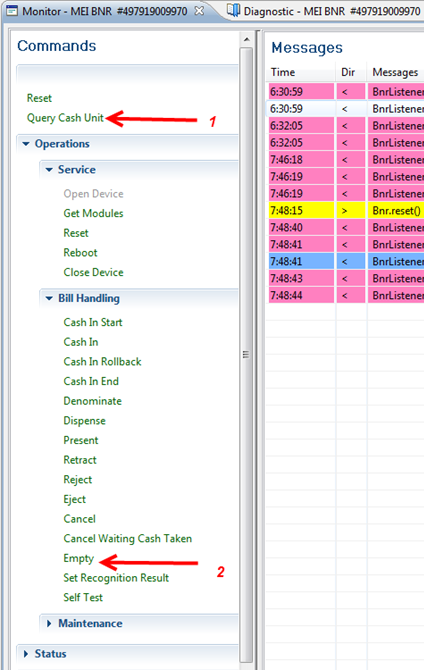
Pasos – Steps:
1. Seleccione Query Cash Unit (en la parte superior del menú).
1. Select Query Cash Unit (at the top of the menu).
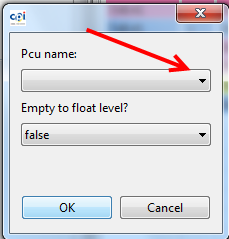
2. Seleccione Empty; se abrirá una ventana nueva.
2. Select Empty; a new window will open.
|
|
Seleccione – Select Pcu name
|
|
1. Seleccione – Select LO1
2. Seleccione – Select OK
|
|
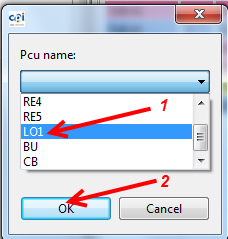
El Loader repartirá los billetes de 1 dólar que quedaron cargados.
The Loader will distribute the 1-dollar bills that were loaded.
Seleccione el icono del folder.
Select the folder icon.
|
|
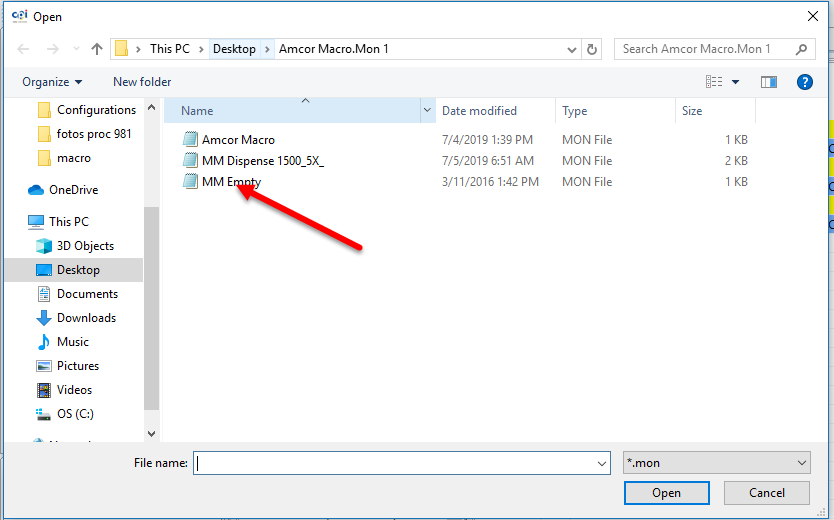
Seleccione – Select MM Empty
Seleccione – Select Open
|
|
Seleccione – Select Play
|
|
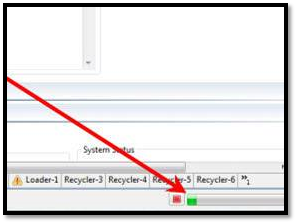
En este punto todos los billetes deben ser enviados a la caja de efectivo y los indicadores led del Loader deben estar en color rojo.
At this point, all banknotes must be sent to the cash-box and the Loader's LED indicators must be red.
|
|

Gire la llave, levantando bandera del Interlock y retire la caja de efectivo. Revise que todos los billetes se encuentren en buen estado.
Turn the key, raising the Interlock marker, and remove the cash-box. Check that all the banknotes are in good condition.
|
|
|

Al terminar de probar la unidad el personal de calidad se lleva la unidad a su estación de trabajo, pará el siguiente proceso.
At the end of testing the unit, the quality personnel take the unit to their work station, for the following process.
|
|
WI#: 1088 MEI Loader |
Originator/ Originador: B Perez 11/2/12 |
||||
|
Rev/ Revisión: 13 |
Rev Date/ Fecha de Revisión: 03/18/22 |
Name/ Nombre: D Casas |
Update/ Actualización: Translation/ Traducción |
Next Review/ Próxima Revisión: NA |
Approval/ Aprobado por: Tom St John |
|
|
14 |
04/26/22
|
D Casas |
Translation/ Traducción |
NA |
Tom St John |
|