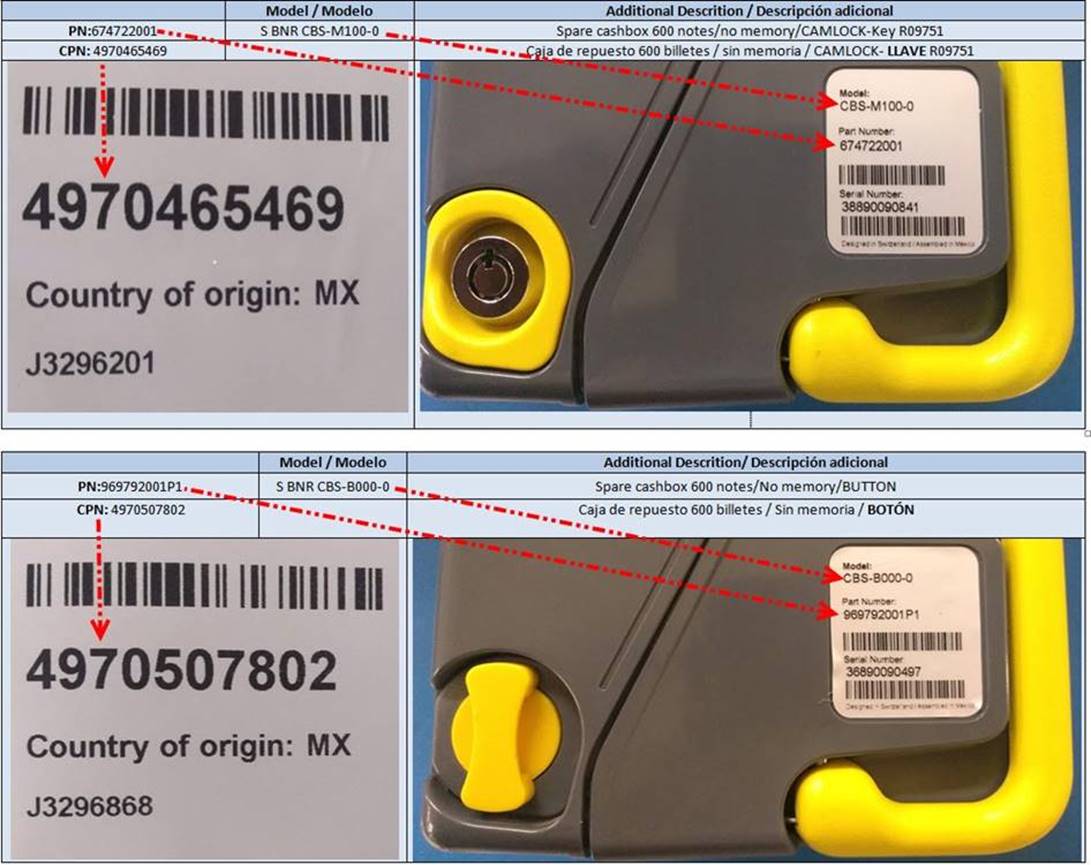
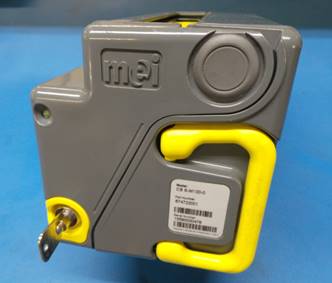
WI# 1057 BNR CASH-BOX
674722001 / 969792001
NOTA: Antes de empezar es importante verificar que el Customer Part Number (CPN) coincida con el Part Number (PN) y Modelo de la unidad.
NOTE: Before you start it is important to verify that the Customer Part Number (CPN) matches the Part Number (PN) and Model of the unit.
Ejemplo: El CPN 4970465469 corresponde a la cerradura metálica y el CPN 4970507802 corresponde al seguro de botón o plástico.
Example: CPN 4970465469 corresponds to the metal lock and CPN 4979507802 corresponds to the button or plastic lock.
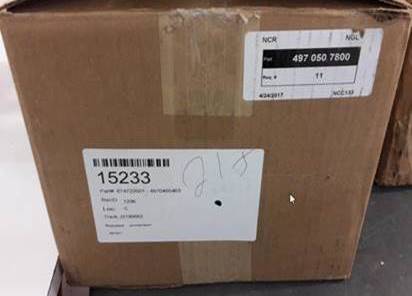
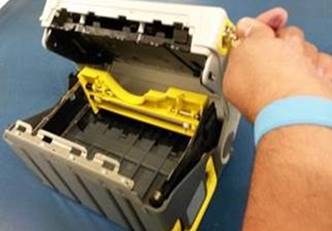
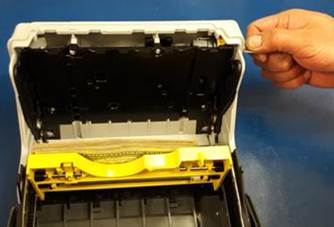
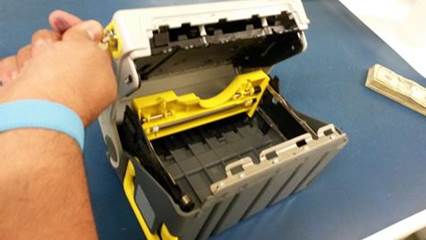
Saque la unidad de su empaque e ingrese la información del Tracking # en la página AMCOR como lo indican las instrucciones de trabajo.
Remove the unit from its packaging and enter the Tracking # information on the AMCOR page as indicated in the work instructions.
|
|
|

Antes de realizar cualquier prueba debe verificar la revisión de la unidad, si la revisión es 06 o anterior debe hacerla SCRAP. La revisión es el 5to y 6to número del MSN de la etiqueta ubicada en la parte posterior de la unidad, si la revisión es 07 o posterior, se reparan (está sujeta a cambios).
Before carrying out any test, you must verify the revision of the unit, if the revision is 06 or earlier, you must make it SCRAP. The revision is the 5th and 6th MSN number of the label located on the back of the unit, if the revision is 07 or later, they are repaired (it is subject to changes).
Nota: si la unidad trae partes sueltas o quebradas, pero que se puede reparar, no las meta a probar. Dele mantenimiento o reparación según sea el caso.
Note: If the unit has loose or broken parts that can be repaired, do not test them. Give it maintenance or repair as the case may be.
Debe ingresar la información de la caja de efectivo en una hoja de Excel (Tracking #, número de serie, MSN y código de falla).
You must enter the cash-box information in an Excel sheet (Tracking #, serial number, MSN and fault code).
|
|

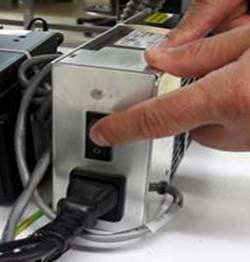
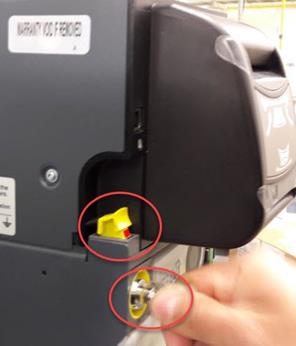
Encienda la fuente de la cama de prueba, la llave debe estar abierta y la bandera amarilla hacia arriba.
Turn on the source of the test bed, the key must be open and the yellow flag up.
|
|
|

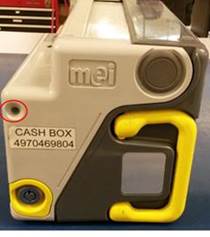
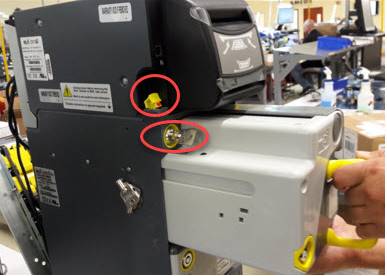
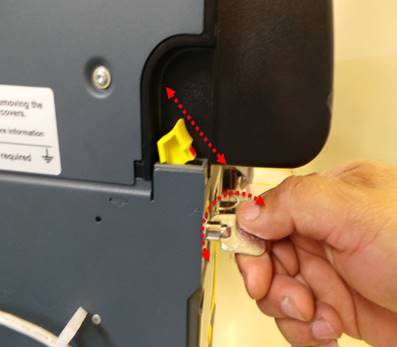
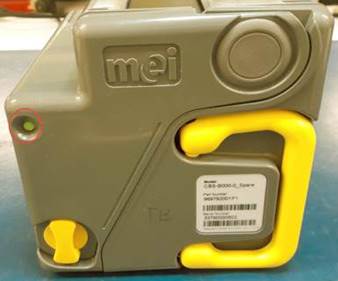
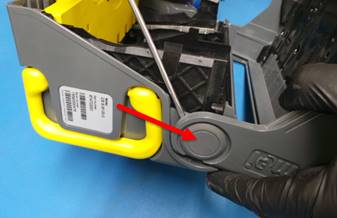
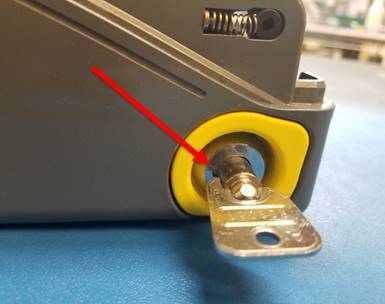
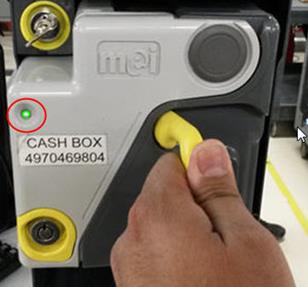
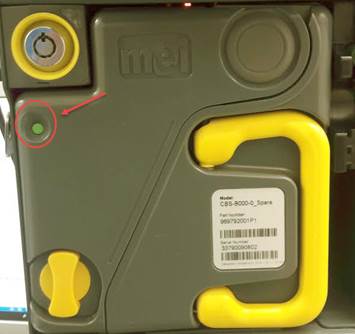
Si la caja de efectivo tiene cerradura metálica, antes de colocarla en la cama de prueba verifique el color del sensor, si el color es oscuro, abra y cierre la caja con la llave para que el sensor quede en color verde, de esa manera quedara preparada y lista para insertar en la cama de prueba. En el caso de la caja de efectivo con cerradura plástica no es necesario abrirla y cerrarla.
If the cash box has a metal lock, before placing it on the test bed check the color of the sensor, if the color is dark, open and close the box with the key so that the sensor turns green, that way It will be prepared and ready to insert into the test bed. In the case of the cash box with a plastic lock, it is not necessary to open and close it.
|
Sensor oscuro – Dark sensor |
Abra y cierre la caja – Open and close box |
Sensor verde – Green sensor |
|
|
|
|

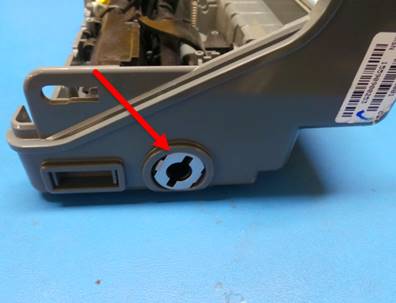
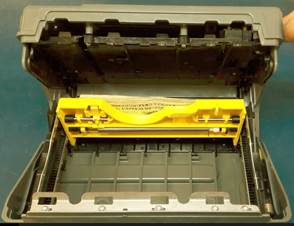
Caja con seguro de plástico.
Box with plastic lock.
|
|

Si la caja de efectivo no trae daños físicos que impidan la prueba y el diagnóstico, realice lo siguiente:
If the cash box does not bring physical damage that prevents testing and diagnosis, do the following:
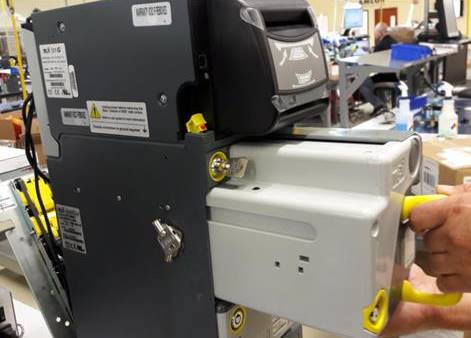
Debe tener la llave abierta y la bandera hacia arriba para colocar la caja en la cama de prueba, baje la bandera y cierre la llave girando a la izquierda y retírela.
You must have the key open and the flag up to place the box on the test bed, lower the flag and close the key by turning counterclockwise and remove it.
Coloque la caja de efectivo con la llave abierta y la bandera hacia arriba.
Place the cash-box with the key open and the flag up.
|
|
Baje la bandera amarilla, cierre la llave girando a la izquierda y retírela.
Lower the yellow flag, close the key by turning to the left and remove it.
|
|
|
En la página oficial de ATS seleccione la opción (ECODES), localice la barra gris y deslice hacia arriba y hacia abajo para escoger el código de error enumerado y su descripción que le encontró a la unidad.
On the official ATS page select the option (ECODES), locate the gray bar and slide up and down to choose the listed error code and its description found on the unit.
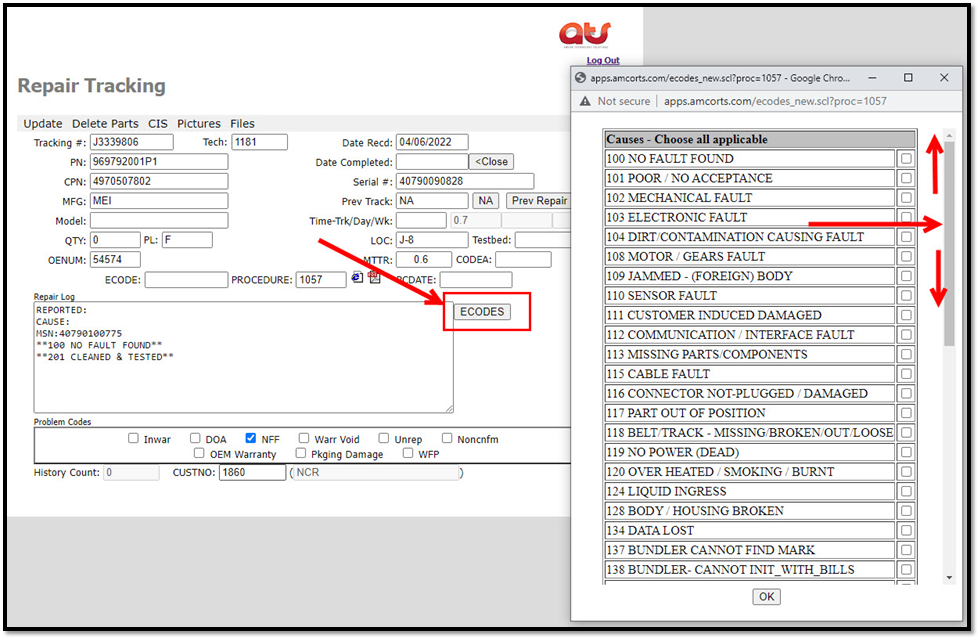
Nota: los diagnósticos se guardan si el cliente lo solicita.
Note: Diagnostics are saved if requested by the customer.
PRE-PRUEBA Y REVISIÓN VISUAL / PRE-TEST AND VISUAL REVIEW
|
TECNICO: Deberá de guardar los diagnósticos. |
TECHNICIAN: Should save the diagnostics. |
Únicamente los técnicos realizaran los siguientes pasos:
Only technicians will perform the following steps:
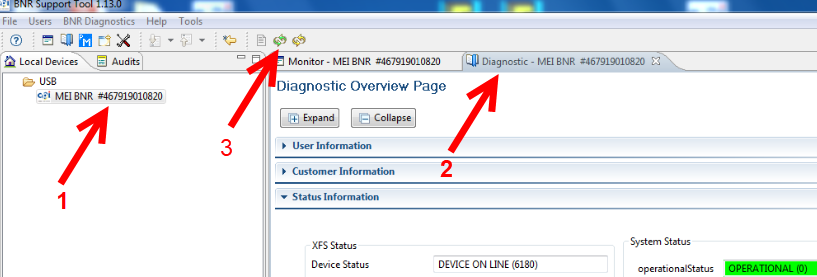
Con la cama de prueba preparada, seleccione el icono BNR Support
Tool: 
With the test bed ready, select the BNR Support Tool icon:
En la siguiente ventana seleccione MEI BNR XXXXXXXXXXX
In the next window select MEI BNR XXXXXXXXXXX
Empezará a abrir el programa.
It will start to open the program.
1.-Seleccione Mei BNR – Select Mei BNR
2.-Seleccione Diagnostic – Select Diagnostic
3.-Seleccione Refresh – Select Refresh
|
|
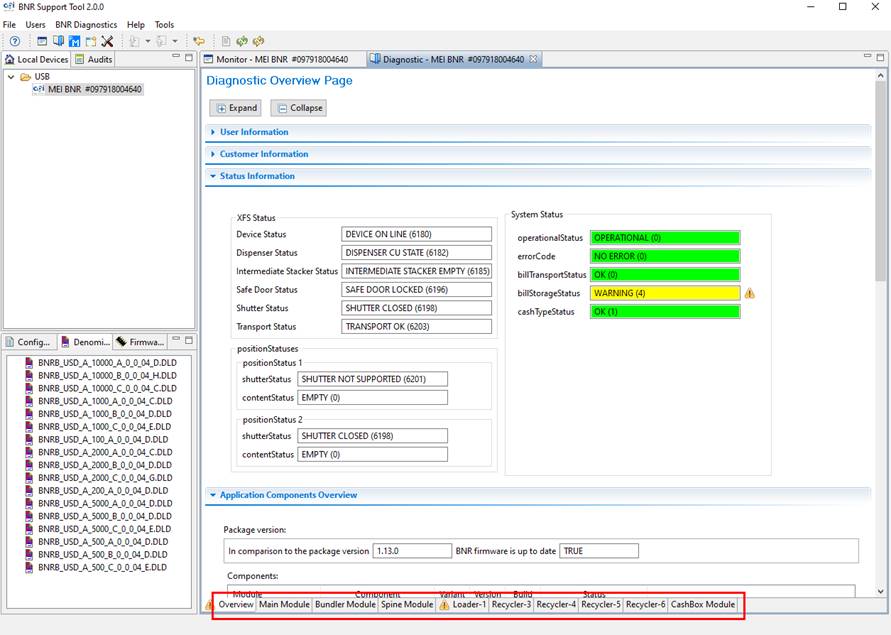
Espere a que el MM realice su preparación.
Wait for the Main Module to prepare.
Cuando el cabezal o cualquier otro modulo tenga un error, será detectado en esta sección.
When the head or any other module has an error, it will be detected in this section.
|
|
COMO GENERAR UN DIAGNÓSTICO / HOW TO GENERATE A DIAGNOSIS
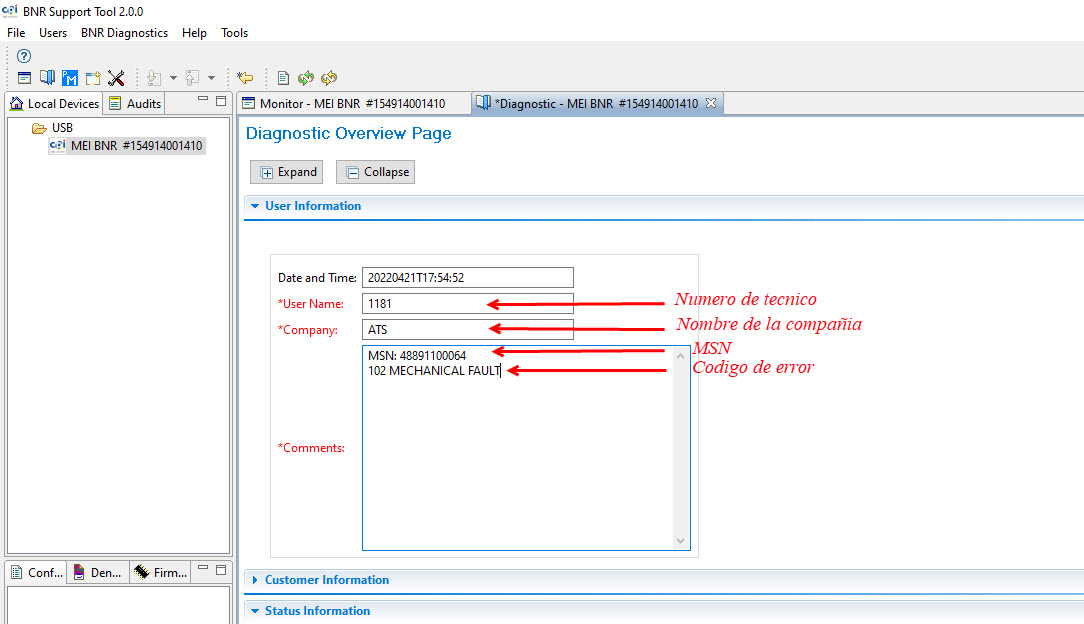
Llene las siguientes casillas como se muestra en la imagen, utilizando el código de error para la caja de efectivo.
Fill in the following boxes as shown in the image, using the error code for the cash-box.
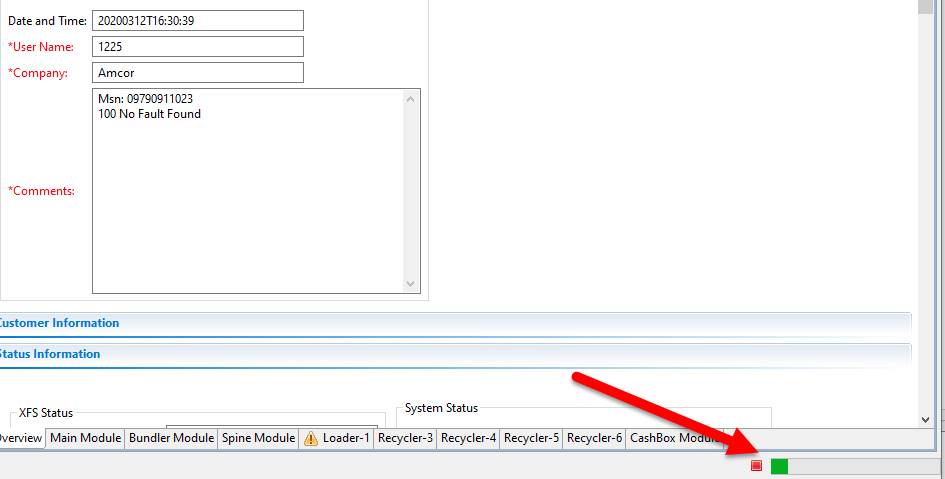
Seleccione User information.
Select User Information.
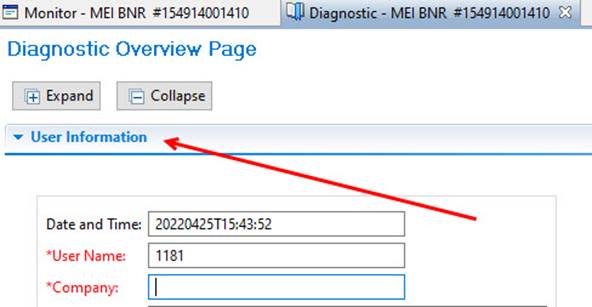
Llene las siguientes casillas: User Name – Company – Comments.
Fill in the following blanks: User Name-Company-Comments.
|
|
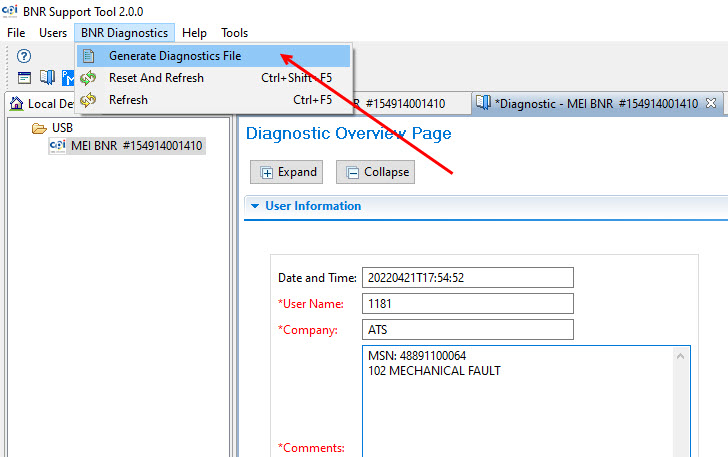
Seleccione en la barra de herramientas la opción BNR Diagnostics.
Select the BNR Diagnostics option from the toolbar.
Seleccione Generate Diagnostics File.
Select Generate Diagnostics File.
|
|
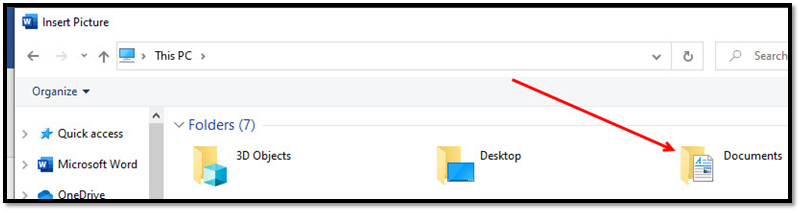
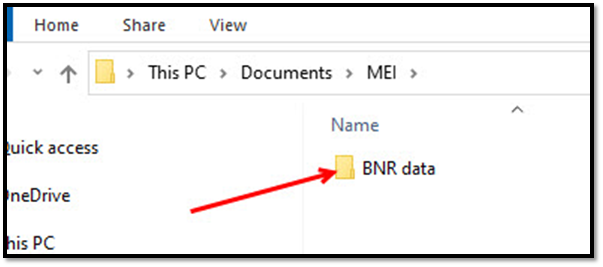
En su PC localice y vaya abriendo los folders: Documents, MEI, bnr data, Audit hasta encontrar el Folder Cas Box diagnostic
On your PC locate and open the folders: Documents, MEI, bnr data, Audit until you find the Folder Cas Box diagnostic
Documents
MEI

BNR data
Audit
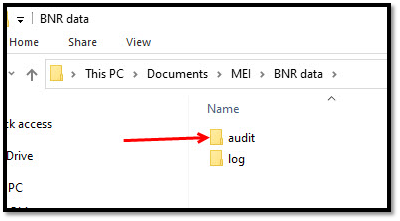
Seleccione – Select Cash Box Diagnostic
|
|
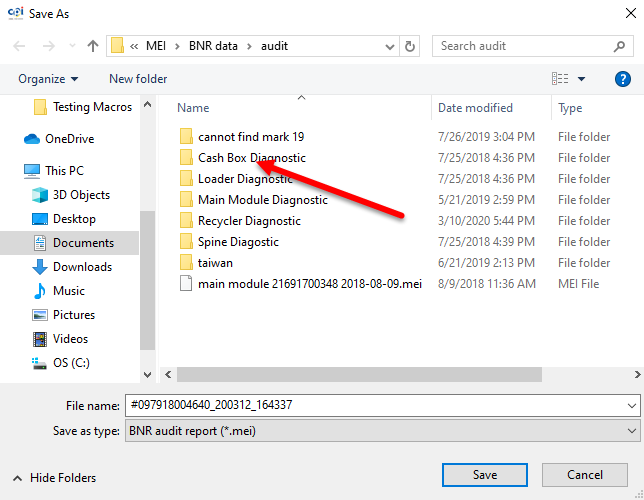
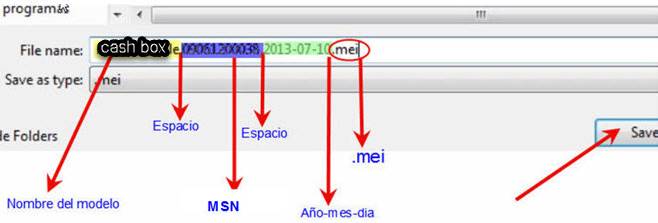
En el área de nombre del archivo (File name) ingrese la siguiente información tal y como se indica:
In the File name area, enter the following information as indicated:
El nombre del modelo, en este caso es cash box, msn, fecha y .mei al final.
The model name, in this case is cash box, msn, date and. mei at the end.
|
|
Al terminar seleccione guardar (Save).
When finished select Save.
Comenzará a cargar la información.
The information will start to load.
|
|
Como revisar el diagnóstico guardado:
How to review the saved diagnosis:
1. Seleccione la opción Audits.
1. Select the Audits option.
2. Seleccionar flecha para abrir folder.
2. Select arrow to open folder.
3. Seleccionar Diagnostico por MSN o por fecha de elaboración.
3. Select Diagnosis by MSN or by elaboration date.
4. Se abrirá una pestaña nueva Diagnostic cash box en el cual podrá revisar los datos almacenados.
4. A new Diagnostic cash-box tab will open in which you can review the stored data.
|
|

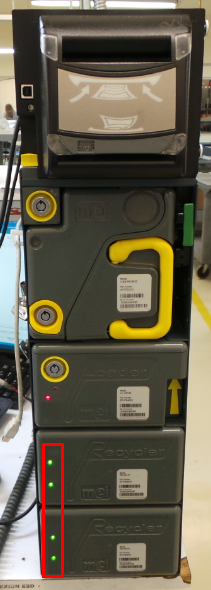
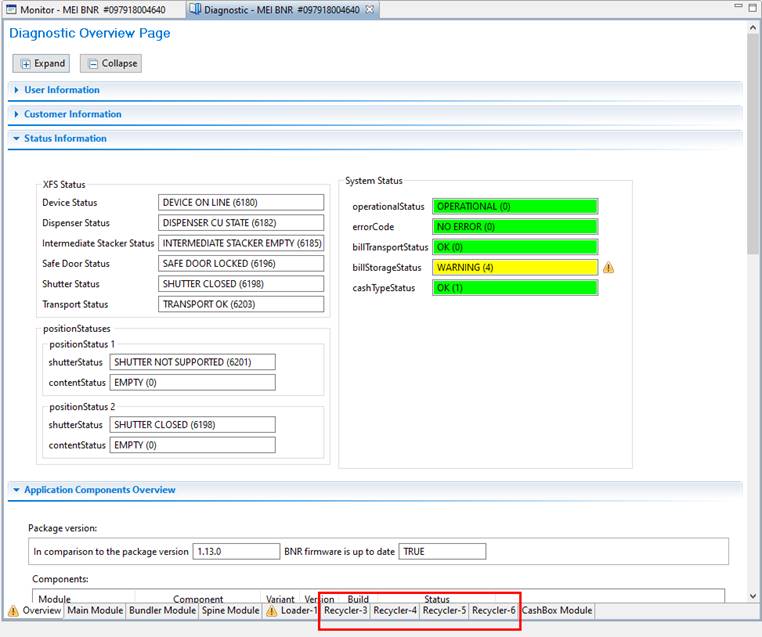
Los indicadores led de los recicladores se encuentran encendidos, esto significa que están activos y listos para recibir billetes. Es necesario bloquearlos para realizar la prueba del cash-box.
The recyclers' LEDs are on, this means that they are active and ready to receive bills. It is necessary to block them to perform the cash-box test.
|
|
NOTA: Si durante el proceso de bloqueo de recicladores la caja presenta ruidos, proceder con el mantenimiento o reparación de la unidad y de este modo evitar dañar los billetes.
NOTE: If the box presents noises during the recyclers blocking process, proceed with the maintenance or repair of the unit and thus avoid damaging the banknotes.
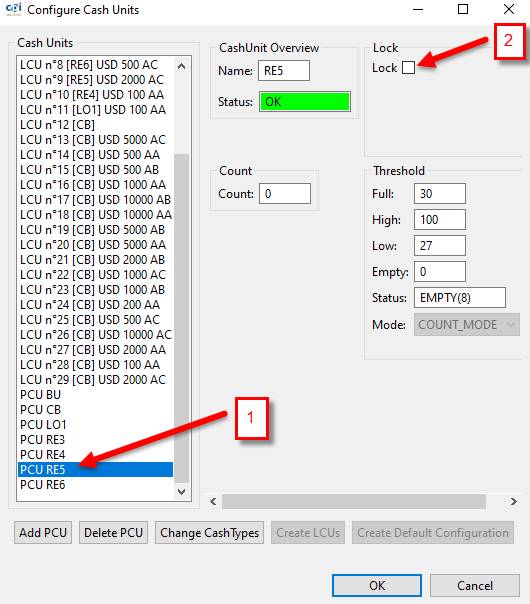
COMO BLOQUEAR LOS RECICLADORES / HOW TO BLOCK RECYCLERS
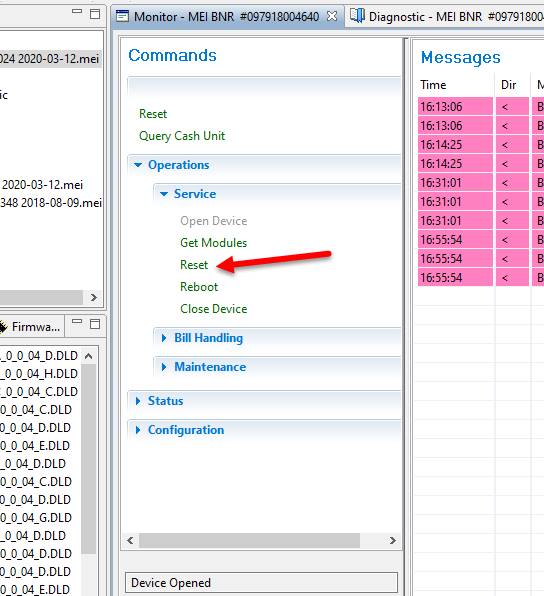
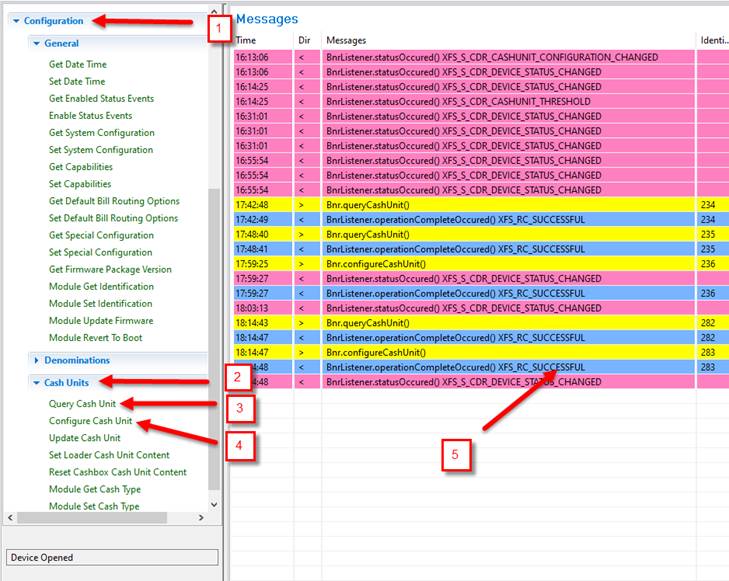
En la pestaña de Monitor, seleccione las siguientes opciones:
In the Monitor tab, select the following options:
1. Configuration
2. Cash Unit
3. Query Cash Unit
4. Configure Cash Unit
5. Doble clic en renglón azul del lado derecho de su programa – Double-click the blue row on the right side of your program.
|
|

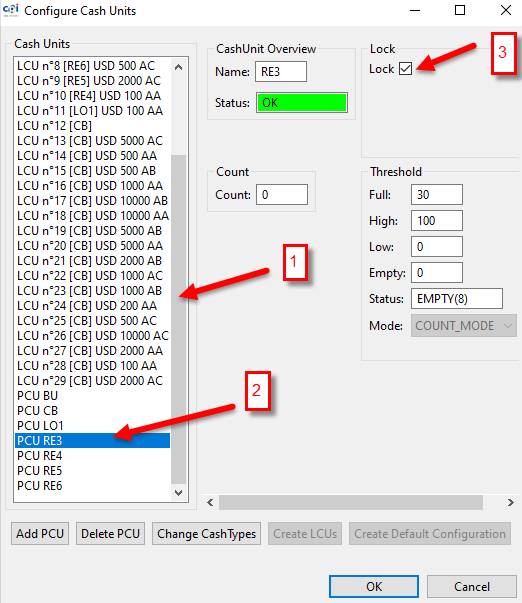
Se abrirá una ventana en el lateral izquierdo del programa;
A window will open on the left side of the program;
1. Mueva la barra deslizante hasta encontrar la opción PCU RE3
1. Move the slider bar until you find the PCU RE3 option.
2. Seleccione PCU RE3
2. Select PCU RE3
3. Marque la casilla de Lock.
3. Check the Lock box.
(Se repite el proceso con PCU RE4, PCU RE5 y PCU RE6)
(The process is repeated with PCU RE4, PCU RE5 and PCU RE6)
|
|
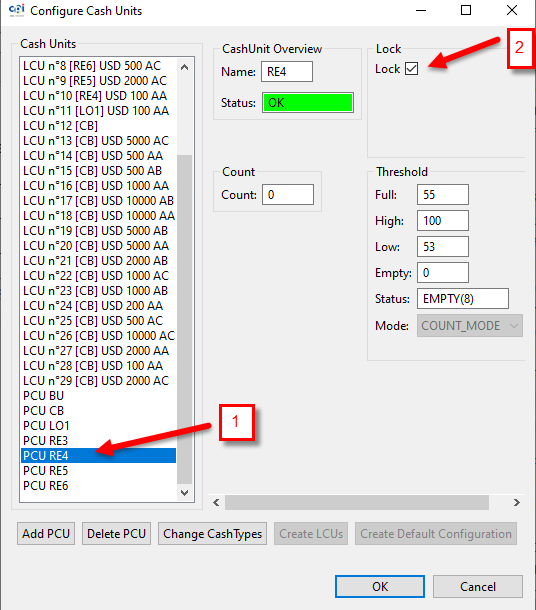
1. Seleccione PCU RE4
1. Select PCU RE4
2. Marque la casilla de Lock.
2. Check the Lock box.
|
|
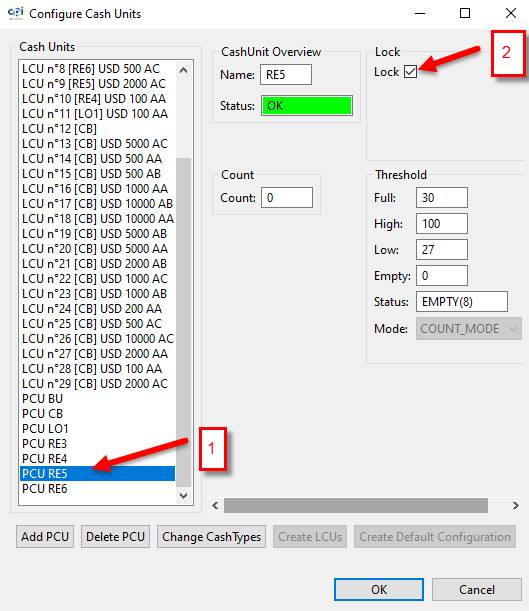
1. Seleccione PCU RE5
1. Select PCU RE5
2. Marque la casilla de Lock.
2. Check the Lock box.
|
|
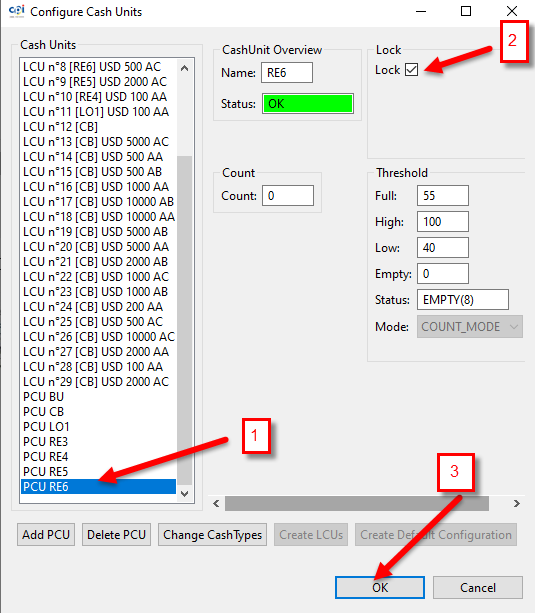
1. Seleccione PCU RE6
1. Select PCU RE6
2. Marque la casilla de Lock.
2. Check the Lock box.
3. Seleccionar OK
3. Select OK
|
|
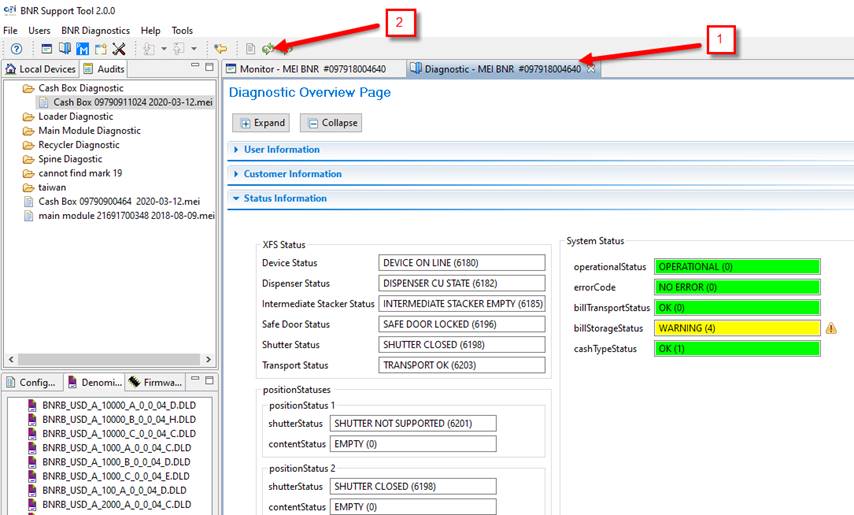
1. En la pestaña de Diagnostic.
1. On the Diagnostic tab.
2. Seleccione reset refresh, esto bloqueara los recicladores y los indicadores led se apagarán.
2. Select reset refresh, this will block the recyclers and the led indicators will turn off.
|
|
En la pestaña Diagnostic, en la parte inferior del programa aparecerá así:
In the Diagnostic tab, at the bottom of the program it will appear like this:
|
|
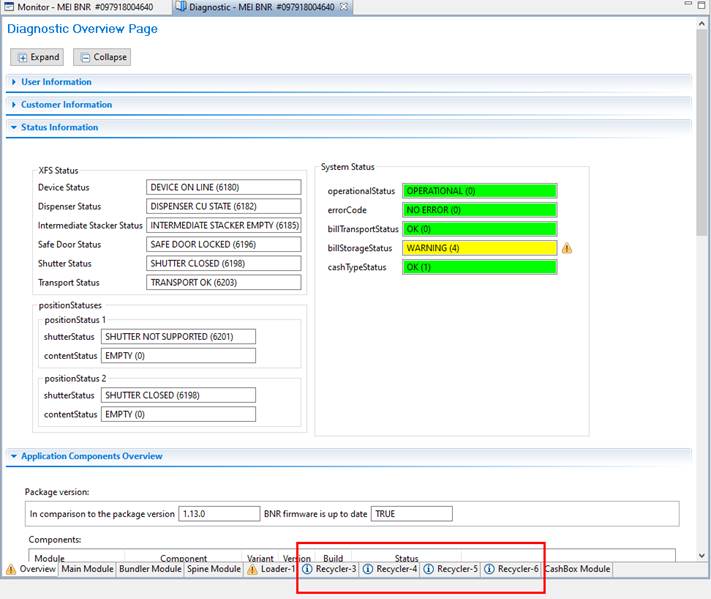
Los indicadores led deben estar apagados.
The led indicators must be off.
|
|

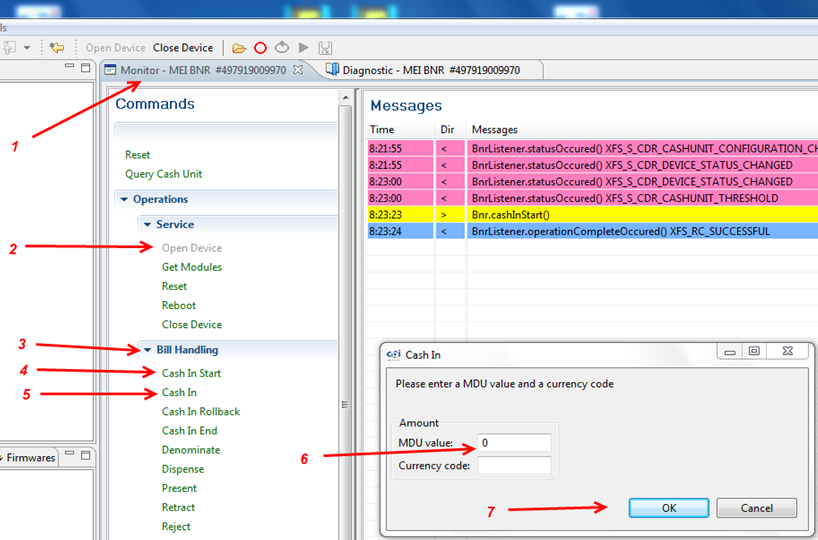
PRUEBA DE BILLETES PARA DIAGNOSTICAR FALLAS
Después de haber bloqueado los recicladores y reiniciado la cama de prueba, realice la prueba con todos los billetes, los billetes se irán directamente a la caja de efectivo.
After you have locked the recyclers and restarted the test bed, run the test with all the bills, the bills will go directly to the cash-box.
INSERCIÓN DE TODOS LOS BILLETES.
INSERTION OF ALL BANKNOTES.
Mientras realice la prueba debe revisar que la unidad:
While performing the test, you must check that the unit:
-No realice ruidos extraños
-Do not make strange noises
-No atasque los billetes
-Do not jam the bills
-No salgan los billetes doblados
-No folded banknotes
Debe realizar dos veces la inserción de los billetes.
You must insert the banknotes twice.
Siga las siguientes instrucciones:
Follow the instructions below:
1. Seleccione - Select Monitor- MEI BNR
2. Seleccione - Select Open Device
3. Seleccione - Select Bill Handling
4. Seleccione - Select Cash in Start
5. Seleccione - Select Cash In
6. Localice campo MDU y escriba el número 0 – Locate MDU blank and write number 0
7. Seleccione - Select OK
|
|

Los LEDs de color verde indican que la unidad esta lista para que ingresemos los billetes.
The green LEDs indicate that the unit is ready for us to insert the bills.
|
|
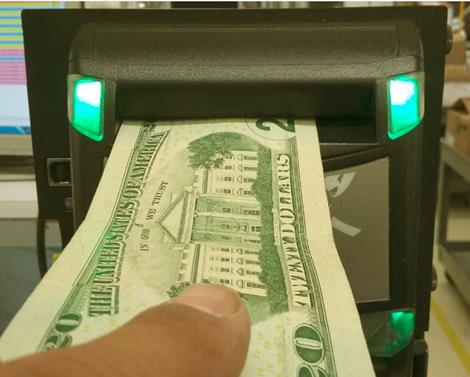
El MM mandará los billetes directo a la caja de efectivo, durante la prueba no debe realizar ruidos extraños la caja de efectivo al momento de estar aceptando los billetes.
The Main Module will send the banknotes directly to the cash-box, during the test the cash-box should not make strange noises when accepting the banknotes.
Cuando termine de ingresar todos los billetes, abra la llave girando a la derecha, levante la bandera amarilla y saque la caja.
When you finish entering all the bills, open the key by turning to the right, raise the yellow flag and take out the box.
|
|
|
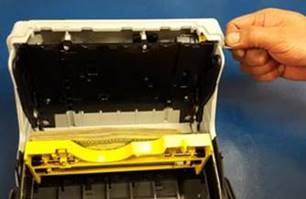
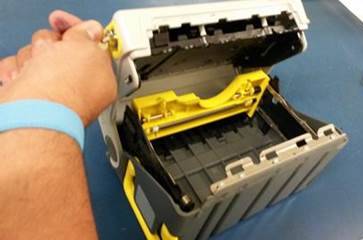
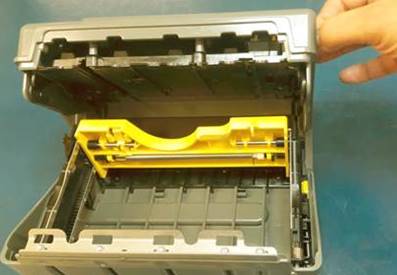
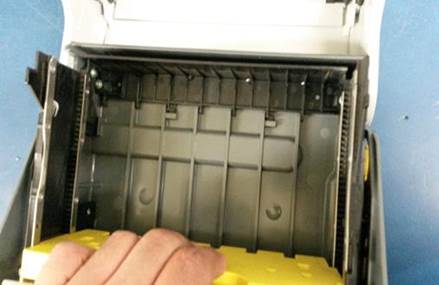
Si la caja es de cerradura metálica abra la caja con la llave, verifique que los billetes salgan acomodados y retírelos o si tiene seguro de plástico gire a la izquierda y a la derecha para abrir y verifique que los billetes salgan acomodados.
If the box has a metal lock, open the box with the key, check that the bills come out accommodated and remove them, or if it has a plastic lock, turn left and right to open and check that the bills come out accommodated.
|
|
|
|
|
|
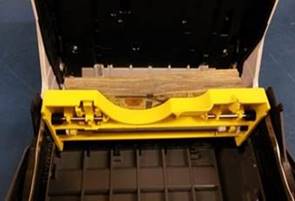


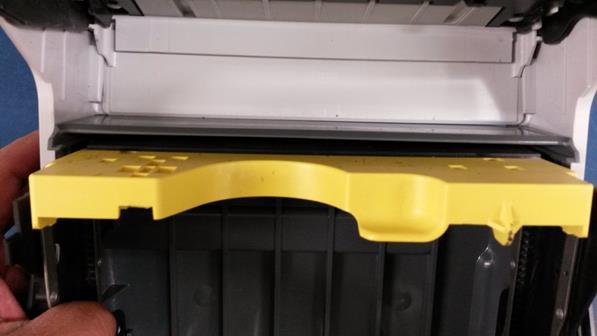
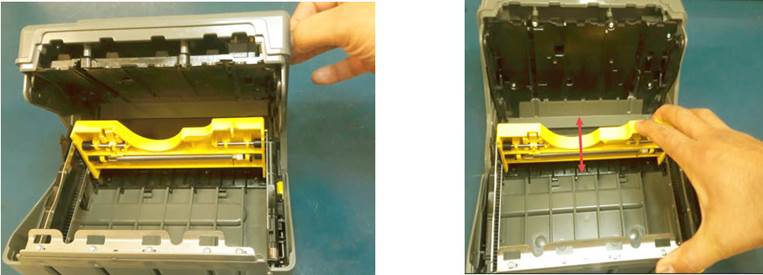
Abra y cierre la caja de efectivo, baje y suba la plataforma amarilla por lo menos tres veces para cerciorarse que funcione correctamente.
Open and close the cash-box, lower and raise the yellow platform at least three times to make sure it works properly.
Con cerradura metálica – With metal lock
|
|
|

Con cerradura de plástico – With plastic lock
|
|
|

REPARACION Y MANTENIMIENTO / REPAIR AND MAINTENANCE
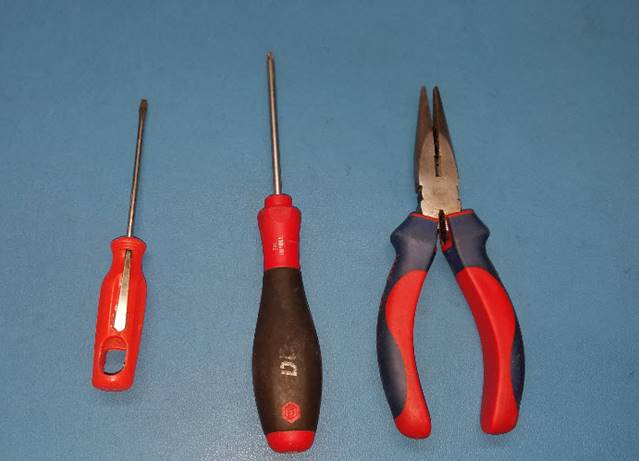
Herramientas necesarias para mantenimiento o reparación de caja de efectivo.
Tools needed for maintenance or repair of cash drawer.
1 – Desarmador Torx 10
1 - Torx 10 Screwdriver
2 – Desarmador plano chico
2 - Small flat screwdriver
3 – Pinzas de punta
3 - Tip tweezers
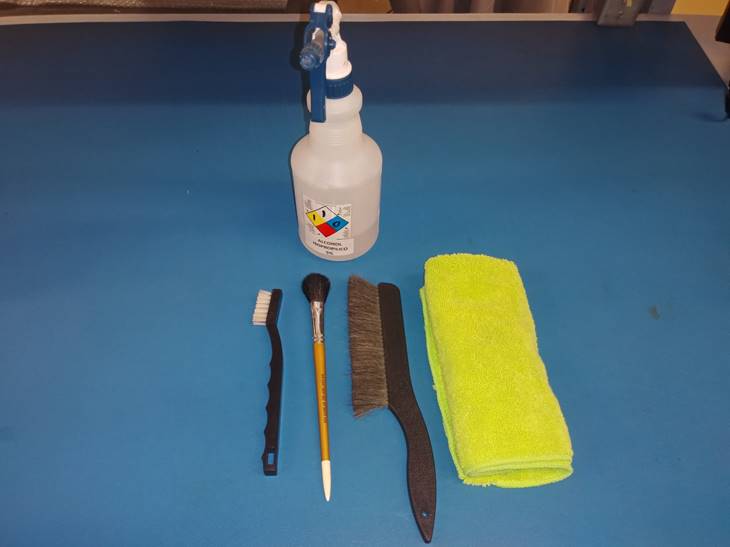
Artículos requeridos para realizar limpieza general.
Items required to perform general cleaning.
· Alcohol isopropílico al 5%
· 5% isopropyl alcohol
· Cepillo antiestático
· Antistatic bristle brush
· Brochas antiestáticas
· Antistatic brushes
· Franela de Microfibra
· Microfiber Flannel
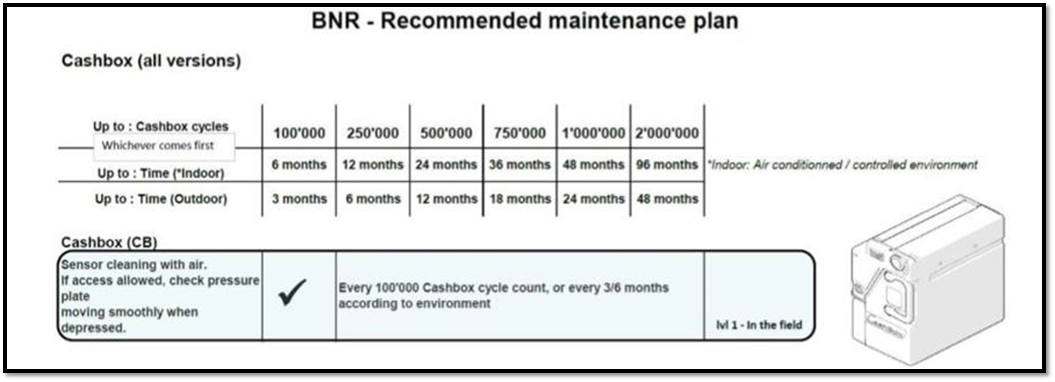
PLAN DE MANTENIMIENTO
MAINTENANCE PLAN
La caja de efectivo no registra ciclos, por lo cual, para este modelo se tomará en cuenta el tiempo en campo.
The cash box does not record cycles, so, for this model time in the field will be taken into account.
|
|

|
|
Abra y cierre la caja varias veces para cerciorarse que funcione correctamente, que no se atore el mecanismo al momento de abrir o cerrar, de ser así, ajuste y realice limpieza.
Open and close the box several times to make sure it works properly, that the mechanism does not jam when opening or closing, if so, adjust and clean.
|
|
|
Revisar que la llave entre bien y sin dificultad en la cerradura, que la cerradura no se encuentre desviada, que al girar la llave no haya problema y que se pueda retirar la llave sin que se atore.
Check that the key enters the lock easily and without difficulty, that the lock is not deviated, that turning the key is not a problem and that the key can be removed without jamming.
En la caja con cerradura de plástico, verifique que al girar la cerradura funcione correctamente.
In the box with a plastic lock, check that turning the lock works correctly.
|
|
|

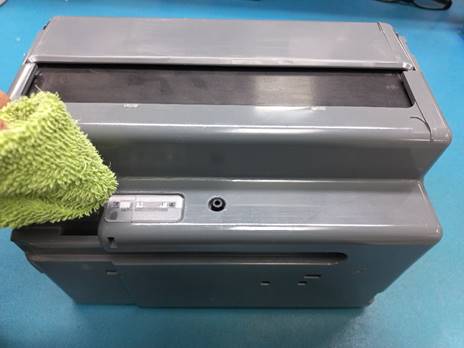
Utilice aire a presión para retirar partículas de suciedad y limpie los cristales con una franela de microfibra humedecida con alcohol isopropílico al 5%
Use pressurized air to remove dirt particles and clean the crystals with a microfiber flannel moistened with 5% isopropyl alcohol.
|
|
Revise que la guía del elevador no se encuentre dañada, que los engranes se deslicen correctamente de arriba hacia abajo y no se atoren.
Check that the elevator guide is not damaged, that the gears slide correctly from top to bottom and do not jam.
|
|
|
Revise qué la plataforma este bien alineada.
Check that the platform is well aligned.
|
|
Revise que el resorte tenga buena tensión y que la plataforma presione bien los billetes, de no ser así, alinee el resorte y ajuste.
Check that the spring has good tension and that the platform presses the bills well, if not, align and adjust the spring.
|
|
NOTA: Recuerde que, si la caja está muy dañada o quebrada debe marcarse como SCRAP en el sistema, así mismo si la revisión es baja (la revisión se encuentra en el 5to y 6to digito del MSN)
NOTE: Remember that if the box is badly damaged or broken it should be marked as SCRAP in the system, as well as if the revision is low (the revision is in the 5th and 6th digits of the MSN)
FALLAS COMUNES / COMMON FAILURES
Caja atorada, la caja no abre ni cierra.
Stuck box, the box does not open or close.
Esto acurre cuando el mecanismo de la caja se encuentra fuera de tiempo.
This occurs when the box mechanism is out of time.
Solución: utilizando la llave de seguridad gire cuidadosamente el mecanismo para ponerlo a tiempo.
Solution: using the safety key carefully turn the mechanism to set it on time.
|
|
|
BNR SHUTTER LINK (RE Y FR) à Quebradas – broken
Reemplazo – replace à BNR SHUTTER LINK (RE Y FR)
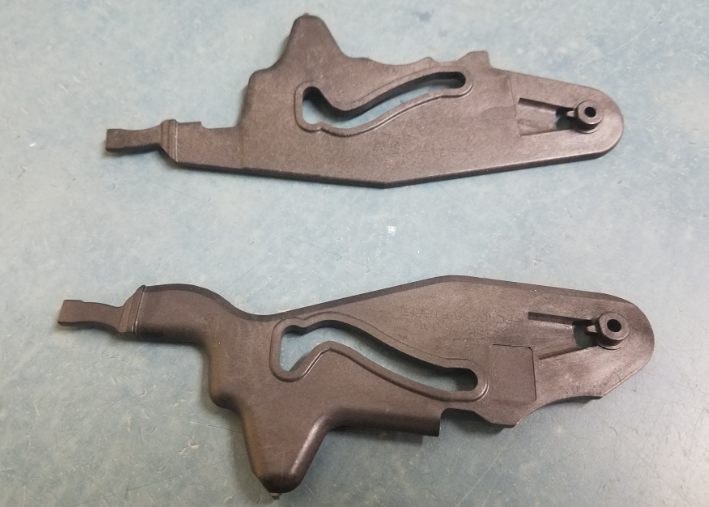
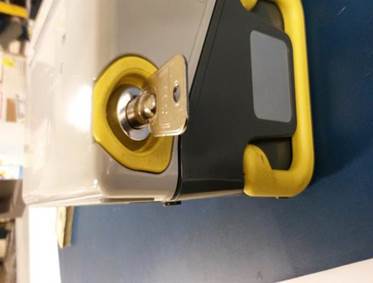
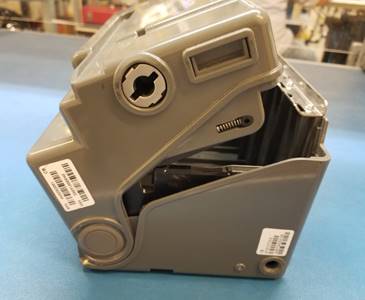
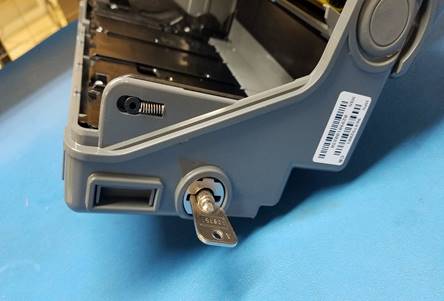
Abra la caja de efectivo, si tiene cerradura metálica utilice una llave y si es de plástico, solo gire la cerradura.
Open the cash box, if it has a metal lock use a key and if it is plastic just turn the lock.
|
|
|
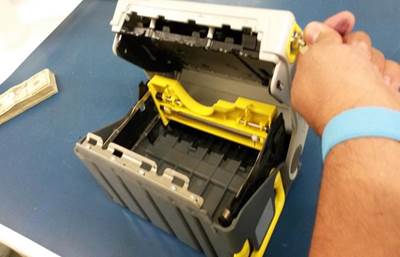
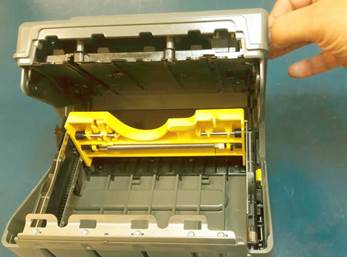
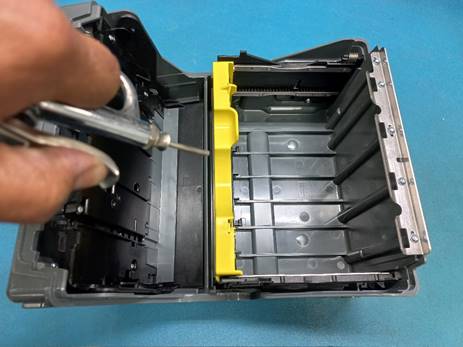
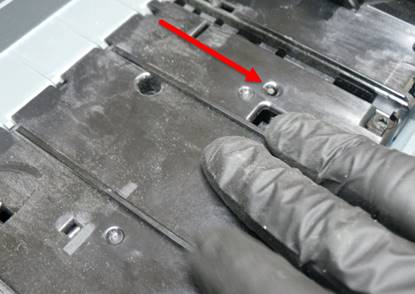
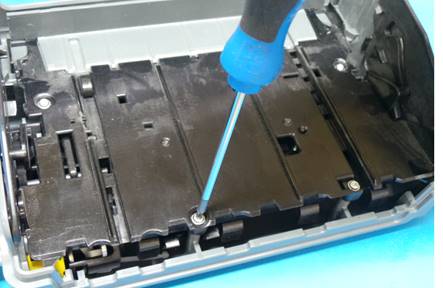
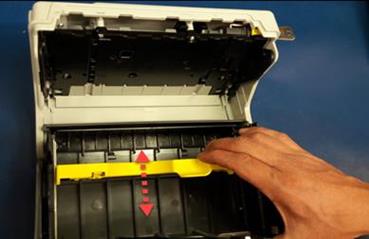
Utilizando un desarmador torx 10, retire los tornillos que sostienen la parte de la plataforma en la caja.
Using a 10 torx screwdriver, remove the screws that hold the deck part in the box.
|
|
|

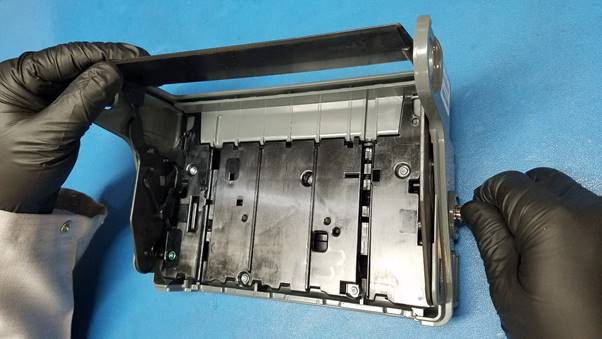
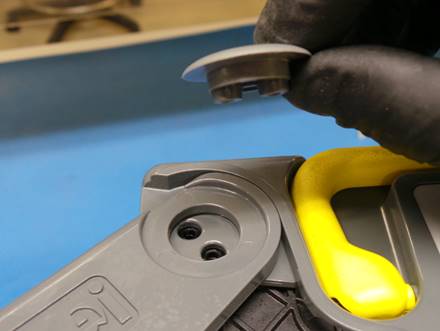
Con un desarmador plano retire la base de plástico que funciona como bisagra.
With a flat screwdriver remove the plastic base that works as a hinge.
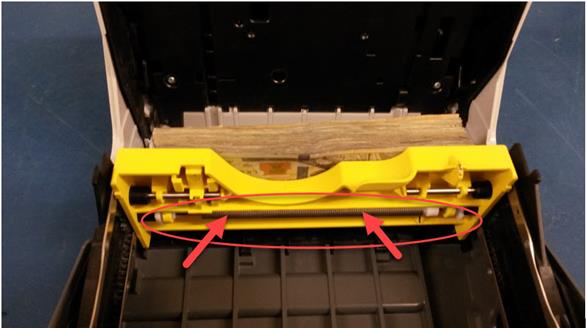
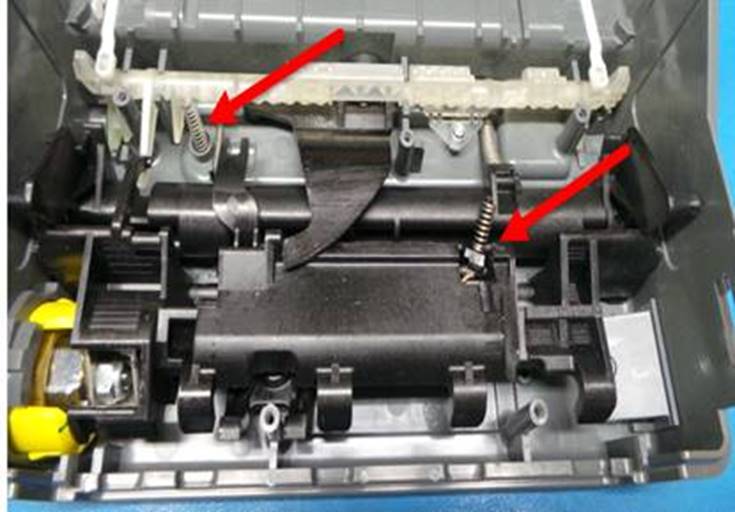
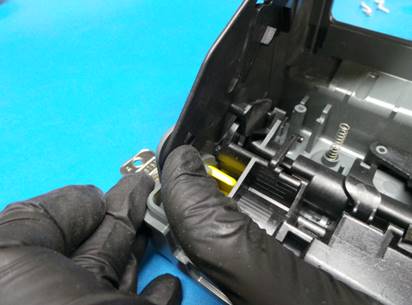
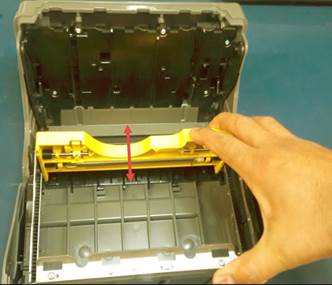
Separe las 2 partes que conforman la caja, retire los tornillos y desensamble la placa de plástico (este paso debe realizarse con cuidado para evitar que los resortes internos se salten)
Separate the 2 parts that make up the box, remove the screws and disassemble the plastic plate (this step must be done carefully to avoid the internal springs from coming-out)
|
|
|
|
|
|
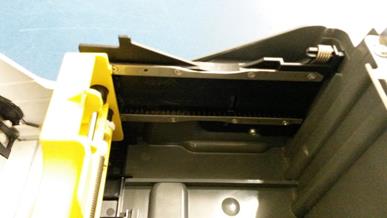
Para el siguiente paso es necesario que la cerradura este en posición de cerrado y la parte trasera este en esta posición (ver imagen), para lograr esta posición se puede utilizar la llave de seguridad y con precaución girar lentamente.
For the next step it is necessary that the lock is in the closed position and the rear part is in this position (see image), to achieve this position you can use the security key and carefully turn slowly.
|
|
|
|

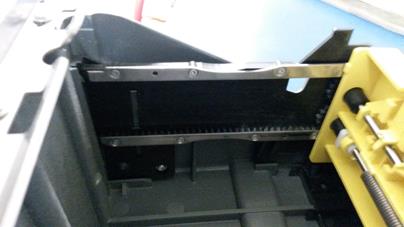
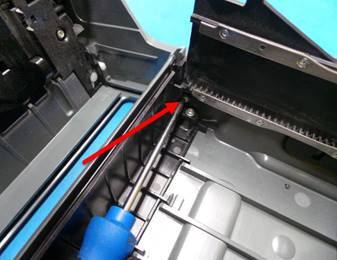
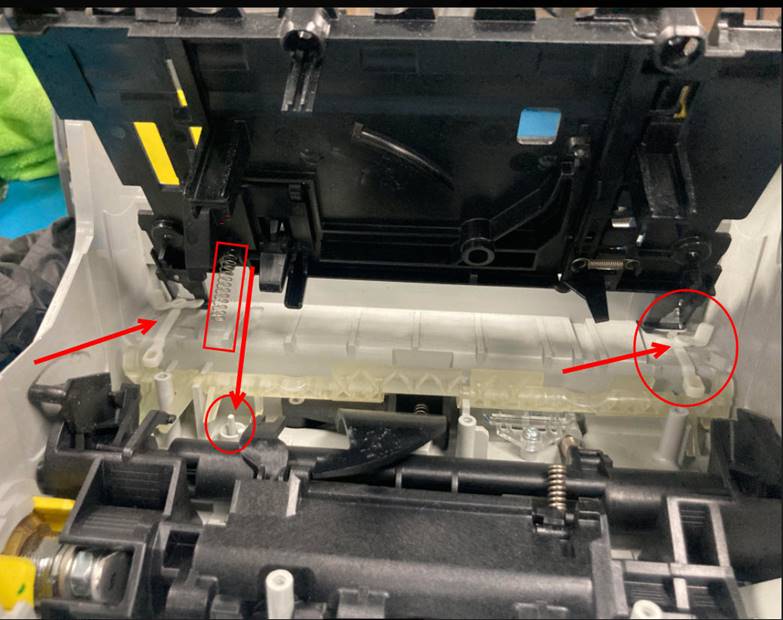
Colocar dentro de la ranura el BNR SHUTTER LINK front o rear, según corresponda.
Place the BNR SHUTTER LINK front or rear inside the slot, as appropriate.
|
|
|

Utilizando un desarmador plano apalancar levemente para poder ensamblar el BNR SHUTTER LINK en la guía de plástico.
Using a flat-blade screwdriver, slightly leverage to assemble the BNR SHUTTER LINK in the plastic guide.

Después de haber realizado el ensamble de BNR SHUTTER LINK de ambos lados, ensamblar la placa de plástico en su posición original.
After you have assembled the BNR SHUTTER LINK on both sides, assemble the plastic plate in its original position.
Utilizando unas pinzas de punta sostener el resorte junto con su perno para ensamblarlo en el orificio de la placa, como se muestra.
Using pointed pliers, hold the spring together with its bolt to assemble it into the hole in the plate, as shown.
|
|
|

Colocar los tornillos de la placa de plástico.
Install the screws of the plastic plate.
Colocar la CB-SHUTTER ensamblada con la BNR SHUTTER LINK de ambos lados y sobre su guía en la base.
Place the assembled CB-SHUTTER with the BNR SHUTTER LINK on both sides and on its guide at the base.
|
|
|


Girar la parte metálica para finalizar el ensamble de CB SHUTTER sobre su base.
Rotate the metal part to finish the CB SHUTTER assembly on its base.
|
|
|

Ensamblar las 2 partes que conforman la caja de efectivo, coloque el botón de plástico que funciona como bisagra, en ambos lados de la caja de efectivo.
Assemble the 2 parts that make up the cash box, place the plastic button that works as a hinge, on both sides of the cash box.
Cierre la caja.
Close the box.
Verifique que el indicador led de la caja de efectivo este de color verde, de no ser así, tendrá que reacomodar el mecanismo de la caja de efectivo.
Verify that the LED on the cash-box is green, if not, you will have to rearrange the cash-box mechanism.
|
|
|
|
|
DESBLOQUEO DE RECICLADORES / UNLOCK RECYCLERS
Verifique que, al momento de volver a cerrar la caja de efectivo el indicador led debe este en color verde. Vuelva a colocar la caja de efectivo en la cama de prueba, seleccione reset y desbloquee los recicladores.
Verify that, when closing the cash box, the LED indicator should be green. Put the cash-box back on the test bed, select reset and unlock the recyclers.
Con cerradura metálica – With metal lock
|
|
|

Con cerradura de plástico – With plastic lock
|
|
|
En la pestaña de monitor, seleccione Reset.
In the monitor tab, select Reset.
|
|
Seleccione las siguientes opciones:
Select the following options:
1. Seleccione – Select Configuration.
2. Seleccione – Select Cash Unit,
3. Seleccione – Select Query Cash Unit
4. Seleccione – Select Configure Cash Unit
5. Seleccione renglón azul – Select blue row
|
|
1. Seleccione PCU RE3
1. Select PCU RE3
2. Desmarca la casilla Lock.
2. Uncheck the Lock box.
|
|

1. Seleccione PCU RE4
1. Select PCU RE4
2. Desmarca la casilla Lock.
2. Uncheck the Lock box.
|
|

1. Seleccione PCU RE5
1. Select PCU RE5
2. Desmarca la casilla Lock.
2. Uncheck the Lock box.
|
|
1. Seleccione PCU RE6
1. Select PCU RE6
2. Desmarca la casilla Lock.
2. Uncheck the Lock box.
3. Seleccione OK
3. Select OK
|
|

1. Seleccione Diagnostic – Select Diagnostic
2. Seleccione Refresh – Select Refresh
|
|

En la parte inferior de la pestaña de Diagnostic aparecen los recicladores activos.
Active recyclers appear at the bottom of the Diagnostic tab.
|
|
Los indicadores led de los recicladores comienzan a parpadear en color verde.
The recyclers' LED indicators start to flash green.
|
|
NOTA: Antes de comunicarse con el personal de calidad el técnico debe de haber realizado la reparación y mantenimiento correspondiente, así como debe tener bloqueados los recicladores y restablecida la cama de prueba.
NOTE: Before contacting quality personnel, the technician must have carried out the corresponding repair and maintenance, as well as having the recyclers blocked and the test bed restored.
PRUEBA FINAL DE CALIDAD Y TECNICOS
FINAL QUALITY AND TECHNICAL TEST
Realizar las pruebas en la computadora por lo menos 2 ocasiones.
Perform tests on the computer at least 2 times,
PRUEBA DE BILLETES / BANKNOTES TEST
En la parte inferior del programa se encuentran los recicladores bloqueados.
At the bottom of the program are locked recyclers.
|
|

Los indicadores led deben estar apagados.
The led indicators must be off.
|
|
INSERCIÓN DE TODOS LOS DE BILLETES.
INSERTION OF ALL BANKNOTES.
Mientras realice la prueba debe revisar que la unidad:
While performing the test, you must check that the unit:
-No realice ruidos extraños
-Do not make strange noises
-No atasque los billetes
-Do not jam the bills
-No salgan los billetes doblados
-No folded banknotes
Elija las siguientes opciones:
Choose the following options:
1. Seleccione - Select Monitor- MEI BNR
2. Seleccione - Select Open Device
3. Seleccione - Select Bill Handling
4. Seleccione - Select Cash in Start
5. Seleccione - Select Cash In
6. Localice campo MDU y escriba el número 0 – Locate MDU blank and write number 0
7. Seleccione - Select OK
|
|
Los LEDs de color verde indican que la unidad esta lista para que ingresemos los billetes.
The green LEDs indicate that the unit is ready for us to insert the bills.
|
|
El MM mandará los billetes directo a la caja de efectivo, durante la prueba no debe realizar ruidos extraños la caja de efectivo al momento de estar aceptando los billetes.
The Main Module will send the banknotes directly to the cash-box, during the test the cash-box should not make strange noises when accepting the banknotes.
Cuando termine de insertar todos los billetes, abra la llave girando a la derecha, levante la bandera amarilla y saque la caja.
When you finish inserting all the banknotes, open the key by turning clockwise, raise the yellow flag and take out the box.
|
|
|
Si la caja es de cerradura metálica abra la caja con la llave y verifique que los billetes salgan acomodados y retírelos. Si la cerradura es de plástico gire a la izquierda y a la derecha para abrir y verifique que los billetes salgan acomodados y retírelos.
If the box has a metal lock, open the box with the key and verify that the bills are arranged and remove them. If the lock is made of plastic, turn left and right to open and check that the bills are arranged and remove them.
Con cerradura metálica.
With metal lock.
|
|
|
Con cerradura de plástico.
With plastic lock.
|
|
|
Abra y cierre la caja de efectivo, baje y suba la plataforma amarilla por lo menos tres veces para cerciorarse que funcione correctamente.
Open and close the cash-box, lower and raise the yellow platform at least three times to make sure it works properly.
Con cerradura metálica.
With metal lock.
|
|
|
Con cerradura de plástico.
With plastic lock.
|
|
|

Al terminar de probar la unidad el personal de calidad se lleva la unidad a su estación de trabajo, pará el siguiente proceso.
At the end of testing the unit, the quality personnel take the unit to their work station, for the following process.
Técnicos: si van a cambiar a otro modelo no olviden desbloquear los recicladores
Technicians: if you are going to change to another model, do not forget to unlock the recyclers
|
|
WI#: 1057 BNR Cash-Box |
Originator / Originador: B Perez 2/21/13 |
||||
|
Revision / Revisión: 10 |
Revision Date/ Fecha de Revisión: 10/2/20 |
Name/ Nombre: H Bailón |
Update / Actualización: CPN and model verification |
Next Review próxima revisión: NA |
Approval / Aprobado por: Tom St John |
|
|
11 |
04/27/22 |
D Casas |
Translation |
NA |
Tom St John |
|